

Crochet a Mouse King Amigurumi for Your Nutcracker Christmas
Crochet a small mouse king amigurumi with a gold crown and a pink cloak with spotted fur trim. A charming Nutcracker decoration for Christmas.
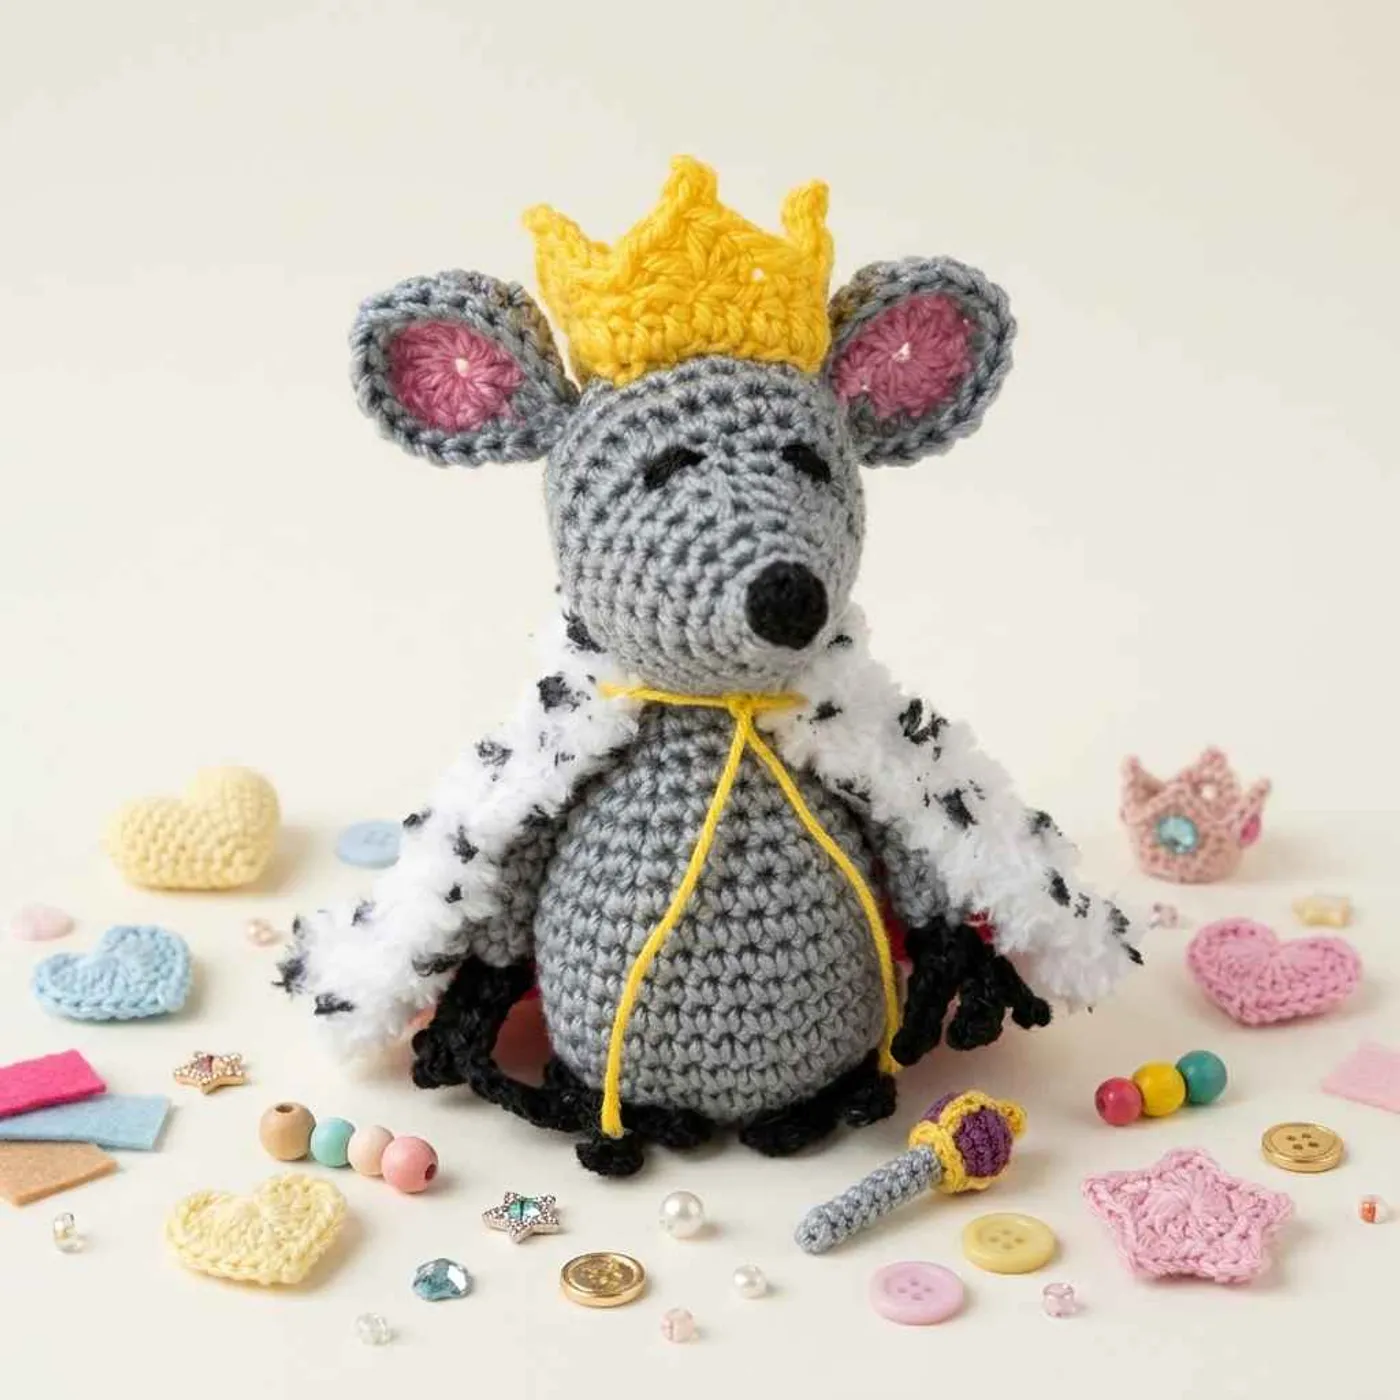
This mouse king amigurumi is a small gray mouse with a gold crown, pink ears and a pink cloak trimmed with spotted "royal fur".
If you set up a Nutcracker scene every December, or want a Christmas villain to go with your toy soldiers, this little king is a fun weekend project in fine cotton.
At a glance
- Yarn: Alize Miss (100% mercerized cotton, 50 g / 280 m) in gray, pink, yellow, white and black, plus Alize Softy (polyester, 115 m) in white for the fur trim
- Hook: 1.25 mm
- Other: tapestry needle, stitch marker, stuffing, black paint and a thin brush
- Finished size: not given in the pattern; our estimate is about 4 in (10 cm) tall with the crown
- Difficulty: advanced beginner to intermediate (thin thread, small pieces, a few rows in the back loop only)
- Time: about 4–8 hours (our estimate)
Credit: this Mouse King pattern and its photos are by designer Oksana Timofeeva (named in the PDF's file details). All credit for the design goes to her.
Who this pattern is for
The pattern itself says it suits advanced beginners or intermediate crocheters who know the basic stitches. You only need sc, hdc, dc, sl st, chains and a picot.
The tricky part is the scale. A 1.25 mm hook and thread-weight cotton make every piece tiny, so good light and a stitch marker help a lot.
Finished size
The PDF doesn't give a finished size. From the photos, the finished king sits in the palm of a hand, about 4 in (10 cm) tall including the crown (our estimate, not measured).
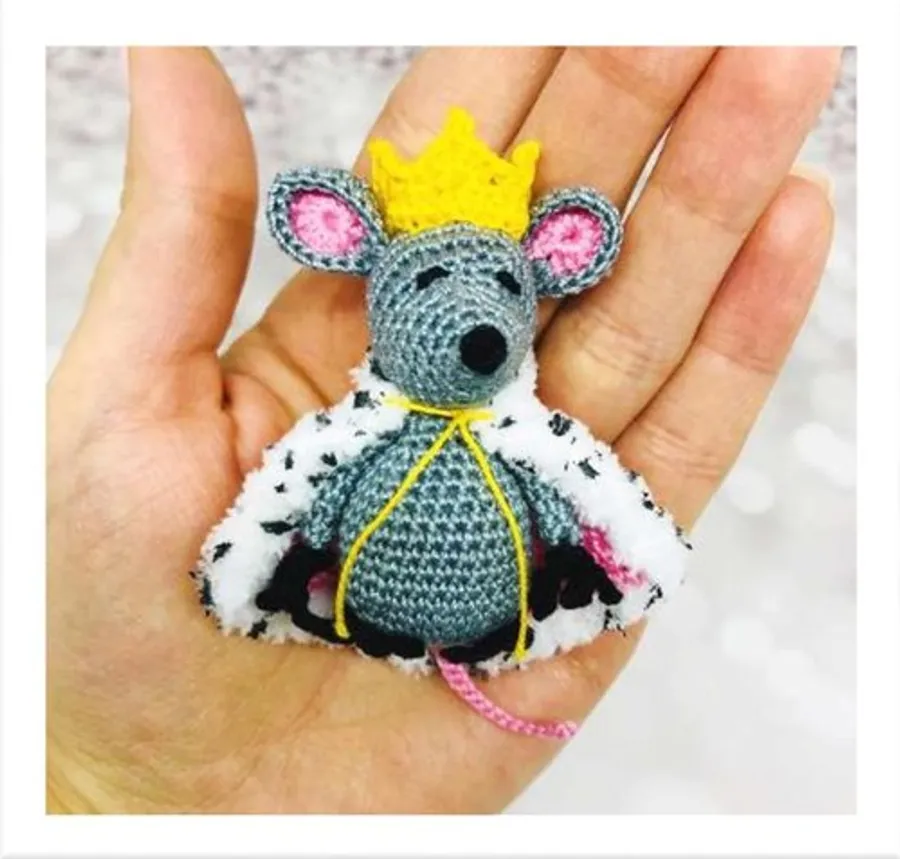
Thicker yarn and a bigger hook give a bigger mouse with the same counts. See the bonus section for ideas.
Yarn substitution
Alize Miss is a fine mercerized cotton thread. Any similar thread works, for example a size 10 crochet cotton or a light fingering-weight cotton.
- Keep the gray, pink, yellow and black the same thickness, or the head and body won't match.
- The fur trim uses Alize Softy, a fluffy baby yarn. Any soft, fuzzy white yarn or thin chenille gives the same ermine look.
- No Softy? Trim the cloak with white cotton in
scand paint the spots on that instead. It just looks less fluffy.
Before you start
The head, body and arms are worked in a continuous spiral. Mark the first stitch of each round and move the marker up as you go.
The head mixes sc and hdc in the same round. This is on purpose: the hdc side grows faster and shapes the pointed mouse snout, so follow the counts exactly.
Colors used for each part, as listed in the pattern:
- Gray (496): head, body, arms (the "rat")
- Pink (170): cheeks, cloak, inner ears, tail
- Yellow (478): crown and cloak strings
- Black (60): paws, feet and the face embroidery
- White (55): feather. The pattern lists it but doesn't include a feather part, so you can skip it or add a tiny white feather to the crown yourself.
- White Softy (450): royal fur trim
Head
With gray, work in a spiral:
- R1: 4
scin a magic ring. (4) - R2:
inc, 3sc. (5) - R3:
inc2 times, 3sc. (7) - R4: 1
sc,inc2 times, 4sc. (9) - R5: 2
sc,inc2 times, 5sc. (11) - R6: 3
sc,inc2 times, 6sc. (13) - R7: 4
sc,inc, 1sc,inc, 4sc, 1hdc,hdc inc. (16) - R8: 1
hdc, 4sc,inc, 2sc,inc, 4sc, 2hdc,hdc inc. (19) - R9: 2
hdc, 4sc,inc, 3sc,inc, 4sc, 3hdc,hdc inc. (22) - R10: 3
hdc, 4sc,inc, 4sc,inc, 4sc, 4hdc,hdc inc. (25) - R11: 4
hdc, 4sc,inc, 4sc,inc, 4sc,inc, 4sc,inc2 times. (30) - R12–R15:
scin each st (4 rounds). (30) - R16: (
dec, 4sc) 5 times. (25) - R17: (
dec, 3sc) 5 times. (20) - R18: (
dec, 2sc) 5 times. (15)
Stuff the head firmly, pushing stuffing into the snout.
- R19: (
dec, 1sc) 5 times. (10) - R20:
dec5 times. (5)
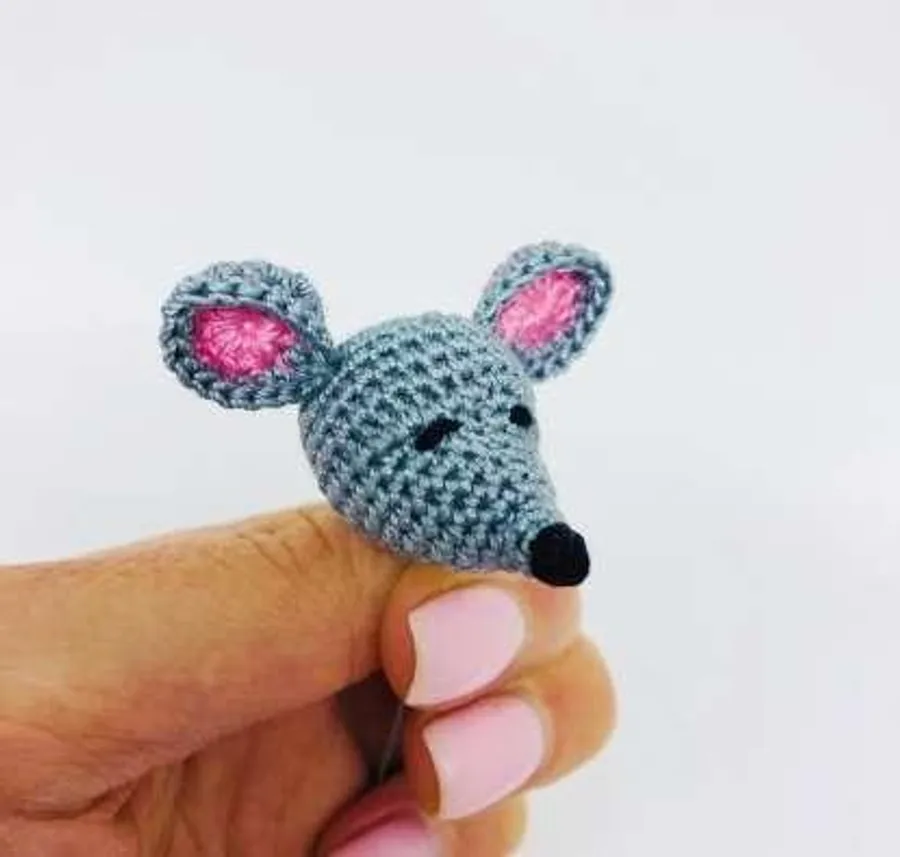
Fasten off and close the opening. With a small amount of black yarn, embroider the eyes and the nose on the tip of the snout.
Tip: the pattern lists pink for the cheeks. Use a few stitches of pink thread, or a little blush, on each side of the snout.
Ears (make 2)
- R1: with pink, 12
dcin a magic ring. - Change to gray.
- R2: ch 3, (
inc, 1dc) 5 times,dc inc,sl st.
Fasten off, leaving a tail of about 5 inches (13 cm). The increases in R2 are worked as dc increases.
Sew the ears to the head, on top and a little to the back, with the pink side facing forward.
Body
With gray, start with an oval base:
- R1: ch 9. Starting in the 2nd ch from the hook, 1
sc, 6sc, 3scin the last ch. Turn and work along the other side of the chain: 6sc,inc. Place a marker. (18) - R2:
inc, 6sc,inc3 times, 6sc,inc2 times. (24) - R3: (
inc, 3sc) 6 times. (30) - R4–R9:
scin each st (6 rounds). (30) - R10: (
dec, 3sc) 6 times. (24) - R11–R12:
scin each st (2 rounds). (24) - R13: (
dec, 2sc) 6 times. (18) - R14:
scin each st. (18) - R15: (
dec, 1sc) 6 times. (12) - R16:
scin each st. (12)
Fasten off with a long tail. Stuff the body firmly; the flat oval base helps the mouse sit up.
Arms (make 2)
With gray:
- R1: 5
scin a magic ring. (5) - R2–R7:
scin each st (6 rounds). (5) - R8:
inc, 4sc. (6) - R9:
inc, 5sc. (7) - R10:
inc, 6sc. (8) - R11:
scin each st. (8)
Fasten off with a tail for sewing. The wider end goes against the body at the shoulder.
Paws (make 2)
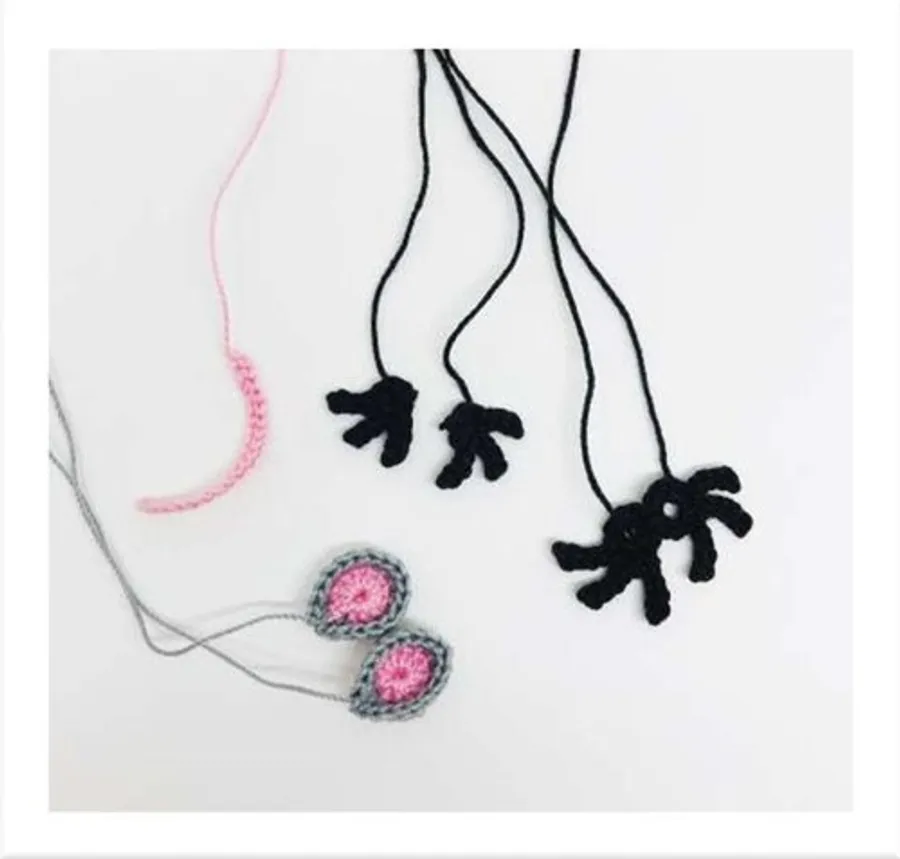
The PDF prints these next to the arms without a separate title. In the photos they are the small black hands with three fingers.
With black:
- R1: 6
scin a magic ring,sl st. - R2 (fingers): ch 4,
sl stinto the 2nd ch from the hook and in the next 2 ch,sl stinto the next st of the ring. - Ch 5,
sl stinto the 2nd ch from the hook and in the next 3 ch,sl stinto the next st. - Ch 4,
sl stinto the 2nd ch from the hook and in the next 2 ch,sl stinto the next st.
Fasten off with a tail. The middle finger is a little longer than the other two.
Legs (make 2)
With black:
- R1: 10
scin a magic ring,sl st. - R2 (toes): ch 5,
sl stinto the 2nd ch from the hook and in the next 3 ch,sl stinto the next st. - Repeat step 2 two more times, for three toes in total.
Fasten off with a tail. These flat feet are sewn under the front of the body.
Tail
With pink:
- Ch 21.
Sl stinto the 2nd ch from the hook and in each of the next 19 ch (20sl st).
Fasten off and sew the tail to the back of the body.
Crown
With yellow:
- R1: ch 24 and join into a ring with a
sl st. - R2: 24
hdc. (24) - R3: ch 1, (
scin the next st, skip 2 sts, shell in the next st, skip 2 sts) 4 times,sl stto join.
Shell = 3 hdc, picot, 3 hdc, all in the same stitch.
How to make the picot
- Chain 3. Find the third chain from the hook (the first chain you made) and insert your hook into the V of that chain.
- Yarn over and pull through all loops on the hook. This closes the picot.
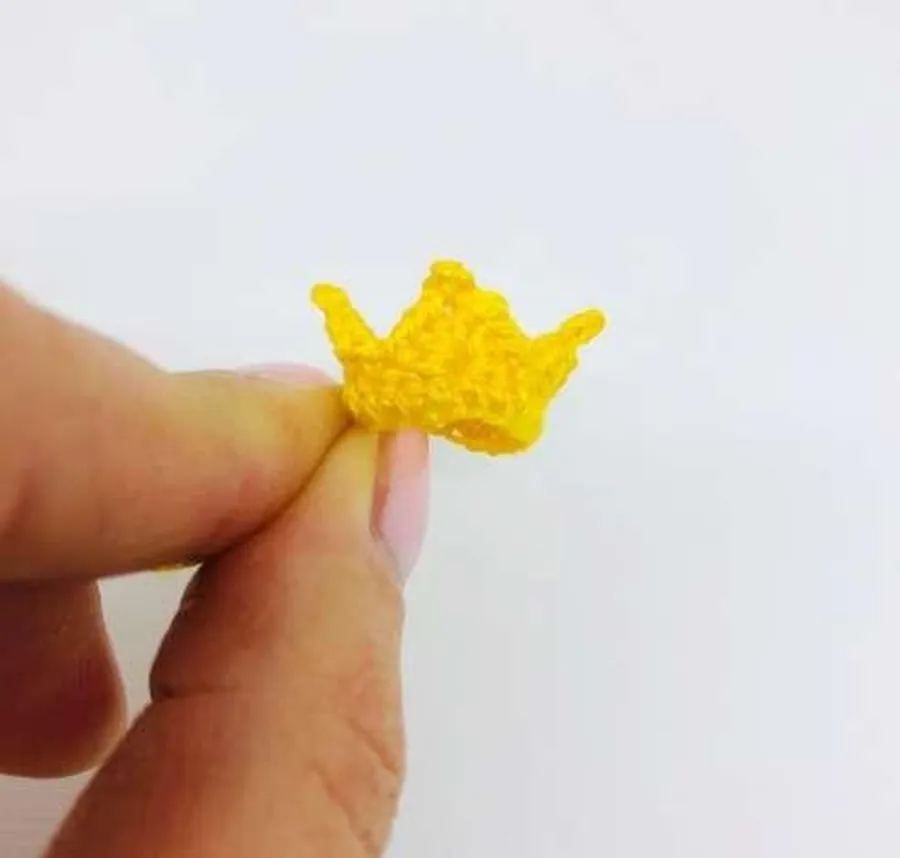
You now have a crown with four pointed tips. Weave in the ends.
Cloak
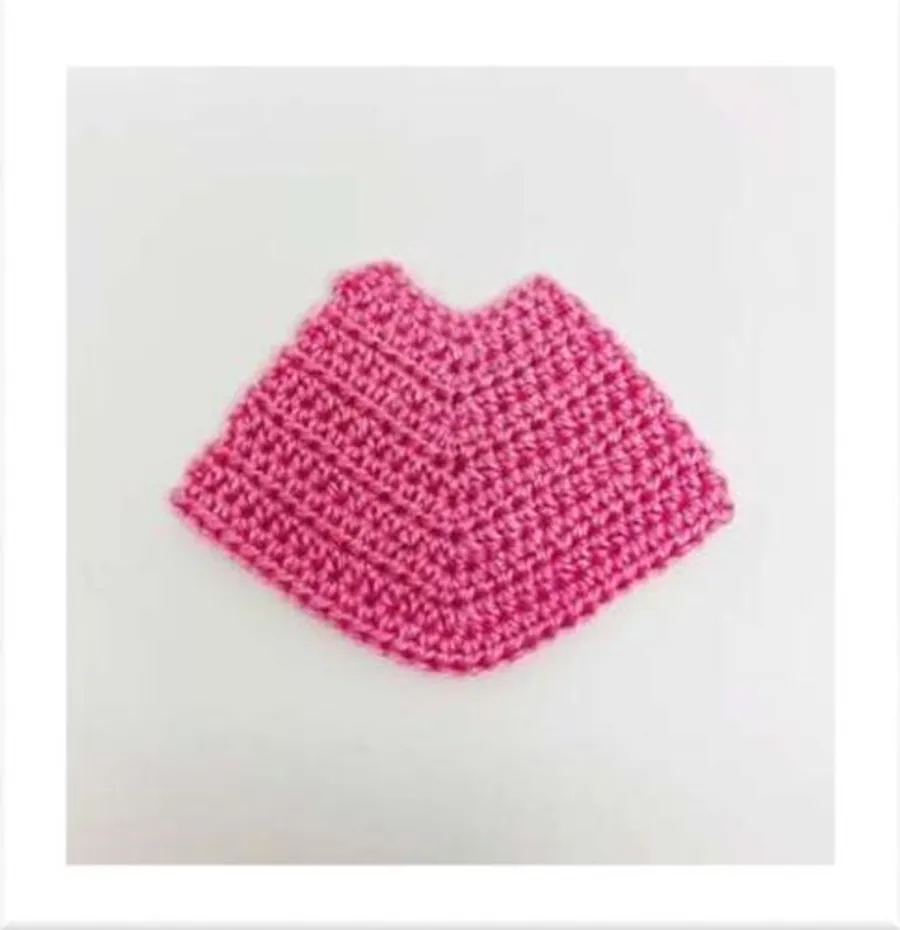
With pink, worked in rows:
- Row 1: ch 13. Starting in the 3rd ch from the hook, 5
hdc, 3hdcin the next ch, 5hdc, ch 2, turn. - Row 2 (BLO): 6
hdc, 3hdcin the next st, 6hdc, ch 2, turn. - Row 3 (BLO): 7
hdc, 3hdcin the next st, 7hdc, ch 2, turn. - Row 4 (BLO): 8
hdc, 3hdcin the next st, 8hdc, ch 2, turn. - Row 5 (BLO): 9
hdc, 3hdcin the next st, 9hdc, ch 2, turn. - Row 6 (BLO): 10
hdc, 3hdcin the next st, 10hdc, ch 2, turn. - Row 7 (BLO): 11
hdc, 3hdcin the next st, 11hdc, ch 2, turn. - Row 8 (BLO): 12
hdc, 3hdcin the next st, 12hdc, ch 2, turn. - Row 9 (BLO): 13
hdc, 3hdcin the next st, 13hdc, ch 2, turn.
The 3 hdc in the center stitch of every row make a V-shaped point at the bottom of the cloak, and the back-loop rows give it a ribbed texture.
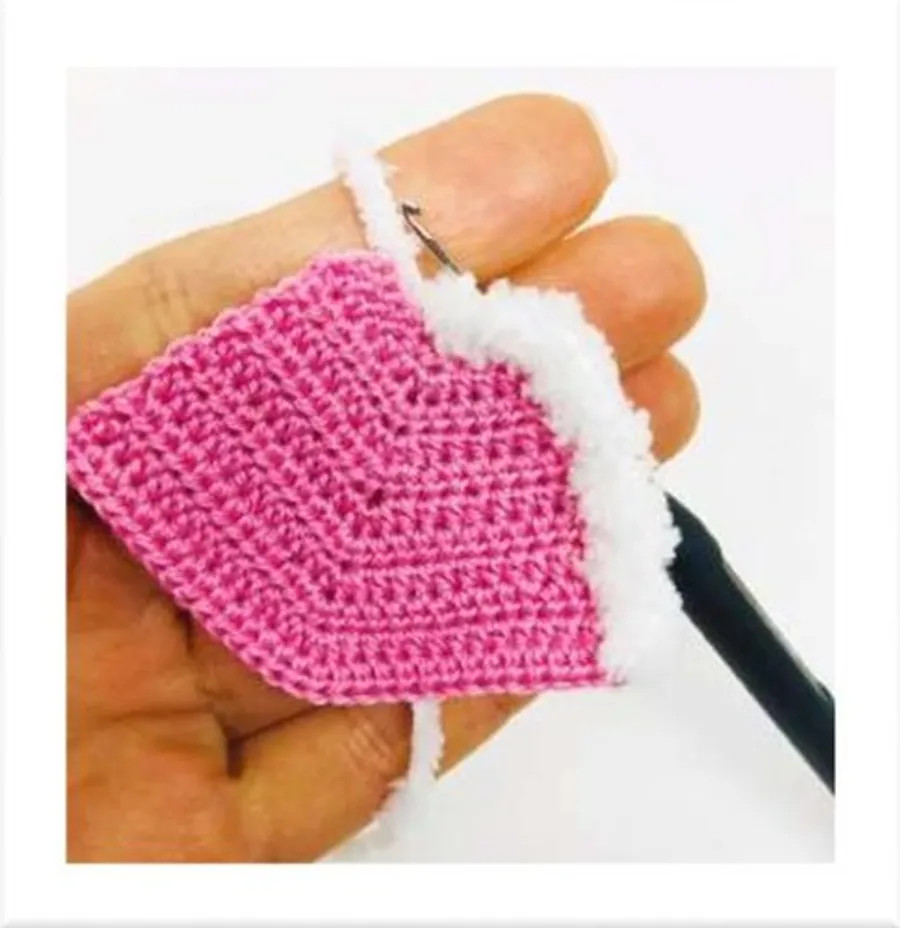
Join the white Alize Softy and work sc all around the edge of the cloak to make the royal fur trim.
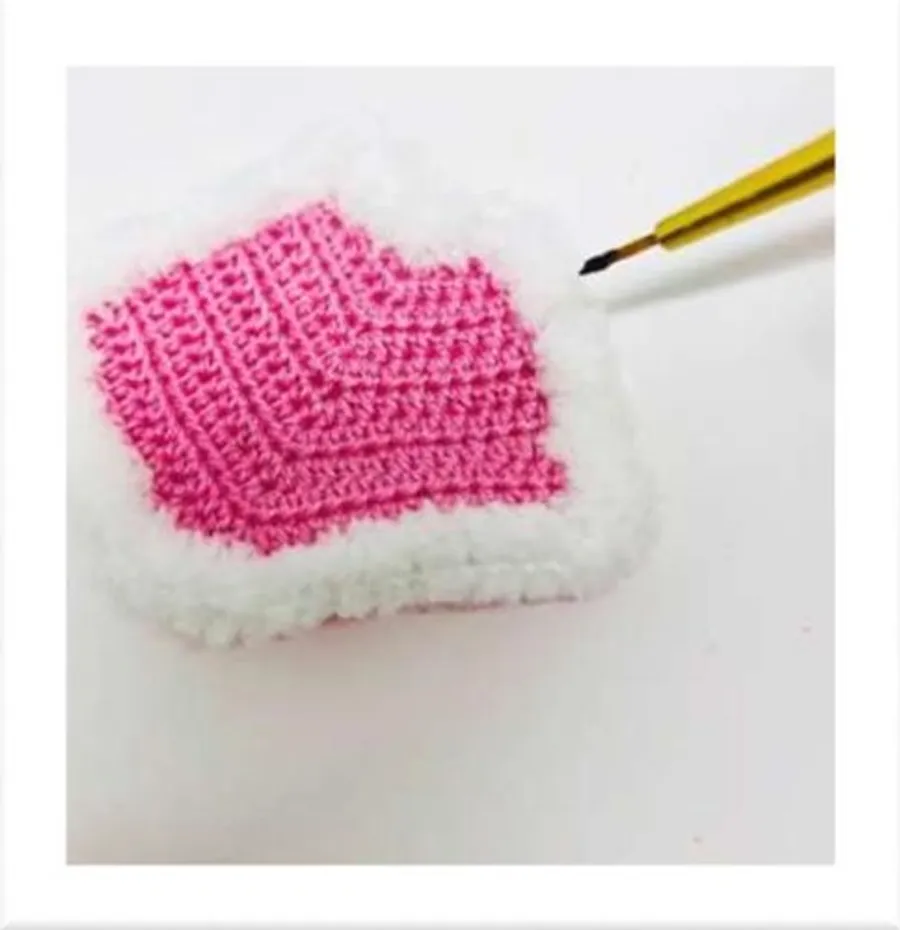
Paint small black spots on the white trim with black paint and a thin brush, so it looks like ermine fur. Let it dry completely before you put the cloak on the mouse.
Assembly
Before sewing, lay out all the parts: head, body, 2 arms, 2 paws, 2 legs, tail, crown and cloak.
- Sew the head onto the open top of the body.
- Sew a black paw to the narrow end of each arm, then sew the arms to the sides of the body just below the head.
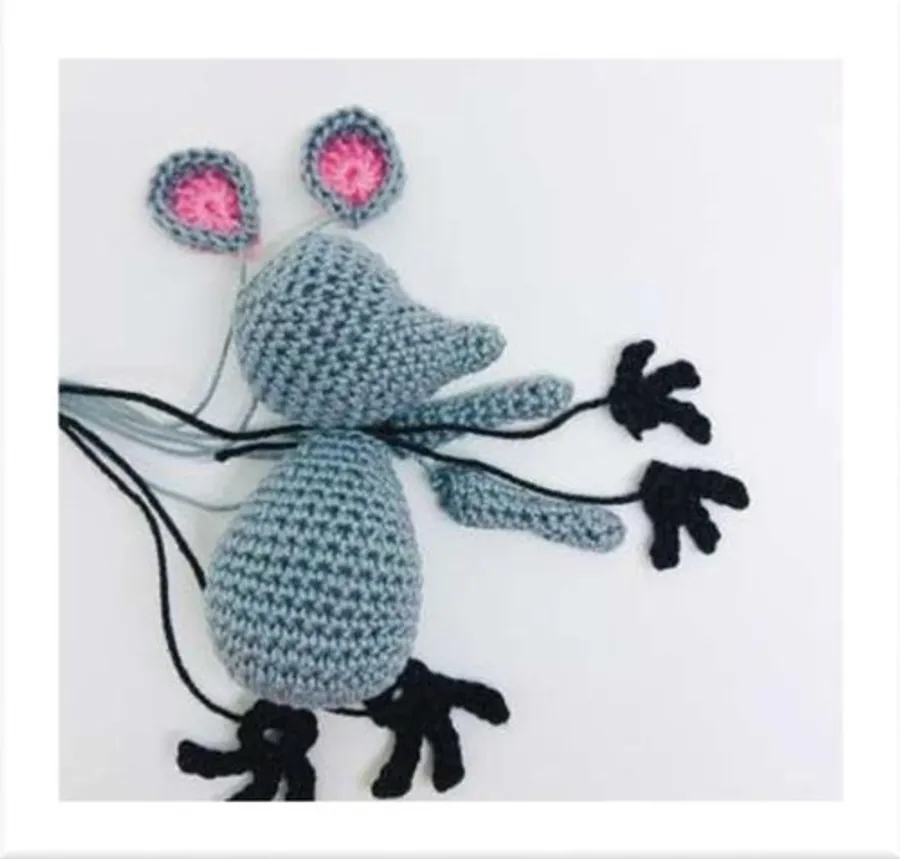
- Sew the feet under the front of the body and the pink tail at the back, near the base.
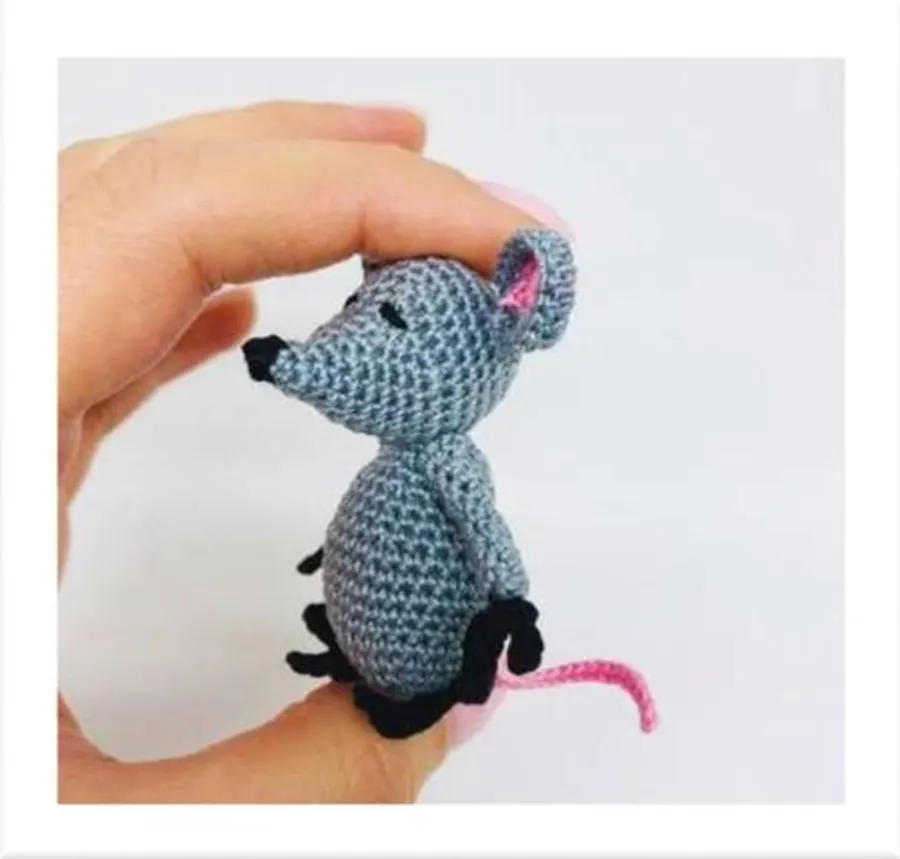
- Place the cloak around the shoulders and sew it at the neck. With yellow thread, make two cloak strings and tie them in a small bow at the front.
- Put the crown on the head between the ears and sew it in place.
Common mistakes
- Snout points the wrong way: the
hdcstitches in R7–R11 make the snout. Keep them on the same side every round and don't swap them forsc. - Head too soft: with thin cotton, stuffing shows through quickly. Stuff firmly and go down a hook size if you see gaps.
- Cloak curling: work only in the back loop from Row 2 onward, and don't pull the Softy trim too tight.
- Smudged spots: use acrylic paint with an almost dry brush, and paint after the trim is finished, not before.
- Wobbly mouse: sew the feet a little in front of the oval base so the king leans back slightly and sits steadily.
FAQ
Is the Mouse King safe for small children?
There are no safety eyes, since the face is embroidered. But the crown, cloak strings and painted trim are small details, so treat it as a decoration rather than a baby toy.
What weight is Alize Miss?
It's a fine mercerized cotton thread (280 m per 50 g), close to a size 10 crochet thread or a light fingering yarn. That's why the hook is only 1.25 mm.
Do I need to paint the fur?
No. The black spots copy the classic royal ermine look. You can also embroider tiny black stitches, or leave the trim plain white.
Can I use one hook for the fluffy yarn too?
The pattern lists only the 1.25 mm hook. If your fluffy yarn is hard to work with such a small hook, a 1.5–2 mm hook is fine for the trim round (our suggestion).
Bonus: make it your own
- Build a Nutcracker scene: pair the Mouse King with a toy soldier, a ballerina or our Santa doll with braids on a Christmas shelf.
- Change the royal colors: a red or purple cloak with gold strings looks very regal; a white mouse with a blue cloak makes a winter king.
- Add the feather: the pattern lists white for a feather. Crochet a few chains with
sl stback, or glue a tiny white feather beside the crown. - Make a mouse queen: skip the cloak, add a small pink skirt worked like the cloak rows, and keep the crown.
- Gift idea: hang it from the tree with a loop of yellow thread through the crown, or give it with our mini reindeer or snowman as a little Christmas set.
Optional & Creative Ideas
- Make it bigger: use sport or DK cotton with a 2.5–3 mm hook for a larger mouse with the same counts (our estimate, not tested).
- No paint at home: embroider the ermine spots with short black straight stitches.
- Fix a lopsided head: if the snout looks crooked, pinch and shape it while stuffing, then sew the ears to balance the face.
- Display tip: a small wooden spool or a stack of mini books makes a perfect throne for the king.
Patterns and instructions on OpenCrochet are for personal use. Please do not redistribute copies of this content; share the page link instead.


