

Santa Doll Christmas Girl Amigurumi with Braids
Crochet a small Christmas girl doll in a Santa hat, ruffled red dress and boots, with a braided wig and a tiny Santa face.
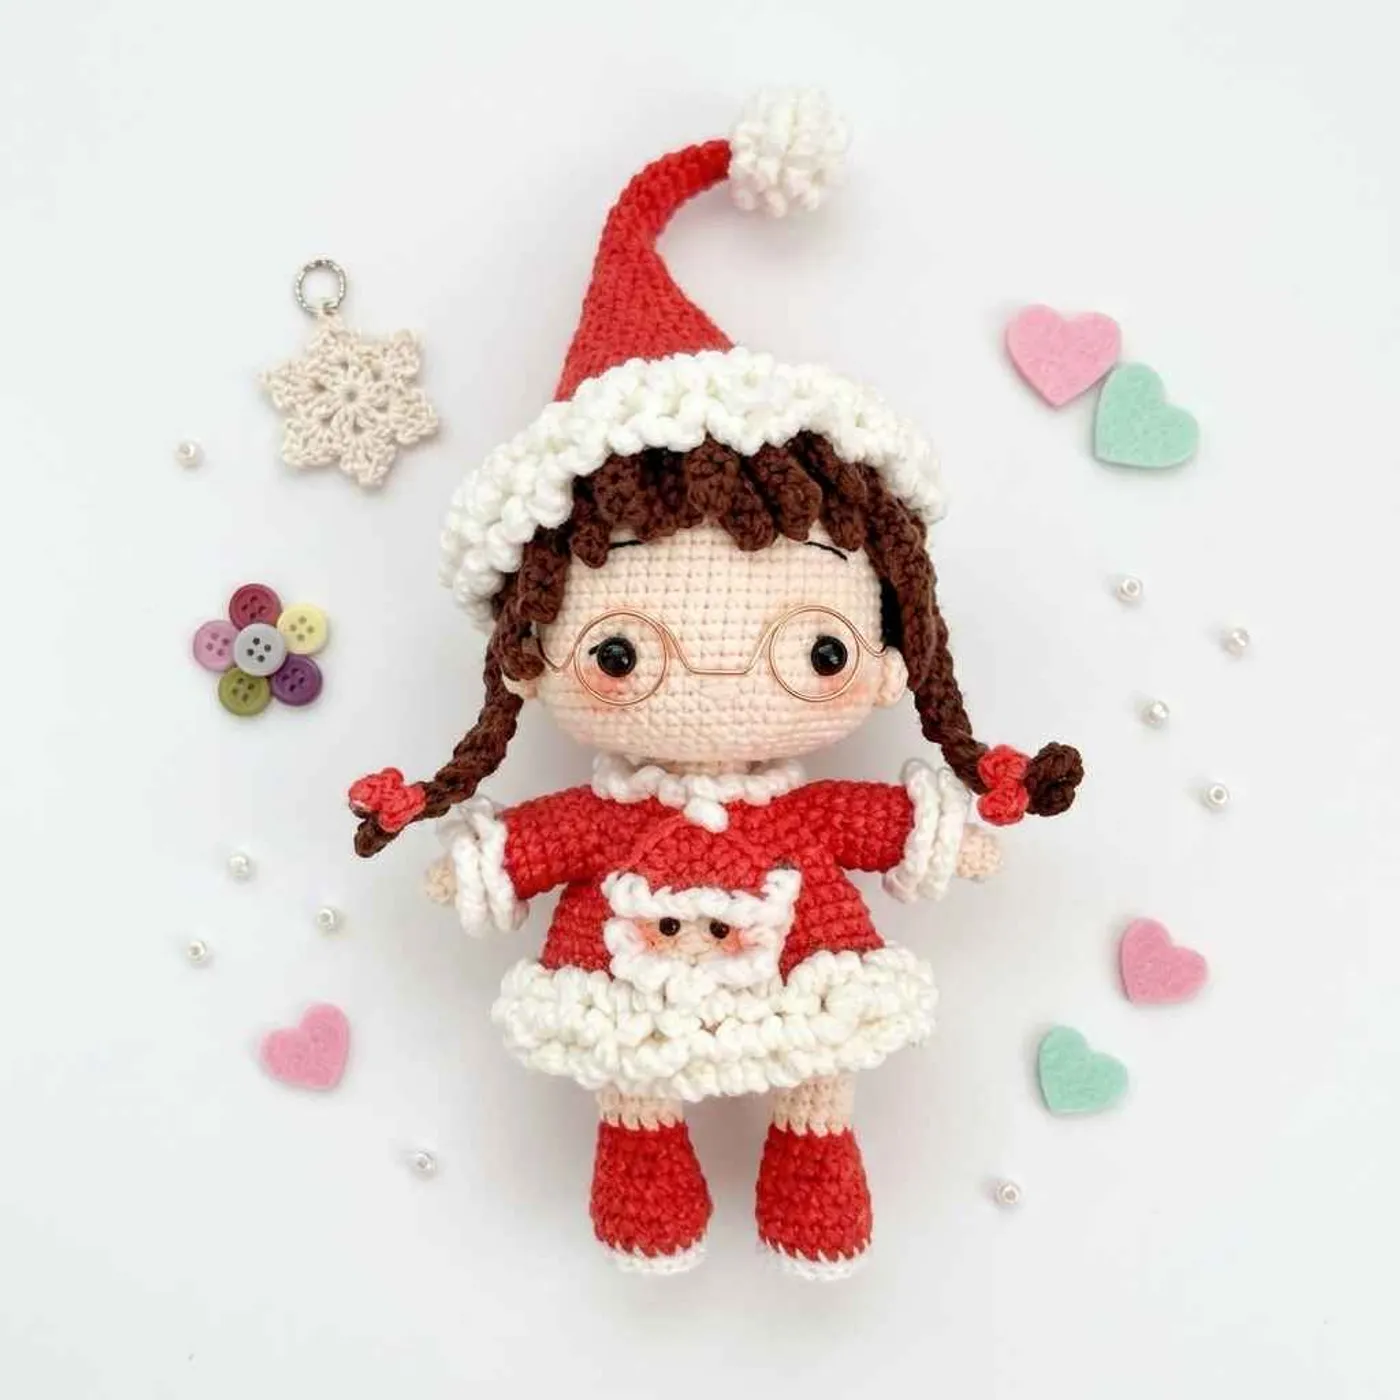
This Santa doll crochet pattern makes a small Christmas girl amigurumi in a full Santa outfit: a tall red Santa hat with a fluffy white pompom and brim, a red dress with white ruffled trim, red boots, brown hair with two braids, and a tiny Santa face sewn on the front of the
dress.
It is worked in sport weight cotton-blend yarn (the designer used YarnArt Jeans) with a 2.0–2.5 mm hook, so the stitches are tight and neat and the doll is a good size to hold in one hand or hang on the tree as a special ornament.
What makes this doll different from a basic amigurumi is the detail.
The legs are joined and the body is worked up from them in one piece, the hair is a separate crocheted wig with long chain strands, and every white trim is made with little chain loops worked into front loops, so it looks fluffy like faux fur.
It suits a crocheter who is comfortable with small yarn, back and front loop rounds and sewing small parts, and who wants a festive gift or decoration with lots of character.
Tip: Use stitch markers on the BLO rounds of the hat, dress and sleeves. The front loops you leave behind are where the white loop trim goes later, so you need to find them again.
Finished size
The PDF does not give a finished height. Based on the stated gauge (9 sc and 9 rounds = 1 in with a 2.0 mm hook) and the round counts, expect a doll roughly 5–6 in (13–15 cm) tall to the top of the head, with the tall Santa hat adding more height. Treat this as an estimate.
A slightly bigger hook or thicker yarn makes a bigger doll. Keep the fabric tight so the stuffing does not show.
Yarn substitution
The designer used YarnArt Jeans, a sport weight cotton/acrylic blend. You need four colors: skin color, white, red and brown for the hair, plus black yarn or embroidery thread for details.
- Any sport weight or light DK cotton blend works well with a 2.0–2.5 mm hook. Smooth yarn shows the small stitches and the loop trims best.
- Fluffier trim: For a softer, fur-like brim and pompom, you can work the white loop trims in a fuzzy yarn of the same weight.
- Hair color: Any hair color works. The braids are made from the long slip stitch strands of the wig, so choose a yarn that does not split easily.
Common mistakes
- Losing the front loops. Many rounds are worked in back loops only (hat pompom and brim, dress hem, sleeve cuffs, Santa beard). The leftover front loops are used for the white loop trim, so do not skip the BLO instruction.
- Sewing the head to the body. The PDF says not to sew the head to the neck. The head's own neck is pushed up inside the head, and the body neck is stuffed very firmly so it holds the head.
- Placing the eyes too late. Insert the 5–6 mm safety eyes between Rnds 19 and 20 of the head, 10 sts apart, before you close the head.
- Miscounting the joined legs. The first leg ends with 10 sc on Rnd 13 and the second with 5 sc. Then ch 3 joins the legs. Count 36 sts on the first body round.
- Getting lost in the wig strands. Wig Rnd 6 makes 29 strands of different lengths. Work it slowly and count the strands, or mark each group as you finish it.
FAQ
Is this doll safe for a baby?
Safety eyes and small sewn parts can be a choking risk for children under 3. For a young child, embroider the eyes with black yarn and sew every part on very securely.
How do I attach the wig?
Place the wig on the head so the two braids sit on each side, about 3 sts from the ears. The designer says you can use hot glue or sew it on. Sewing is more durable for a toy that will be handled.
What are the long strands in the wig?
The strands made with chain 33 and 32 slip stitches are longer than the hdc strands. Group three of these long strands on each side and braid them into the two pigtails, then add a red bow to each.
Where does the little Santa face go?
The pattern does not say, but the cover photo shows it sewn on the front of the dress, below the collar. Sew the mini Santa hat on top of the face first.
Do I need to stuff the arms?
The PDF does not ask you to stuff the arms. They are only 7 sts wide, so they keep their shape without stuffing. Add a little fiberfill if you want them firmer.
Pattern notes
- The doll is made in these pieces: Head, 2 Arms, 2 Legs joined into the Body, Wig, 2 Ears, 2 Bows, Santa Hat, Dress, 2 Sleeves, Santa Face and a Mini Hat for the face.
- Work in continuous spiral rounds unless the pattern says otherwise. Use a stitch marker for the first stitch of each round.
- dec = invisible decrease. Numbers in [ ] are the stitch counts at the end of the round.
- A few small typos in the PDF are corrected here (hat Rnds 11–12, 30 and 39).
Head
With skin color, make a magic ring.
- Rnd 1: 8
scin MR. [8] - Rnd 2:
incin each st around. [16] - Rnd 3: (
sc,inc) 8 times. [24] - Rnd 4: (2
sc,inc) 8 times. [32] - Rnd 5:
sc,inc, (3sc,inc) 7 times, 2sc. [40] - Rnd 6: (4
sc,inc) 8 times. [48] - Rnd 7:
scin each st around. [48] - Rnd 8: 2
sc,inc, (5sc,inc) 7 times, 3sc. [56] - Rnds 9–18 (10 rnds):
scin each st around. [56] - Rnd 19: (6
sc,inc) 8 times. [64] - Rnds 20–23 (4 rnds):
scin each st around. [64]
Insert the safety eyes between Rnds 19 and 20, 10 sts apart.
- Rnd 24: (6
sc,dec) 8 times. [56] - Rnd 25: (5
sc,dec) 8 times. [48] - Rnd 26: (4
sc,dec) 8 times. [40] - Rnd 27: (3
sc,dec) 8 times. [32] - Rnd 28: (2
sc,dec) 8 times. [24] - Rnd 29: (
sc,dec) 7 times, 3sc. [17] - Rnds 30–36 (7 rnds): working in BLO,
scin each st around. [17] - Rnd 37: 8
dec,sc. [9]
Cut the yarn, leaving a long tail. Thread it on a needle and close the remaining gap. Pull the needle straight up to the top of the head.
Use the handle of your hook or a stick to push the neck tube you just made up inside the head. Weave in the end. Do not sew the head to the body neck.
Arms (make 2)
With skin color, make a magic ring.
- Rnd 1: 6
scin MR. [6] - Rnd 2: (
sc,inc) 3 times. [9] - Rnd 3:
scin each st around. [9] - Rnd 4: 2
sc,dec, 3sc,dec. [7] - Rnds 5–13 (9 rnds):
scin each st around. [7]
Cut the yarn, leaving a long tail. Sew the arms to the body at Rnd 13 of the body.
Legs (make 2) and Body
Legs
Start with white for the sole. Ch 4 and start in the 2nd ch from the hook.
- Rnd 1:
incin first ch,scin next ch, 5scin last ch; working on the other side of the chain,scin next ch,incin last st. [11] - Rnd 2:
inc, 2sc, 5inc, 2sc,inc. [18] - Rnd 3: switch to red; working in BLO,
scin each st around. [18] - Rnds 4–5 (2 rnds):
scin each st around. [18] - Rnd 6: 6
sc, 3dec, 6sc. [15] - Rnd 7: 5
sc,dec,sc,dec, 5sc. [13] - Rnd 8: 5
sc,dec, 6sc. [12] - Rnd 9: switch to skin color; working in BLO,
scin each st around. [12] - Rnd 10: 11
sc,inc. [13] - Rnds 11–12 (2 rnds):
scin each st around. [13] - Rnd 13 (first leg only): 10
scand end the round here. Fasten off.
Make the second leg the same way up to Rnd 12, then:
- Rnd 13 (second leg): 5
sc. Do not cut the yarn.
Switch to white, ch 3 and join to the first leg. Keep going onto the body.
Boot trim: on each leg, with white, work a slst into each of the 18 front loops left on Rnd 3. Invisible fasten off.
Body
- Rnd 1: on the first leg 13
sc; on the chainsinc,sc,inc; on the second leg 13sc; on the other side of the chainsinc,sc,inc. [36] - Rnds 2–4 (3 rnds):
scin each st around. [36] - Rnd 5: (4
sc,dec) 6 times. [30] - Rnd 6: switch to skin color;
scin each st around. [30] - Rnd 7: (3
sc,dec) 6 times. [24] - Rnds 8–12 (5 rnds):
scin each st around. [24]
Start stuffing the body firmly.
- Rnd 13: (2
sc,dec) 6 times. [18] - Rnd 14: (
sc,dec) 6 times. [12] - Rnd 15:
dec, 10sc. [11] - Rnds 16–22 (7 rnds):
scin each st around. [11] - Rnd 23: 5
dec,sc. [6]
Stuff the neck as firmly as you can. Cut the yarn, leaving a long tail, and close the remaining gap with a needle.
Tip: The neck needs to be very firm because the head is not sewn on. Add fiberfill a little at a time and push it down with the back of your hook.
Wig
With brown, make a magic ring.
- Rnd 1: 7
scin MR. [7] - Rnd 2:
incin each st around. [14] - Rnd 3: working in FLO, (
sc,inc) 7 times. [21] - Rnd 4: (2
sc,inc) 7 times. [28] - Rnd 5:
sc,inc, (3sc,inc) 7 times, 2sc. [35]
Rnd 6 (hair strands): each strand is made by chaining, working back along the chain and slip stitching into the next stitch of Rnd 5.
- ch 12, 2
scand 9hdcon the chain,slstin next st. - (ch 9, 2
scand 6hdcon the chain,slstin next st) 7 times. - ch 12, 2
scand 9hdcon the chain,slstin next st. - ch 15, 2
scand 12hdcon the chain,slstin next st. - (ch 33, 32
slston the chain,slstin next st) 3 times. - (ch 16, 2
scand 13hdcon the chain,slstin next st) 3 times. - (ch 16, 2
scand 13hdcon the chain, skip 1 st,slstin next st) 6 times. - (ch 16, 2
scand 13hdcon the chain,slstin next st) 3 times. - (ch 33, 32
slston the chain,slstin next st) 3 times. - ch 15, 2
scand 12hdcon the chain,slstin next st.
You now have 29 strands. Next, insert your hook into the back loops left on the FLO round (Rnd 3).
Rnd 7: (ch 12, 2 sc and 9 hdc on the chain, slst in next st) 4 times, (ch 17, 2 sc and 14 hdc on the chain, slst in next st) 8 times, ch 12, 2 sc and 9 hdc on the chain, slst in next st. You now have 13 strands.
Braids: the slip stitch strands are longer than the others. On each side of the wig, braid the 3 long strands into a pigtail.
Place the wig on the head with one braid on each side, 3 sts away from the ears. Sew it on or use hot glue.
Ears (make 2)
With skin color, leave a long tail, work 4 sc in MR and cut the yarn, leaving another long tail. Tighten the ring.
Sew the ears to the head, spanning Rnds 20 to 21, 7 sts away from each eye.
Bows (make 2)
With red: ch 3, 2 hdc in the first ch, ch 2, 2 hdc in the first ch, ch 1, slst in the first ch.
Tie the middle to make a bow shape and sew one bow to each braid.
Santa hat
Start with white for the pompom. Make a magic ring.
- Rnd 1: working in BLO, 5
scin MR. [5] - Rnd 2: working in BLO,
incin each st around. [10] - Rnds 3–4 (2 rnds): working in BLO,
scin each st around. [10] - Rnd 5: working in BLO, 5
dec. [5]
Stuff the pompom. Switch to red.
- Rnd 6: working in FLO, 5
sc. [5] - Rnd 7:
inc, 4sc. [6] - Rnds 8–9 (2 rnds):
scin each st around. [6] - Rnd 10:
inc, 5sc. [7] - Rnds 11–12 (2 rnds):
scin each st around. [7] - Rnd 13:
inc, 6sc. [8] - Rnds 14–15 (2 rnds):
scin each st around. [8] - Rnd 16: (
sc,inc) 4 times. [12] - Rnds 17–18 (2 rnds):
scin each st around. [12] - Rnd 19: (
sc,inc) 6 times. [18] - Rnds 20–21 (2 rnds):
scin each st around. [18] - Rnd 22: (2
sc,inc) 6 times. [24] - Rnds 23–24 (2 rnds):
scin each st around. [24] - Rnd 25: (3
sc,inc) 6 times. [30] - Rnd 26:
scin each st around. [30] - Rnd 27: (4
sc,inc) 6 times. [36] - Rnd 28:
scin each st around. [36] - Rnd 29: (5
sc,inc) 6 times. [42] - Rnd 30:
scin each st around. [42] - Rnd 31: (6
sc,inc) 6 times. [48] - Rnd 32: (5
sc,inc) 8 times. [56] - Rnd 33: 3
sc,inc, (6sc,inc) 7 times, 3sc. [64] - Rnds 34–35 (2 rnds):
scin each st around. [64] - Rnd 36: (7
sc,inc) 8 times. [72] - Rnds 37–38 (2 rnds):
scin each st around. [72]
Switch to white for the brim.
- Rnd 39:
scin each st around. [72] - Rnds 40–41 (2 rnds): working in BLO,
scin each st around. [72] - Rnd 42: (ch 4,
slstin next st) 71 times.
Brim loops: insert your hook from above into the front loops of the BLO rounds (Rnds 40 and 41) and work (ch 4, slst in next st) 71 times.
Pompom loops: insert your hook into the front loops of the pompom (start at Rnd 5) and work (ch 3, slst in next st) until you reach the last white round of the pompom. Invisible fasten off.
Dress
Start with red at the collar. Ch 21 and join into a ring.
- Rnd 1: (2
sc,inc) 7 times. [28] - Rnd 2: (3
sc,inc) 7 times. [35] - Rnd 3: 7
sc, 2inc, 15sc, 2inc, 9sc. [39] - Rnd 4 (armholes): 5
sc, ch 6, skip 8 sts, 11sc, ch 6, skip 8 sts, 7sc. [35] - Rnd 5:
scin each st around. [35] - Rnd 6: (4
sc,inc) 7 times. [42] - Rnds 7–8 (2 rnds):
scin each st around. [42] - Rnd 9: (5
sc,inc) 7 times. [49] - Rnds 10–12 (3 rnds):
scin each st around. [49]
Switch to white for the hem.
- Rnds 13–14 (2 rnds): working in BLO,
scin each st around. [49] - Rnd 15: (ch 4,
slstin next st) 48 times.
Hem loops: insert your hook from above into the front loops of the BLO rounds (Rnds 13 and 14) and work (ch 4, slst in next st) 47 times. Cut the yarn, invisible fasten off and hide the tail.
Collar trim: insert your hook into the very first round at the collar and work (ch 4, slst in next st) 20 times around the collar.
Sleeves (make 2)
Start with red. Join the yarn at an armhole: the PDF says to start at stitch 6 (first sleeve) and stitch 24 (second sleeve) of Rnd 3. Work around the armhole over the 8 skipped sts and the 6 chains.
- Rnds 1–6 (6 rnds):
scin each st around. [14] - Rnd 7: switch to white; working in BLO,
scin each st around. [14] - Rnd 8: (ch 3,
slstin next st) 13 times.
Cut the yarn, invisible fasten off and hide the tail.
Cuff loops: insert your hook from above into the front loops of Rnd 7 and work (ch 4, slst in next st) 13 times. Cut the yarn, invisible fasten off and hide the tail.
Santa face
Start with skin color. Make a magic ring.
- Rnd 1: 7
scin MR. [7] - Rnd 2:
incin each st around. [14] - Rnd 3:
sc,inc,sc, ch 2,incon the foundation chain; working in BLO,inc, (sc,inc) 3 times, ch 2,incon the foundation chain, (sc,inc) 2 times,slst. End the round.
Cut the yarn and hide the tail.
Beard: insert your hook into the front loops of the BLO stitches. With white, ch 3, slst, then (ch 3, slst in next st) 7 times. Cut the yarn and hide the tail.
Mini hat for the Santa face
Start with red. Make a magic ring.
- Rnd 1: 5
scin MR. [5] - Rnd 2: ch 1, turn,
hdc-incin each st. [10]
Cut the yarn. With white, insert your hook at the front edge of the hat and work (ch 3, slst) until you cover the edge. Cut the yarn and hide the tail.
Insert your hook at the top of the hat. With white, work (ch 2, inc into the foundation chain, slst) to make the tiny pompom.
Sew the mini hat on top of the Santa face.
Assembly
- Push the firmly stuffed body neck up into the head (the head is not sewn to the neck).
- Sew the arms to the body at Rnd 13.
- Sew the ears to the head and attach the wig with the braids on each side. Sew a red bow to each braid.
- Put the dress on the doll, pulling the arms through the sleeves.
- Sew the Santa face with its mini hat to the front of the dress.
- Put the Santa hat on the head. Sew it in place if you want it to stay on.
- Embroider any small details with black thread.
Optional & Creative Ideas
- Add glasses: The cover photo shows the doll wearing small round glasses. The PDF has no instructions for them, but you could shape thin craft wire or gold yarn into two small circles.
- Rosy cheeks: Add a touch of pink blush or a few pink stitches under the eyes for a warm, festive face.
- Tree ornament: Sew a loop of yarn to the top of the Santa hat so the doll can hang on the Christmas tree.
- Change the outfit: Work the hat, dress and boots in green for an elf version.
- Child-friendly version: Embroider the eyes with black yarn instead of using safety eyes.
Final Thoughts
This Santa doll takes time because of the wig strands and the loop trims, but those details are what make her special. Work one piece at a time, keep your stitch markers handy on the BLO rounds, and you will have a lovely handmade Christmas gift.
Patterns and instructions on OpenCrochet are for personal use. Please do not redistribute copies of this content; share the page link instead.


