Cute Fruit & Veggie Amigurumi Crochet Pattern
Crochet a cute round fruit and veggie amigurumi with legs, hands and your choice of leaf, eggplant or banana hat. Full rounds for kawaii plush.
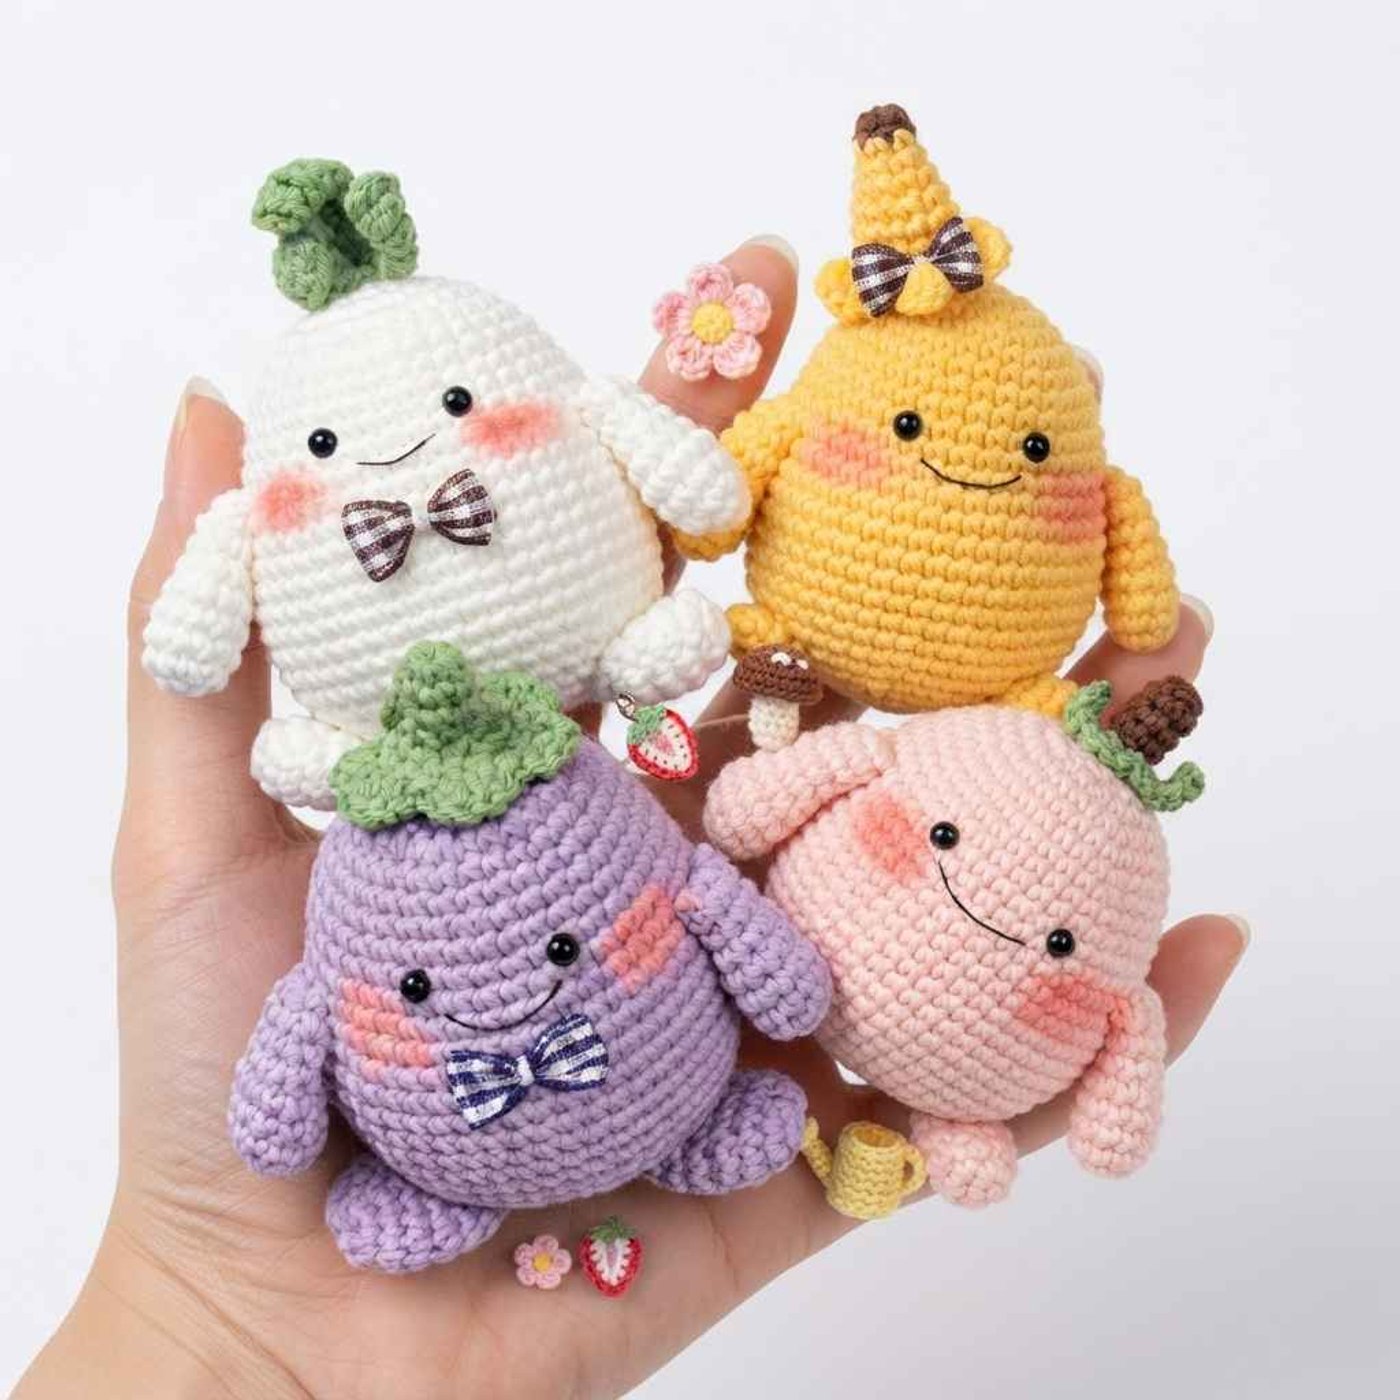
This pattern gives you one round, chubby body with two little legs and two little hands, then lets you turn it into a different character just by changing the color and the hat. The original file includes three hat variants: a leafy top, an eggplant calyx and a banana tip. The photo shows four finished characters: a white one with a green leafy top, a purple eggplant, a yellow banana and a pink one with a leaf and brown stem, all with the same smiley face, pink cheeks and in some cases a tiny bow. The body is mostly plain single crochet with simple increases and decreases, so it is friendly to work. The hats are the part that takes a little attention, because they use chain-and-turn petals with slip stitches, half double, double and treble crochet. Each character is small enough to sit in an adult hand, which makes them good as desk buddies, bag decorations or little gifts. The original pattern does not list materials, so the notes below suggest what to use based on the photo.
Finished size
The original pattern does not give measurements. The widest part of the body is 50 stitches around, and the photo shows each character sitting comfortably in an adult hand. Size depends on your yarn and hook, so use thicker yarn for a bigger character or thinner yarn for a smaller one, keeping the stitch counts the same.
Yarn substitution
- Body: choose a smooth yarn with good stitch definition so the rounded shape and the shaping rounds look clean. Pick a color to match your character: white, purple, yellow or pink in the photo.
- Hats: use a green yarn of the same weight as the body for the leafy top and the eggplant calyx. A brown or yellow scrap works for the banana tip.
- Hook: go down one hook size from the yarn label so stuffing does not show through.
- Face: use black thread for the smile and eyes if you prefer embroidery, and pink thread or a little blush for the cheeks.
Common mistakes
- Leg Round 6: the original reads (3 sc, dec) x3 [9], but that would use 15 stitches and the leg only has 12. To get to 9 stitches, work (2 sc, dec) x3.
- Body Round 10 and Round 12: the increases are placed in the middle section only. The stitch counts check out (45, then 50), so follow the counts carefully and do not spread the increases evenly around the round.
- Hat petals: the petal rounds are written briefly. The leafy hat has 6 petals on 6 stitches, the eggplant calyx has 6 petals on 18 stitches (about 3 base stitches per petal), and the banana hat has 5 petals on 15 stitches (3 base stitches per petal). Try each one on scrap yarn first if you want to see how they sit.
- Stuffing: stuff the body after Round 25 and add more before you close Round 27, or the shape will sag.
- Sewing placement: attach the legs and hands before the hat so you can see the balance of the body.
Pattern notes
- Work in continuous rounds and use a stitch marker for the first stitch of each round.
- Numbers in square brackets are the total stitch count at the end of the round.
- Leave a long tail on the body, legs, hands and hats for sewing.
Head and body
R1: 8 sc in magic ring [8]
R2: (inc) x8 [16]
R3: (sc, inc) x8 [24]
R4: (sc, inc, sc) x8 [32]
R5-6: 32 sc [32]
R7: (3 sc, inc) x8 [40]
R8-9: 40 sc [40]
R10: 10 sc, (3 sc, inc) x5, 10 sc [45]
R11: 45 sc [45]
R12: 10 sc, (2 sc, inc, 2 sc) x5, 10 sc [50]
R13-22: 50 sc [50]
R23: (3 sc, dec) x10 [40]
R24: (sc, dec, sc) x10 [30]
R25: (sc, dec) x10 [20]
Stuff the body.
R26: (dec) x10 [10]
R27: (dec) x5 [5]
Stuff again, fasten off and leave a tail for sewing.
Leg (make 2)
R1: 6 sc in magic ring [6]
R2: (inc) x6 [12]
R3-5: 12 sc [12]
R6: (2 sc, dec) x3 [9] (see Common mistakes)
R7-8: 9 sc [9]
Fasten off and leave a tail for sewing.
Hand (make 2)
R1: 6 sc in magic ring [6]
R2: (inc) x6 [12]
R3: (3 sc, inc) x3 [15]
R4-6: 15 sc [15]
R7: (3 sc, dec) x3 [12]
R8: (dec) x6 [6]
Fasten off and leave a tail for sewing.
Hat 1: Leafy top (green)
R1-4: 6 sc (work R1 in a magic ring) [6]
R5: (ch 6, turn, then in the 2nd chain from the hook work sl st, sc, hdc, dc, tr) x6
Hat 2: Eggplant calyx (green)
R1-4: 6 sc (work R1 in a magic ring) [6]
R5: (inc) x6 [12]
R6: (sc, inc) x6 [18]
R7: (ch 2, turn, dc, dc, ch 2, sl st) x6
Hat 3: Banana tip
R1: 6 sc in magic ring [6]
R2-3: 6 sc [6]
R4: (inc) x6 [12]
R5: (3 sc, inc) x3 [15]
R6-8: 15 sc [15]
R9: (ch 5, turn, sl st, sc, hdc, dc, sl st in the next 2 stitches) x5
Assembly and face
- Sew the two legs to the bottom of the body and the two hands to the sides, using the photo as a guide.
- Add the black eyes and embroider a small smile on the front.
- Add rosy cheeks with pink thread or a touch of blush.
- Sew your chosen hat to the top of the head.
- Add a small bow if you like and weave in all ends.
FAQ
Which hats are included in the pattern?
The file has three hats: a leafy top, an eggplant calyx and a banana tip. The photo also shows a pink character with a leaf and brown stem, which is not written out separately, so adapt the leafy hat if you want to make it.
How firmly should I stuff the body?
Stuff firmly after Round 25 so the round shape holds, then add a little more before closing Round 27. The legs and hands are small, so stuff them lightly if at all.
Are the eyes safe for small children?
Small safety eyes and beads can be a risk for very young children. For a toy for a child under 3, embroider the eyes and cheeks instead.
Can I change the colors?
Yes. The author says you can change the colors and details to suit your preferences, so any body color and hat color combination works.
Do I have to make all three hats?
No. The body, legs and hands are the same for every character, so choose one hat per amigurumi.
Optional & Creative Ideas
- Customize colors: make a whole garden of characters in different body colors, each with its own hat.
- Add accessories: finish with a tiny ribbon or fabric bow, as in the photo.
- Bag charm or ornament: sew a loop of yarn on top to hang one from a bag or tree.
- Safer version: embroider the eyes and cheeks so it is suitable as a gift for a young child.
- Mix and match: swap the hats between bodies to create new combinations.
Final Thoughts
One simple body and a few small hats give you a whole little cast of characters, and each one stays quick to finish and easy to personalize.
Patterns and instructions on OpenCrochet are for personal use. Please do not redistribute copies of this content; share the page link instead.