Grinch Amigurumi Crochet Pattern with Santa Hat & Candy Cane
Crochet a cute Grinch head amigurumi with Santa hat, tiny hands and a striped candy cane. Step-by-step rounds for a festive Christmas decoration.
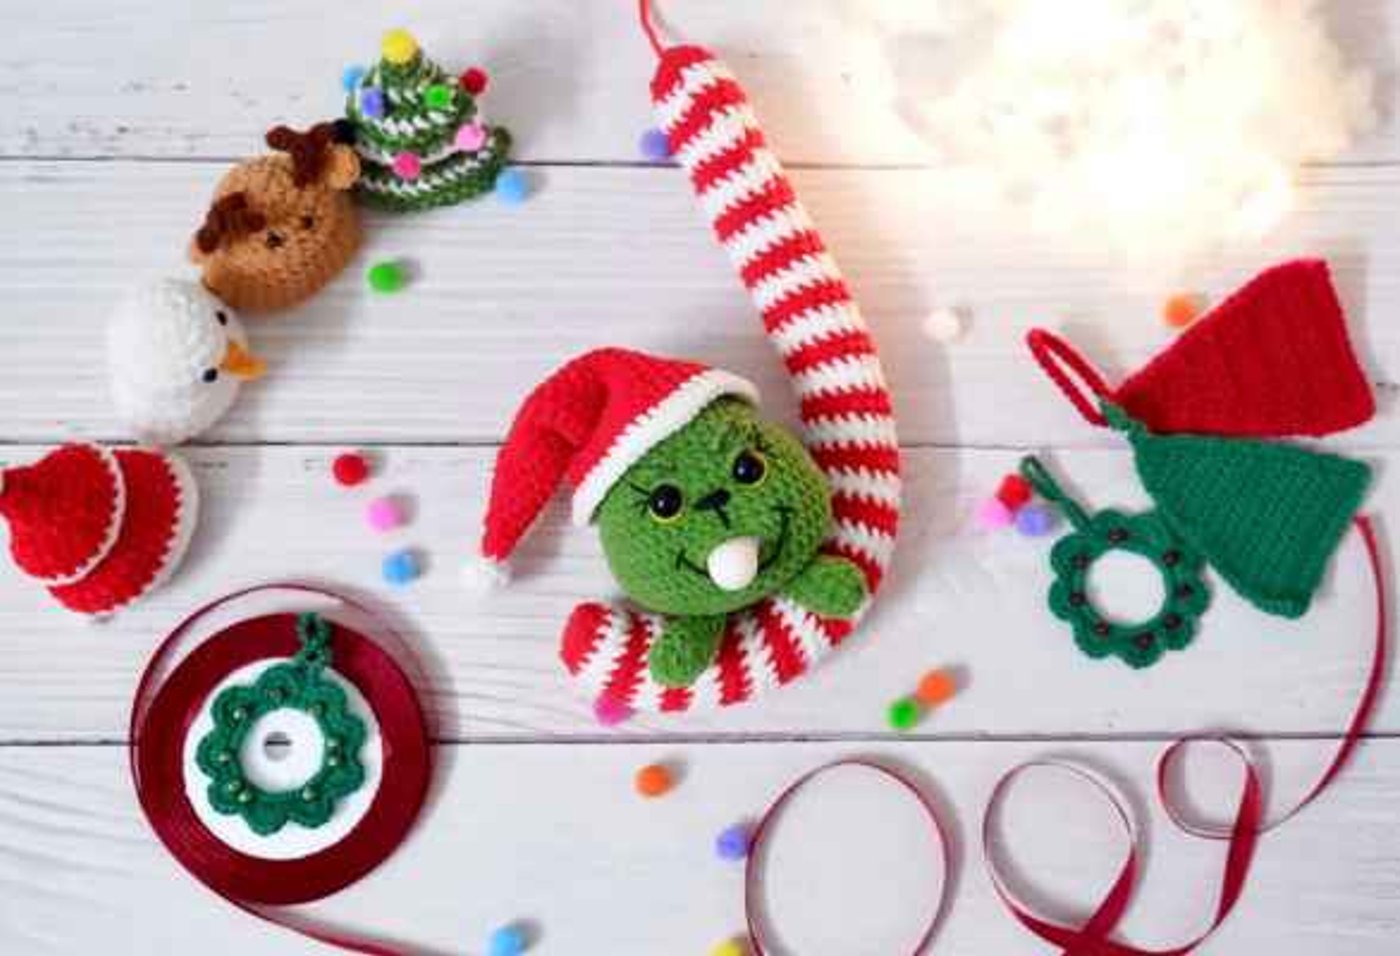
This pattern turns the classic grumpy-but-lovable Christmas green character into a round, squishy Grinch head about 10 cm tall, finished with a pointy Santa hat, two tiny hands and a long red and white striped candy cane. It is written for crocheters who are already comfortable with a magic ring, increases and decreases and want to try a few extras: a small mouth opening that holds an inflatable plastic ball, simple color changes, and a 76-round candy cane that spirals as you work. The designer used green yarn with a 2.5-3 mm hook and 8 mm safety eyes, then added black and yellow cotton yarn for the smile and eyelids. Unlike a generic amigurumi head, the Grinch is worked as one seamless round shape with no separate muzzle, so his personality comes from the embroidery, the hair loops on top and the ball in his mouth. He makes a charming Christmas ornament, shelf decoration or gift topper.
Finished size
With the designer's 2.5 mm yarn the Grinch is about 10 cm tall. The candy cane is worked in 18 stitches per round for 76 rounds, so it ends up much longer than the head. Thicker yarn and a larger hook give a bigger Grinch, and thinner yarn with a smaller hook gives a smaller one. Adjust the hook so the fabric stays tight enough that stuffing does not show.
Yarn substitution
- Green: any yarn in a similar weight works. Choose one that is dense when crocheted, since the head is stuffed firmly and the eyes sit between Rnd 12 and Rnd 13.
- Red and white: use the same weight for the hat, pompon and candy cane so the stripes look even and the hat keeps its shape.
- Black and yellow: thin cotton yarn gives sharper embroidered lines than the main yarn. Blue is suggested for the upper eyelids.
- Hook: go down one size from the yarn label (2.5-3 mm for the sample) so stuffing stays hidden.
- Different size: keep the same stitch counts and just change yarn and hook. The 8 mm eyes and the plastic ball should be scaled to match.
Common mistakes
- Mouth opening on Rnd 16: the instructions say to make 25 sc, chain 4 and continue with 25 sc. The round only totals 54 if you skip 4 stitches under the chain, so do that, then work 1 sc in each chain stitch on Rnd 17.
- Hand stitch count: the original text says 6 sc in the magic ring but lists 9 stitches. Use 9 sc in the ring so the following rounds of 9 work.
- Hat Rnd 24: the original says (10 sc)*3 (36), but only (10 sc, inc)*3 gets from 33 to 36 stitches. Use the increase version.
- Stuffing the hat: the hat is not stuffed. Stuffing it makes the point stiff and lumpy.
- Candy cane stripes: the color change moves one stitch further along every 4 rounds. Keep a marker at the start of the round and count the stitches before each change, or the spiral will drift.
- Eyes and ball: place the safety eyes before stuffing, and put the ball in the mouth before you close the head.
Pattern notes
- Work in continuous rounds without joining and mark the first stitch of each round.
- Stuff the head firmly after Rnd 23, before the last decreases.
- Stuff the candy cane as you go, from Rnd 9 onward.
Head to body (green)
Rnd 1: 6 sc in a magic ring (6)
Rnd 2: 6 inc (12)
Rnd 3: (sc, inc) x6 (18)
Rnd 4: (2 sc, inc) x6 (24)
Rnd 5: (3 sc, inc) x6 (30)
Rnd 6: (4 sc, inc) x6 (36)
Rnd 7-8: sc in all 36 st (36)
Rnd 9: (5 sc, inc) x6 (42)
Rnd 10: sc in all 42 st (42)
Rnd 11: (6 sc, inc) x6 (48)
Rnd 12: sc in all 48 st (48)
Rnd 13: (7 sc, inc) x6 (54)
Rnd 14-15: sc in all 54 st (54)
Rnd 16: 25 sc, ch 4, skip 4 st, 25 sc (54)
Rnd 17: sc in all 54 st, working into the chain stitches (54)
Tip: insert the 8 mm safety eyes between Rnd 12 and Rnd 13 with 4 stitches between them, or place them to your preference. Put the inflatable ball into the Grinch's mouth opening before you continue.
Rnd 18: (7 sc, dec) x6 (48)
Rnd 19: (6 sc, dec) x6 (42)
Rnd 20: (5 sc, dec) x6 (36)
Rnd 21: (4 sc, dec) x6 (30)
Rnd 22: (3 sc, dec) x6 (24)
Rnd 23: (2 sc, dec) x6 (18)
Stuff the head with filling.
Rnd 24: (sc, dec) x6 (12)
Rnd 25: 6 dec (6)
Finish the head: thread the last strand of yarn through the front loops of each stitch in the last round and pull tight to close the hole. Insert the needle under the hole and weave in the end.
Hair (green)
Chain 8 and slip stitch into the first chain. Chain 10 and slip stitch into the first chain. Chain 7 and slip stitch into the first chain. This makes three loops. Fasten off, leaving a tail, and sew the hair to the top of the head.
Hands (make 2, green)
Rnd 1: 9 sc in a magic ring (9)
Rnd 2-6: sc in all 9 st (9)
Stuff just enough, then close with 3 single crochets and leave a long tail to sew each hand onto the head.
Tip: sew the two hands between rows 21 and 22, with 4 stitches between them.
Candy cane
Start with red yarn.
Rnd 1: 6 sc in a magic ring (6)
Rnd 2: 6 inc (12)
Rnd 3: (sc, inc) x6 (18)
Rnd 4: sc in all 18 st (18)
Change to white. Rnd 5-6: sc in all 18 st (18)
Change to red. Rnd 7-8: sc in all 18 st (18)
Stuff the candy cane and keep stuffing as you go. From here every odd round has a color change and every even round is sc in all 18 st (18).
- Rnd 9:
scin 1 st, change to white,scin next 17 - Rnd 11:
scin 1 st, change to red,scin next 17 - Rnd 13:
scin 2 st, change to white,scin next 16 - Rnd 15:
scin 2 st, change to red,scin next 16 - Rnd 17:
scin 3 st, change to white,scin next 15 - Rnd 19:
scin 3 st, change to red,scin next 15 - Rnd 21:
scin 4 st, change to white,scin next 14 - Rnd 23:
scin 4 st, change to red,scin next 14 - Rnd 25:
scin 5 st, change to white,scin next 13 - Rnd 27:
scin 5 st, change to red,scin next 13 - Rnd 29:
scin 6 st, change to white,scin next 12 - Rnd 31:
scin 6 st, change to red,scin next 12 - Rnd 33:
scin 7 st, change to white,scin next 11 - Rnd 35:
scin 7 st, change to red,scin next 11 - Rnd 37:
scin 8 st, change to white,scin next 10 - Rnd 39:
scin 8 st, change to red,scin next 10 - Rnd 41:
scin 9 st, change to white,scin next 9 - Rnd 43:
scin 9 st, change to red,scin next 9 - Rnd 45:
scin 10 st, change to white,scin next 8 - Rnd 47:
scin 10 st, change to red,scin next 8 - Rnd 49:
scin 11 st, change to white,scin next 7 - Rnd 51:
scin 11 st, change to red,scin next 7 - Rnd 53:
scin 12 st, change to white,scin next 6 - Rnd 55:
scin 12 st, change to red,scin next 6 - Rnd 57:
scin 13 st, change to white,scin next 5 - Rnd 59:
scin 13 st, change to red,scin next 5 - Rnd 61:
scin 14 st, change to white,scin next 4 - Rnd 63:
scin 14 st, change to red,scin next 4 - Rnd 65:
scin 15 st, change to white,scin next 3 - Rnd 67:
scin 15 st, change to red,scin next 3 - Rnd 69:
scin 16 st, change to white,scin next 2 - Rnd 71:
scin 16 st, change to red,scin next 2
Rnd 72-74: sc in all 18 st (18)
Shaping the candy cane: sew a piece of yarn along the length of the cane and pull the end to give it a rounded, curved shape. If you want it to stay straight, insert a paper straw.
Rnd 75: (sc, dec) x6 (12)
Rnd 76: 6 dec (6)
Thread the last strand through the front loops of the last round and pull tight to close. Use the remaining yarn to make a small loop on top of the cane, then sew the end into the cane.
Hat (red and white)
Start with red yarn. Do not stuff the hat.
Rnd 1: 4 sc in a magic ring
Rnd 2: 4 sc (4)
Rnd 3: (sc, inc) x2 (6)
Rnd 4: (2 sc, inc) x2 (8)
Rnd 5: 8 sc (8)
Rnd 6: (3 sc, inc) x2 (10)
Rnd 7: 10 sc (10)
Rnd 8: (4 sc, inc) x2 (12)
Rnd 9: 12 sc (12)
Rnd 10: (5 sc, inc) x2 (14)
Rnd 11: (6 sc, inc) x2 (16)
Rnd 12: 16 sc (16)
Rnd 13: (7 sc, inc) x2 (18)
Rnd 14: (8 sc, inc) x2 (20)
Rnd 15: 20 sc (20)
Rnd 16: (9 sc, inc) x2 (22)
Rnd 17: (10 sc, inc) x2 (24)
Rnd 18: 24 sc (24)
Rnd 19: (11 sc, inc) x2 (26)
Rnd 20: (12 sc, inc) x2 (28)
Rnd 21: 28 sc (28)
Rnd 22: (13 sc, inc) x2 (30)
Rnd 23: (9 sc, inc) x3 (33)
Rnd 24: (10 sc, inc) x3 (36)
Rnd 25: (8 sc, inc) x4 (40)
Rnd 26: 40 sc (40)
Rnd 27: (9 sc, inc) x4 (44)
Change to white yarn.
Rnd 28: 44 sc (44)
Rnd 29: (10 sc, inc) x4 (48)
Pompon (white)
Rnd 1: 5 sc in a magic ring (5)
Rnd 2: 5 inc (10)
Rnd 3-4: 10 sc (10)
Stuff with fiberfill.
Rnd 5: 5 dec (5)
Fasten off, leaving a long tail. Sew the pompon to the tip of the hat. Use red yarn to shape the hat point.
Assembly and face details
- Sew the hair loops to the top of the head.
- Sew the hands between rows 21 and 22, 4 stitches apart.
- Embroider the smile, nose and brows with black cotton yarn. For the eyelids you can use yellow yarn for the lower lids and blue yarn for the upper lids so they stand out.
- Place the hat on the head and stitch it in place.
- Weave in all ends.
FAQ
Are the safety eyes secure, and can I use something else?
The pattern uses 8 mm safety eyes placed between Rnd 12 and Rnd 13, 4 stitches apart. Fix them before stuffing. If the toy is for a young child, embroider the eyes instead of using safety eyes.
Is the inflatable ball safe for children?
The ball is a loose plastic part held in the mouth opening, so treat this Grinch as a decoration and not a toy for babies or toddlers. For a child-safe version, skip the ball and embroider the mouth.
Where do I stuff and where not?
Stuff the head after Rnd 23 and the candy cane as you go. Stuff the hands lightly and the pompon on Rnd 4. Leave the hat unstuffed.
How do I handle the candy cane color changes?
Make each color change on the stitch the instructions give, keep the round marker in place and count stitches before each change. The stripes spiral because the change moves one stitch every 4 rounds.
Can I make a bigger Grinch?
Yes. Use thicker yarn with a larger hook and keep the same stitch counts. Use larger eyes and a bigger ball to match.
Optional & Creative Ideas
- Customize colors: make a different festive character by changing the green to another color and keeping the hat and candy cane.
- Hang it up: sew a loop of yarn to the top of the hat or use the candy cane loop to turn the pieces into tree ornaments.
- Candy cane variations: use thinner yarn for a mini cane, or insert a paper straw to keep it straight.
- Gift topper: attach the finished Grinch head to a wrapped present instead of a bow.
- Face variations: change the eyelid and brow colors, or switch between black and yellow cotton yarn to give him a different expression.
Final Thoughts
This Grinch is a small project with a lot of character: the round head, the tiny mouth ball and the swirling candy cane do most of the work, and the stitching stays simple.
Patterns and instructions on OpenCrochet are for personal use. Please do not redistribute copies of this content; share the page link instead.