Halloween Turtle Amigurumi Crochet Pattern with Removable Shell and Hats
Crochet a tiny Halloween turtle amigurumi with a removable shell and hat. Make a witch, mushroom, bat or spider costume version.
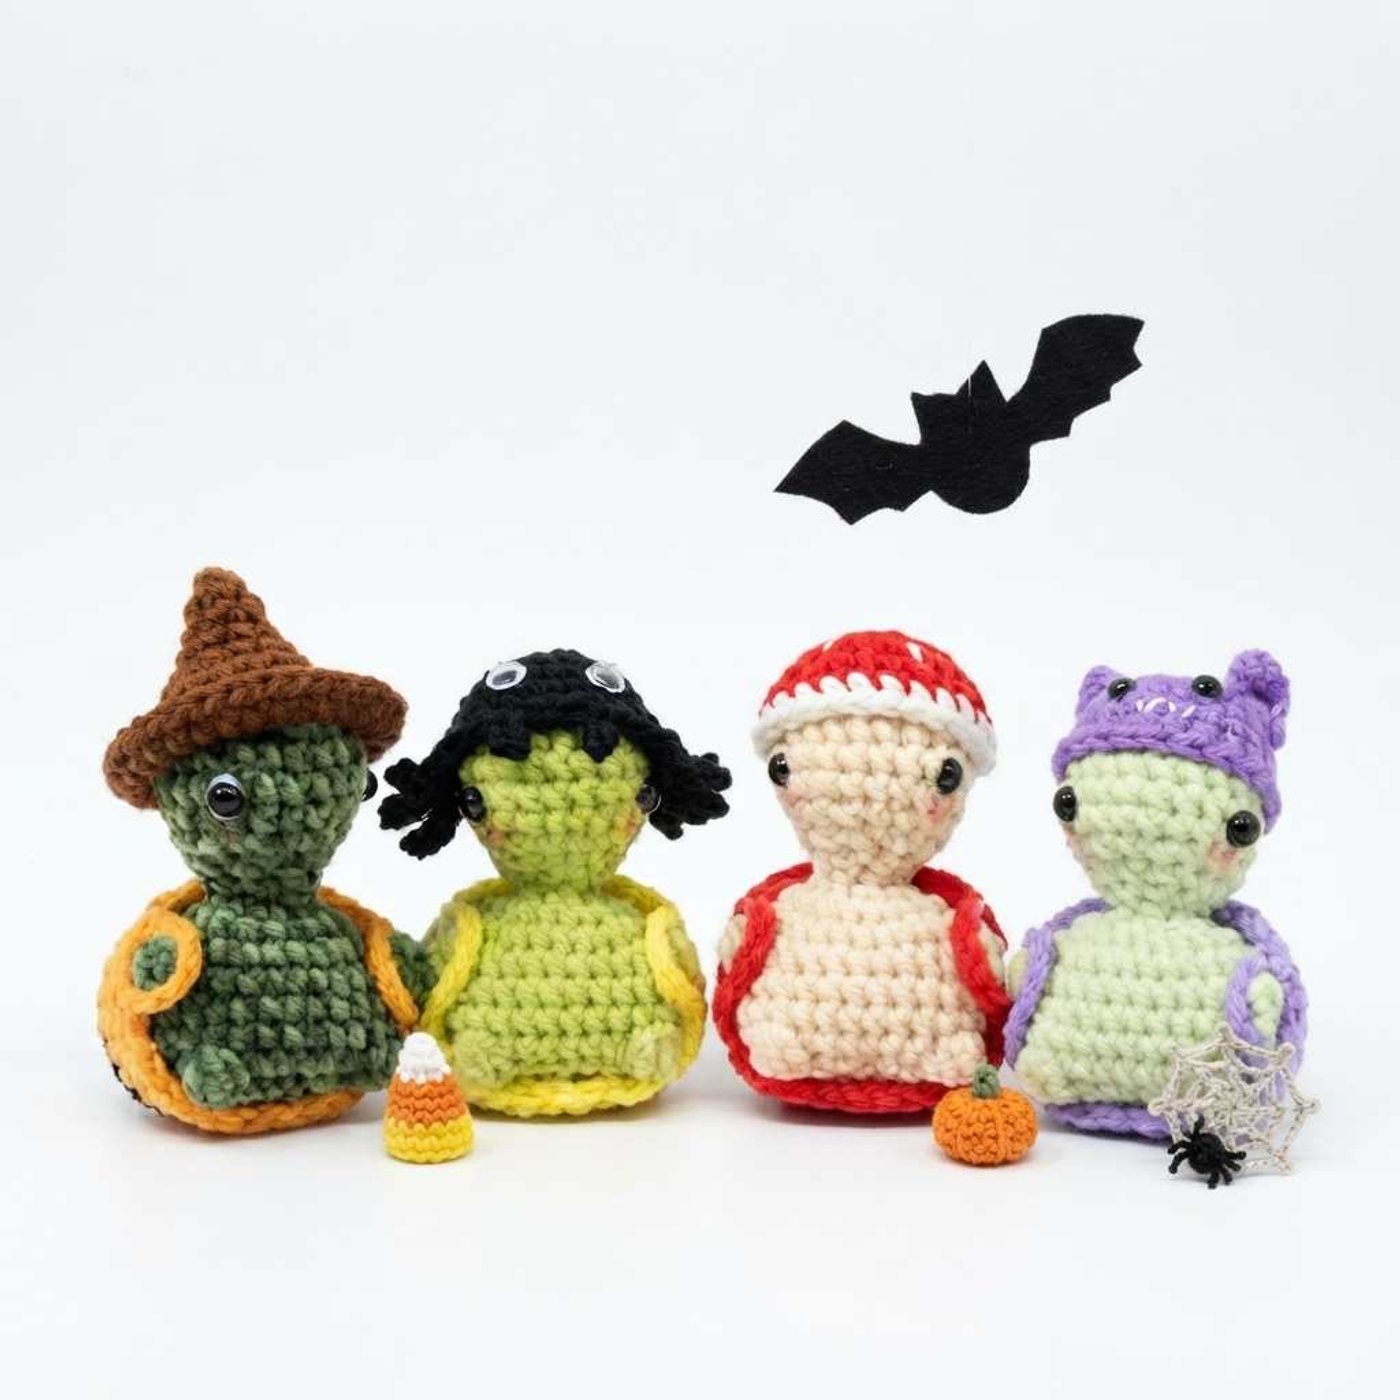
This little Halloween turtle is a pocket-sized amigurumi, about 7 cm tall when worked with a 2.5 mm hook, and its best trick is that the shell and the hat come off. You crochet one simple green turtle body, then dress it up with a separate shell and a matching hat. The pattern gives you four costumes: a witch with a pumpkin shell and pointy brown hat, a red mushroom with a white-spotted cap, a purple bat with ears and tiny fangs, and a black spider hat on a candy corn shell.
It is a great project for crocheters who are comfortable with single crochet, increases, decreases and a few color changes, and who want a small seasonal make for a shelf, a Halloween table or a handmade gift. The head and body are worked in one piece from the top down, with a small chin decrease and bobble stitches that form the arms and feet. Because the costumes are made separately, you can crochet several outfits for a single turtle and swap them all season.
You only need a 2.5-3 mm hook, 6 mm safety eyes, stuffing, and scraps of yarn in your favorite Halloween colors. Chenille or plush yarn gives the soft look seen in the witch and bat versions, while a smooth cotton makes sharper stitches.
Finished size
With a 2.5 mm hook and light yarn, the turtle stands about 7 cm (2.75 in) tall. The shell and hat are made to fit this body, so they scale with your yarn. For a larger turtle, use thicker yarn and a bigger hook, and keep the stitch counts the same. Try the shell on the body before you finish it, because the number of shell rounds depends on how large your turtle's booty turns out.
Yarn substitution
- Body yarn: any soft green in a similar weight works. Chenille gives a plush look, while cotton shows the stitches more clearly.
- Shell and hat yarn: use the same weight as the body so the shell fits snugly over the booty.
- Mushroom version: swap the green for cream or beige, and use red for the shell and cap with white yarn for the brim and spots.
- Thicker or thinner yarn: change the hook size to keep a tight fabric with no stuffing showing, and expect a bigger or smaller finished turtle.
Common mistakes
- Treating the stitch counts as a loose guide: a few lines of the written text are unclear (for example, the R18 count should end at 24 stitches, not 2). Always check your total against the number in the brackets before moving on.
- Stuffing the body too firmly: the pattern asks for a softer look, so keep the body only lightly filled and the booty slightly squishy.
- Skipping the shell fitting: rounds 4-7 of the shell can be shortened or lengthened. Test it on the booty before you make the straps.
- Straps that are too tight: if the chain-5 straps do not fit around the arms, chain a few more stitches.
- Eyes placed too close together: on the head they go 7-8 stitches apart between rounds 5 and 6, so mark them with pins first.
- Spots that show on the inside: on the mushroom set, knot the white spot yarn inside the hat and shell so the ends stay hidden when the turtle wears them.
FAQ
Are safety eyes safe for toys for small children?
Safety eyes lock in place, but they are not recommended for babies and toddlers. For a child under three, embroider the eyes with black yarn instead. The googly eyes on the spider hat should be glued on firmly, so this version is best kept as decoration.
How do I give the turtle a rounder booty?
Leave a long tail after closing the body. Thread it, or a 15 cm piece of body-colored yarn, onto a needle and go through the center of the back (between rounds 13-14), then exit at the middle of the bottom. Pull gently, knot twice, and weave in the ends. Cotton yarn gives a sharper curve.
How do I change colors for the candy corn shell?
Start with white for rounds 1-2, switch to orange for rounds 3-5, and use yellow for rounds 6-7 before you work the strap round. Change colors on the last stitch of each round and weave in the tails.
Can the hats be worn by other toys?
Yes. They are small, so they fit other minis of a similar head size, and you can add a loop to turn one into a Halloween ornament.
How do I make the hats different from each other?
The mushroom, bat and spider hats share one basic cap. The bat adds two ears and tiny embroidered fangs, and the spider changes round 6 into leg loops, so you only need to learn one base.
Pattern notes
Tip: Work in a continuous spiral and keep a stitch marker in the first stitch of each round. The marker also shows the back of the head.
Tip: Stuff the head after round 8 and the body at round 18, adding a little more as you decrease.
Head and body (green)
- R1:
mr, 8sc[8] - R2: 8
inc[16] - R3: (3
sc,inc) x4 [20] - R4-6: 20
sc[20] - R7: 4
sc, (dec,sc) x4, 4sc[16] (this creates the chin)
Insert the safety eyes between rounds 5 and 6, about 7-8 stitches apart.
- R8: 4
sc, 4dec, 4sc[12]
Stuff the head now.
- R9: (
sc,dec) x4 [8] - R10: 8
sc[8] - R11: 8
inc[16] - R12: (
sc,inc) x8 [24] - R13: (2
sc,inc) x8 [32] - R14: 12
sc,bo, 9sc,bo, 9sc[32] - R15-16: 32
sc[32] - R17: 14
sc,bo, 7sc,bo, 9sc[32] - R18: (
dec, 2sc) x8 [24]
Stuff the body lightly so it stays soft.
- R19: (
dec,sc) x8 [16] - R20: 8
dec[8]
Fasten off and sew the hole closed, leaving a long tail in case you want to shape the booty (see the FAQ).
Shell (orange for the witch, or any color)
- R1:
ch7, starting in the 2nd chain from the hook: 5sc, 3scin the last chain, then on the other side 4sc, 1inc[14] - R2: (
sc,inc) x7 [21] - R3: 2
inc, 7sc, 3inc, 1sc, 1inc[27] - R4-7: 27
sc[27] (add or remove rounds to fit your booty) - R8 (straps): 2
sc,ch5,scin the next stitch, 11sc,ch5,scin the next stitch, 12sc,sl st
Fasten off and weave in the ends. For the witch, embroider a jack-o'-lantern face on the shell with black yarn.
Witch hat (brown)
- R1:
mr, 4sc[4] - R2: 1
sc,incx2 [6] - R3: 2
sc,incx2 [8] - R4: 3
sc,incx2 [10] - R5: 4
sc,incx2 [12] - R6: 1
sc,incx6 [18] - R7: 18
sc[18] - R8: 2
sc,incx6 [24] - R9: 24
hdcin the back loop only (this makes the brim)
Fasten off and weave in the ends.
Mushroom set (red)
Make the shell exactly like the main shell, but in red yarn.
Red hat:
- R1:
mr, 9sc[9] - R2: 9
inc[18] - R3: (2
sc,inc) x6 [24] - R4-5: 24
sc[24] - R6: change to white yarn, 24
sc[24]
Fasten off and weave in the ends. With white yarn, stitch small spots on both the shell and the hat, and knot the ends on the inside so they stay hidden.
Bat set (purple)
Make the shell in purple yarn, following the main shell. Make the hat like the red hat, using purple for all 6 rounds.
- Ears (make 2):
ch5, then starting in the 2nd chain from the hook: 1sl st, 1sc, 1hdc. Fasten off, leaving a tail for sewing. - Insert safety eyes between rounds 3 and 4, about 2-3 stitches apart, then sew on the ears and embroider tiny fangs.
Spider and candy corn set
Candy corn shell:
- R1: in white,
ch7, starting in the 2nd chain from the hook: 5sc, 3scin the last chain, then on the other side 4sc, 1inc[14] - R2: (
sc,inc) x7 [21] - R3: change to orange, 2
inc, 7sc, 3inc, 1sc, 1inc[27] - R4-5: 27
sc[27] - R6-7: change to yellow, 27
sc[27] - R8 (straps): 2
sc,ch5,scin the next stitch, 11sc,ch5,scin the next stitch, 12sc,sl st
Black spider hat: work like the red hat, but change round 6 to: 3 sc, (4 ch, 3 sl st, sl st in the next stitch) x3, 2 sc, (2 ch, sl st), 2 sc, (2 ch, sl st), 2 sc, (4 ch, 3 sl st, sl st in the next stitch) x3, 3 sc. Glue on googly eyes.
Assembly
- Slip the shell over the booty and thread the straps around the arms.
- Place the hat on the head.
- Add the mouth with black cotton yarn and finish any embroidery.
Optional & Creative Ideas
- Customize colors: Try a pastel ghost turtle in white, a pumpkin-orange body, or a glow-in-the-dark yarn shell.
- Mix and match: Because the shell and hat are separate, swap costumes between turtles and make a whole Halloween parade.
- Make it an ornament: Add a small loop to the hat and hang a turtle on a Halloween tree or garland.
- Add a spider web: Chain a white web from thin yarn to display your turtles, like in the photos.
- Gift idea: Pack a turtle with a spare hat in a small treat bag for a handmade Halloween favor.
Final Thoughts
The removable shell and hat turn one simple turtle into a whole cast of Halloween characters, so a single body pattern gives you many different finished pieces.
Patterns and instructions on OpenCrochet are for personal use. Please do not redistribute copies of this content; share the page link instead.