Crochet Tiger Amigurumi Pattern with Ruffle Scarf
Crochet a standing tiger amigurumi with a white belly, rosy cheeks and a ruffled pink scarf.
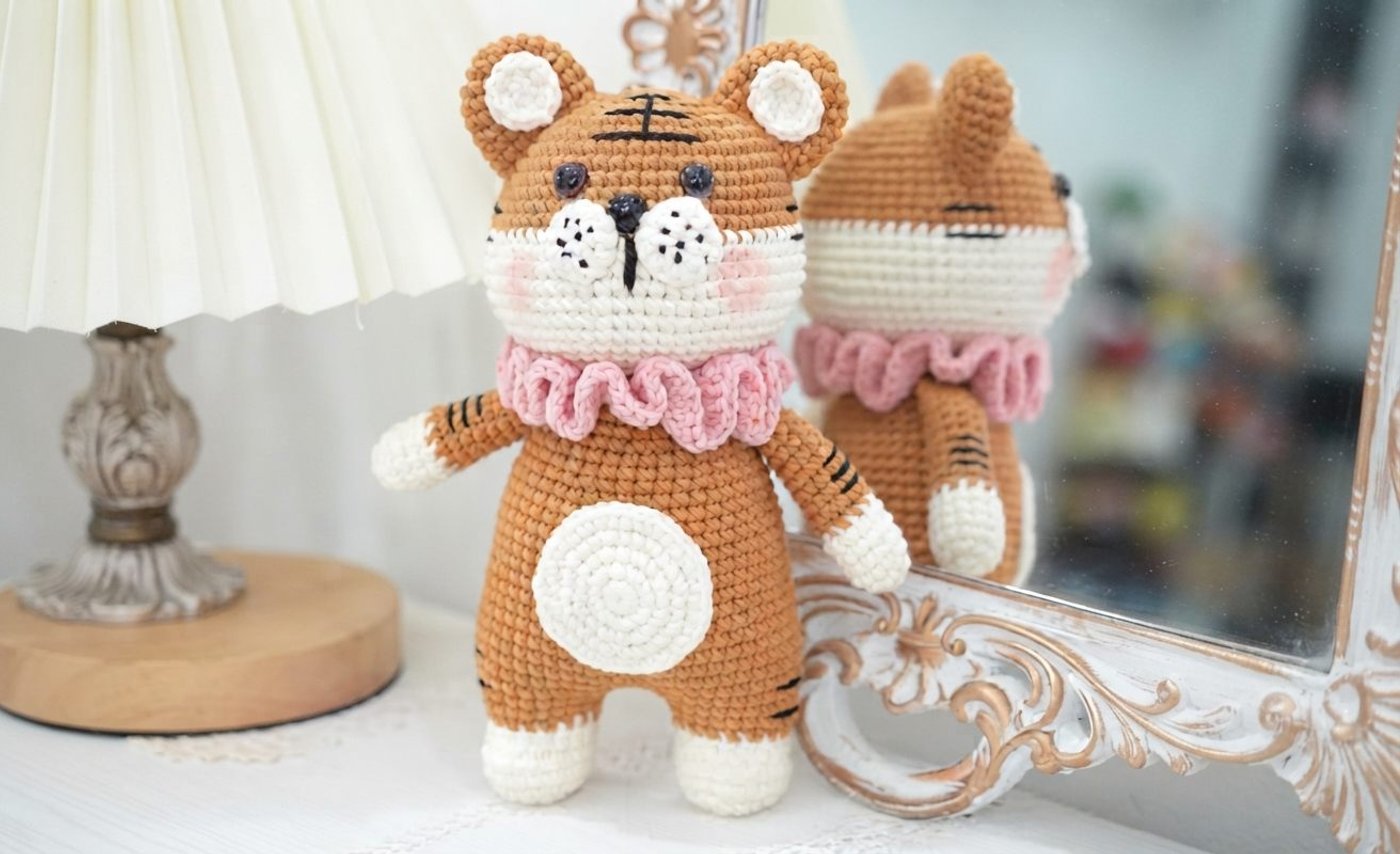
This crochet tiger is a standing amigurumi built from separate pieces: an orange-brown head and body, a white muzzle, white cheeks, a round white belly patch, white feet, and a ruffled pink scarf that gives it a soft, storybook look. The body is worked from the feet up. Both legs are made first and joined with a chain, so the tiger stands on its own two feet without any wire. The head is shaped the same way, with the colour changing to white on the lower half to form the muzzle and chin.
The pattern uses Loopara 5ply combed cotton (Pink 17, Brown 52, Black 59, White 61) with a 3.0mm hook. The result is a dense, neat fabric that holds its shape. It suits crocheters who are comfortable with magic rings, increases and decreases, stitch counts in the 40s and 50s, and sewing several small parts onto a larger form. The stripes, crown mark, mouth and cheek details are all embroidered afterwards, so this is as much an embroidery project as a crochet one. It is a good gift for the Year of the Tiger or for anyone who likes jungle animals.
Finished size
The source pattern gives no measurement. With 5ply cotton and a 3.0mm hook, the tiger in the cover photo looks like a toy of roughly 25-30 cm (10-12 in) tall, based on the stitch counts (54 stitches at the widest part of head and body). Treat this only as an estimate, because tension, stuffing and yarn all change the final size. A thicker yarn and a larger hook will give a bigger tiger with the same stitch counts.
Yarn substitution
- Weight: a smooth fingering to sport weight cotton or cotton blend works best. Pick a hook small enough that the fabric is tight and the fiberfill does not show through.
- Colours: you need an orange-brown main colour, white or cream for the muzzle, cheeks, belly, hands and feet, a small amount of black for embroidery, and a soft pink for the scarf. Make sure the brown and white contrast clearly.
- Brown shade: the cover photo shows a warm orange-brown. A darker brown will look more like a bear, so choose something with some orange in it.
- Avoid fluffy yarn: mohair and brushed yarns hide stitch definition, which makes the embroidered stripes and French knots harder to place.
- Scarf yarn: the scarf is made of double crochets, so a slightly softer or thinner yarn can make a floppier ruffle. Test a few stitches before committing.
Common mistakes
- Skipping the leg and body join: body R1 is the trickiest round. It uses a chain of 3 between the legs and works into both legs. Place a marker at the start and recount after each section.
- Colour changes in the last stitch: the head (R13), the hands (R6) and the legs (R7) all change colour in the last stitch of the round. Change colour on the final yarn-over so the join does not show a different colour at the wrong place.
- Miscounting repeats: most rounds are repeats such as (7 sc, sc inc) 6 times. Count the total at the end of the round (for example 54 on the head) before moving on.
- Counting changes in the body: rounds 8, 11 and 15 of the body have decreases placed at different points, not simple repeats. Read these rounds carefully and check the stitch count at the end of the round (50, 46 and 42).
- Stuffing too late: the head closes down to a small opening, and the body closes after R25 is worked in the back loops. Stuff each piece firmly before closing.
- Wrong loop for the scarf: the scarf is worked in the front loops left over from body R24, not in R25. R25 is worked in the back loops of the previous round, which is what leaves the front loops free.
- Eyes too close together: the pattern spaces the eyes 5 stitches apart at the centre of the head. Pin both before fixing them.
Tip: the head is worked as one long piece from the crown to the chin. Use a stitch marker on R1 and mark the colour change at R13 so you can find the muzzle line again when you set the eyes.
FAQ
Does the tiger stand without wire?
Yes. The legs are joined at the start of the body and the whole body is worked in one piece, so the tiger stands on its own when firmly stuffed. Stuff the legs tightly and keep the stuffing even.
Are the eyes and nose safe for a baby?
The pattern uses an eyeball and a nose attached with hot melt adhesive. Neither is recommended for babies or toddlers. For young children, embroider the eyes and nose in black yarn instead.
How are the stripes made?
They are embroidered in black yarn on both sides of the arms, legs and face at the end, after all the pieces are sewn on. The pattern also adds a crown pattern on the forehead. Use pins to plan the stripes before you stitch.
What are the cheeks and how are they attached?
The cheeks are two small off-white discs of 6 sc and then 6 sc inc. Before attaching them, make irregular French knots on the back with a single strand of black yarn, then attach the cheeks reversed on both sides of the nose.
How is the scarf attached?
The scarf is worked directly onto the body, not sewn on. After the body is done, work into the front loops of R24 with 3 dc in each stitch (72 total), then a second round of dc increases to make the ruffle.
Where do the hands attach?
The hands are stuffed, flattened, folded in half and closed with 4 single crochets. They are then sewn to both sides of the body just under the head.
Reading this pattern
All rounds are worked in joined rounds. Start each round with ch 1 (not counted), work the stitches shown, and finish with a sl st into the first stitch. Parentheses show repeats. The scarf rounds start with ch 2, which also does not count as a stitch.
How to crochet the head (make 1)
Start with brown yarn.
- R1: Magic ring, ch 1, 8 sc, sl st.
- R2: ch 1, 8 sc inc, sl st. (16)
- R3: ch 1, (sc, sc inc) 8 times, sl st. (24)
- R4: ch 1, (3 sc, sc inc) 6 times, sl st. (30)
- R5: ch 1, (2 sc, sc inc, 2 sc) 6 times, sl st. (36)
- R6: ch 1, (5 sc, sc inc) 6 times, sl st. (42)
- R7: ch 1, (3 sc, sc inc, 3 sc) 6 times, sl st. (48)
- R8-11: ch 1, 48 sc, sl st.
- R12: ch 1, (7 sc, sc inc) 6 times, sl st. (54)
- R13: ch 1, 54 sc (change to off-white in the last sc), sl st.
- R14-16: ch 1, 54 sc, sl st.
- R17: ch 1, (4 sc, sc inc, 4 sc) 6 times, sl st. (60)
- R18: ch 1, (9 sc, sc inc) 6 times, sl st. (66)
- R19: ch 1, (9 sc, sc2tog) 6 times, sl st. (60)
- R20: ch 1, (4 sc, sc2tog, 4 sc) 6 times, sl st. (54)
- R21: ch 1, (7 sc, sc2tog) 6 times, sl st. (48)
- R22: ch 1, (2 sc, sc2tog, 2 sc) 8 times, sl st. (40)
- R23: ch 1, (3 sc, sc2tog) 8 times, sl st. (32)
- R24: ch 1, (sc, sc2tog, sc) 8 times, sl st. (24)
Stuff the head firmly before closing and leave a long tail for sewing it to the body.
How to crochet the belly (make 1)
Use cream or white yarn.
- R1: ch 1, 8 sc in a magic ring, sl st.
- R2: ch 1, 8 sc inc, sl st. (16)
- R3: ch 1, (sc, sc inc) 8 times, sl st. (24)
- R4: ch 1, (sc, sc inc, sc) 8 times, sl st. (32)
- R5: ch 1, (3 sc, sc inc) 8 times, sl st. (40)
How to crochet the hands (make 2)
- R1: With cream yarn, ch 1, 6 sc in a magic ring, sl st.
- R2: ch 1, 6 sc inc, sl st. (12)
- R3-5: ch 1, 12 sc, sl st.
- R6: ch 1, 10 sc, sc2tog (change to brown in the last stitch), sl st. (11)
- R7: ch 1, 11 sc, sl st.
- R8: ch 1, 9 sc, sc2tog, sl st. (10)
- R9-14: ch 1, 10 sc, sl st.
- R15: ch 1, 8 sc, sc2tog, sl st. (9)
- R16: ch 1, 9 sc, sl st.
- Finishing: stuff with fiberfill, flatten and fold in half. Join the edges together with 4 sc. Leave a long tail for sewing.
How to crochet the outer ears (make 2, in brown)
- R1: ch 1, 6 sc in a magic ring, sl st.
- R2: ch 1, 6 sc inc, sl st. (12)
- R3: ch 1, (sc, sc inc) 6 times, sl st. (18)
- R4-8: ch 1, 18 sc, sl st. Leave a long tail for sewing.
How to crochet the inner ears (make 2, in off-white)
- R1: ch 1, 6 sc in a magic ring, sl st.
- R2: ch 1, 6 sc inc, sl st. (12)
How to crochet the cheeks (make 2, in off-white)
- R1: ch 1, 6 sc in a magic ring, sl st.
- R2: ch 1, 6 sc inc, sl st. (12) Attach reversed to the face.
How to crochet the legs (make 2)
- R1: With cream yarn, ch 1, 8 sc in a magic ring, sl st.
- R2: ch 1, 8 sc inc, sl st. (16)
- R3: ch 1, (sc, sc inc) 8 times, sl st. (24)
- R4-5: ch 1, 24 sc, sl st.
- R6: ch 1, 6 sc, sc2tog 6 times, 6 sc, sl st. (18)
- R7: ch 1, 18 sc (change to brown in the last sc), sl st.
- R8: ch 1, 6 sc, (sc inc, sc) 3 times, 6 sc, sl st. (21)
- R9: ch 1, 21 sc, sl st. Fasten off the first leg and continue with the second leg.
How to crochet the body (make 1)
- R1: Join the legs with a chain 3: ch 1, 17 sc (on leg 2), ch 3, 21 sc in the middle of leg 1, ch 3, 3 sc (other side of the chain), 4 sc (leg 2), sl st.
- R2: ch 1, (7 sc, sc inc) 6 times, sl st. (54)
- R3-7: ch 1, 54 sc, sl st.
- R8: ch 1, (11 sc, sc2tog) 3 times, 12 sc, sc2tog, sc, sl st. (50)
- R9-10: ch 1, 50 sc, sl st.
- R11: ch 1, 4 sc, sc2tog, 10 sc, sc2tog, 11 sc, sc2tog, 10 sc, sc2tog, 7 sc, sl st. (46)
- R12-14: ch 1, 46 sc, sl st.
- R15: ch 1, (9 sc, sc2tog) 3 times, 10 sc, sc2tog, sc, sl st. (42)
- R16-17: ch 1, 42 sc, sl st.
- R18: ch 1, (5 sc, sc2tog) 6 times, sl st. (36)
- R19-20: ch 1, 36 sc, sl st.
- R21: ch 1, (2 sc, sc2tog, 2 sc) 6 times, sl st. (30)
- R22-23: ch 1, 30 sc, sl st.
- R24: ch 1, (3 sc, sc2tog) 6 times, sl st. (24)
- R25: ch 1, 24 sc in BLO, sl st. Leave a long tail for sewing and stuff with fiberfill.
Tip: stuff the legs and lower body firmly as you go, since you cannot reach them once the body is closed.
How to crochet the scarf (make 1)
- R1: Working in the front loops only of body R24: ch 2, 3 dc in each stitch around, sl st. (72 dc)
- R2: ch 2, 72 dc inc (2 dc in each stitch), sl st.
Assembly
- Match and sew the head to the body stitch by stitch, then secure and weave in the ends.
- Find the centre of the head to attach the eyes, spacing them 5 stitches apart. Attach the nose in the centre of the row below the eyes. Take the cheek pieces and create irregular French knots on the back with a single strand of black yarn. Attach them on both sides of the nose. Then embroider the mouth in black yarn at the centre of the cheeks. Secure and weave in the ends.
- Attach the inner ears to the outer ears, then carefully position and sew them securely to both sides of the head.
- Sew the arms to both sides of the body, then attach the belly piece to the front.
- Finally, embroider stripes on both sides of the arms, legs and face. Create a crown pattern on the forehead. Tie off and weave in all ends when finished.
Tip: pin the head, ears, arms and belly in place and look at the tiger from the front and sides before you sew. Small changes in ear height and eye spacing change the whole expression.
Optional & Creative Ideas
- Customize colors: swap the pink scarf for red, green or yellow, or make a white tiger by using white for the body and grey for the stripes.
- Skip the glued parts: replace the safety eyes and nose with black embroidery for a toy that is safer for babies and toddlers.
- Make a themed set: pair the tiger with other amigurumi animals worked in the same cotton for a jungle or zodiac display.
- Add a holiday touch: use red and gold yarn for a Lunar New Year gift.
- Scale it up: use a thicker cotton and a larger hook for a bigger tiger. The stitch counts stay the same, so just add more stuffing.
Final Thoughts
This tiger takes time because of the number of separate pieces and the embroidery, but the standing body, rosy cheeks and ruffle scarf make it a charming finished doll. Take extra care with the leg join and the facial embroidery, since those two steps do the most to give the tiger its personality.
Patterns and instructions on OpenCrochet are for personal use. Please do not redistribute copies of this content; share the page link instead.