Crochet Squirrel Amigurumi Pattern (Tiny Cotton Squirrel with Curled Tail)
Crochet a tiny squirrel amigurumi with a cream belly, little ears and a curled tail. Photo tutorial using 5ply cotton and a 3.0mm hook.
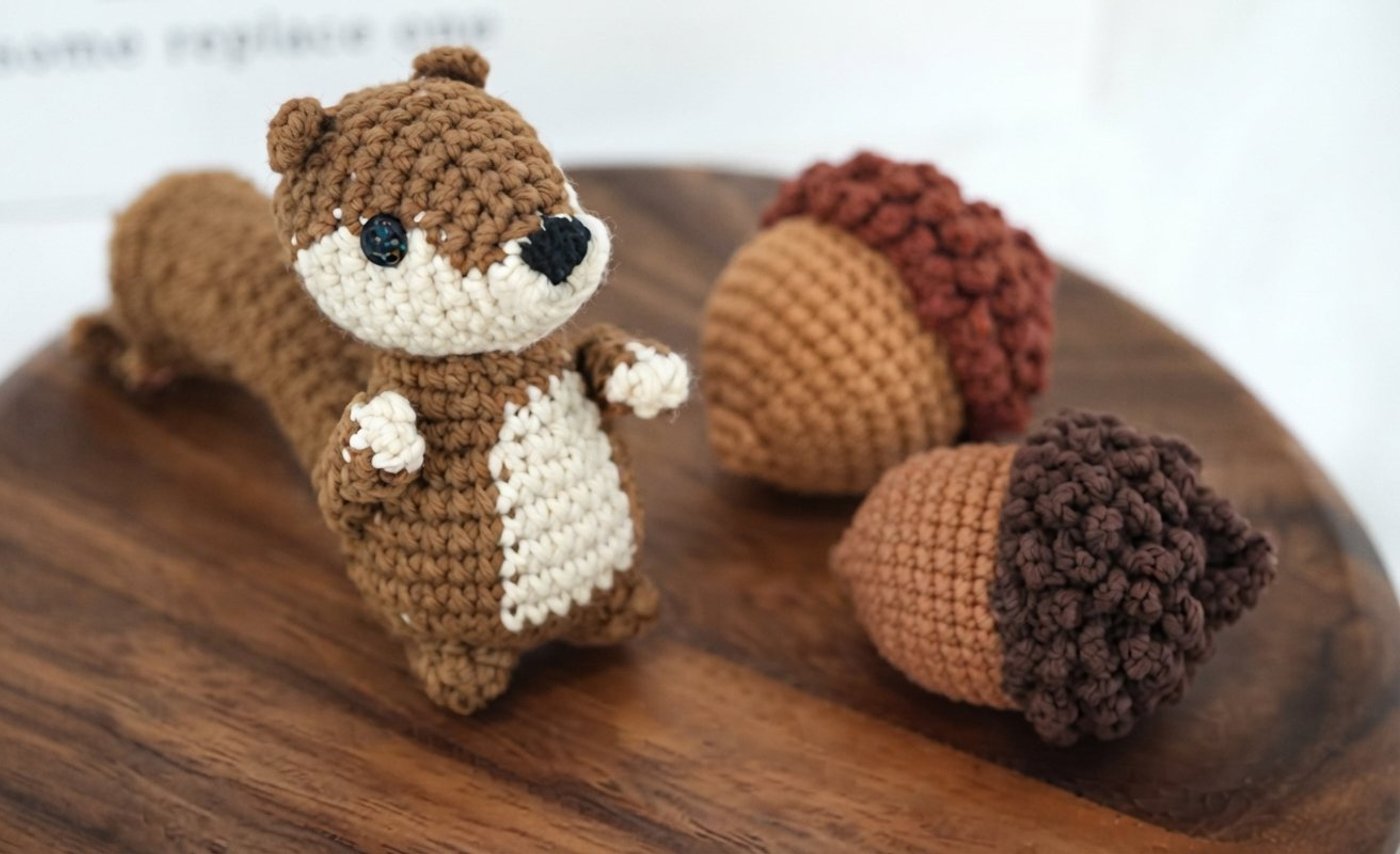
This crochet squirrel is a palm-sized amigurumi: a rounded brown body with a cream belly panel, a cream muzzle and lower face, small round ears, little arms held out to the sides, and a long, softly curved tail that is stuffed as you work. Instead of a plain two-tone toy, the face and belly are built with color changes inside the rounds, so the cream panels grow naturally out of the brown. That is what gives this squirrel its sweet, slightly cartoonish expression.
The pattern uses Loopara 5ply combed cotton (Apricot 50, Brown 55, Black 59) with a 3.0mm hook. The cotton gives crisp, tight stitches that hold their shape without any wire, and the tail stays upright with stuffing alone. It suits crocheters who are already comfortable with magic rings, increases and decreases, and who want to try simple color work in the round and a bit of hand-sewn assembly. It makes a nice autumn desk toy, bag charm, or small gift. The pattern covers the head, body, two hands, two feet, two ears and the tail, then walks you through seven assembly steps with photos.
Finished size
The source pattern does not give a measurement. With 5ply cotton and a 3.0mm hook, expect a squirrel of roughly 8-10 cm (3-4 in) tall without the tail, with the tail adding noticeably more length when it is sewn on. Treat that as an estimate, because tension and yarn will change it. Worked in thicker yarn with a larger hook, the squirrel gets bigger but the stitch counts stay the same.
Yarn substitution
- Weight: any smooth cotton or cotton blend around a fingering to sport weight works. Use a hook small enough that the fabric is dense and the stuffing cannot show through.
- Colors: you need a main brown, a cream or light neutral for the face and belly, and a small amount of black for the nose. Make sure the cream and brown contrast clearly, since the color-change panels are the main feature.
- Fuzzy yarn: avoid mohair or very fluffy yarns. They hide the stitch definition that makes the small color panels readable, and the tiny hands and feet become hard to work.
- Different yarn, different size: if you change yarn or hook, make the head first and check that it still looks proportionate before committing to the rest.
Common mistakes
- Treating the pattern like a spiral: every round here begins with
ch 1(which does not count as a stitch) and ends with asl stto join. Skipping either one throws off your counts and leaves a visible jog. - Losing count in color-change rounds: the rounds are split into segments such as
8 sc, change color, 12 sc, change color, 8 sc. Count each segment and check the total at the end of the round. - Gaps at the color changes: twist the old and new yarn together at each change and pull snug. Loose changes show as small holes on a tiny piece.
- Mixing up the tail bend: tail R8 is worked in the back loops only for the middle 4 stitches, and R12 is worked into the front loops of R8 for those 4 stitches. Do not skip this, since it creates the curve of the tail.
- Stuffing too late: the head, body, hands and feet get closed or sewn shut, so stuff each piece firmly before you finish it. The tail is stuffed as you go, and a small piece of fiberfill pushed in with tweezers every few rounds keeps it from looking lumpy.
- Eyes in the wrong place: the safety eyes go between rows 6 and 7 on the sides of the head. Mark both positions with pins and compare them before locking the eyes.
Tip: the first head round uses incomplete hdc stitches, which the written pattern does not illustrate. Practice them once on a scrap before starting the head.
FAQ
Do I need wire in the tail?
No. The pattern relies on firm fiberfill alone, and the tail curves because of the BLO/FLO round rather than wire. Wire is not recommended for toys that will go to young children.
Are safety eyes okay for a toy for a baby?
Safety eyes are secure for most uses, but they are not recommended for children under 3. For a baby gift, embroider the eyes with black yarn between rows 6 and 7 instead.
How do I handle the color changes without bulky ends?
Switch yarn on the last yarn-over of the stitch before the change. Carry the unused yarn loosely inside the piece only for short gaps, and weave in or cut when a gap is large. Keep the working tails on the inside, since the piece will be stuffed.
How should I assemble it so the squirrel stands and looks balanced?
Follow the order in the assembly steps: eyes, ears, then head to body, arms, legs, and the tail last. Pin every piece with stitch markers or pins and look at the squirrel from the front and side before sewing anything.
What is the nose made from?
It is embroidered at the end using two strands of black yarn (Black 59) on the front of the head.
Reading this pattern
All rounds are worked in joined rounds. Start each round with ch 1 (not counted), work the stitches shown, and finish with a sl st into the first stitch. Brackets and parentheses show repeats. Where a round says change color, pick up the other yarn as shown in the matching photos.
How to crochet the head
- R1: Magic ring,
sc, 2 incomplete hdc, 2sc, 2 incomplete hdc, 2sc,sl st. - R2:
ch 1,sc,sc inc, change color,sc,sc inc,sc, change color,sc inc,sc,sl st. - R3:
ch 1, 2sc,sc inc, change color,sc inc, 2sc,sc inc, change color,sc inc, 2sc,sl st. - R4:
ch 1, 2sc, 2sc inc, change color, 6sc, change color, 2sc inc, 2sc,sl st. - R5:
ch 1, 3sc, 3sc inc, change color,sc,sc inc, 2sc,sc inc,sc, change color, 3sc inc, 3sc,sl st. - R6:
ch 1, 8sc, change color, 3sc,sc inc, 2sc,sc inc, 3sc, change color, 8sc,sl st. - R7-8:
ch 1, 8sc, change color, 12sc, change color, 8sc,sl st. - R9:
ch 1, 7sc, change color, 14sc, change color, 7sc,sl st. - R10:
ch 1, 6sc, change color, 16sc, change color, 6sc,sl st. - R11: Change color.
ch 1, (5sc,sc2tog) 6 times,sl st. - R12:
ch 1, (sc,sc2tog,sc) 6 times,sl st. - R13:
ch 1, (sc,sc2tog) 6 times,sl st,ch 1. - R14:
ch 1, 6sc2tog, stuff with fiberfill,sl st, leave a long tail.
How to crochet the body
- R1:
ch 7, 5scin the 2nd chain from the hook, 3scin 1 stitch, 4sc,sc inc,sl st. - R2:
ch 1,sc inc, 4sc, 3sc inc, 4sc, 2sc inc,sl st. - R3:
ch 1,sc,sc inc, 4sc, (sc inc,sc) 3 times, 4sc, (sc,sc inc) twice,sl st. - R4:
ch 1, 2sc,sc inc, 3sc, (sc,sc inc,sc) 3 times, change color for 6sc, change color forsc,sc inc, 2sc,sc inc,sl st. - R5-7:
ch 1, 19sc, change color for 6sc, change color for 7sc,sl st. - R8:
ch 1, (2sc,sc2tog, 2sc) 3 times,sc, change color for 6sc, change color for 3sc,sc2tog, 2sc,sl st. - R9:
ch 1, (sc2tog, 2sc) 4 times, change color for (sc,sc2tog) twice, change color for 2sc,sc2tog, 2sc,sl st. - R10:
ch 1, 12sc, change color for 4sc, change color for 5sc,sl st. - R11:
ch 1, (5sc,sc2tog) 3 times,sl st. - R12:
ch 1, (2sc,sc2tog, 2sc) 3 times,sl st. Fasten off leaving a long tail and stuff with fiberfill.
How to crochet the hand (make 2)
- R1: Magic ring,
ch 1, 5scin the ring,sl st. - R2-5: Change color,
ch 1, 5sc,sl st. - R6:
ch 1, flatten the piece and work 2scthrough both layers, leave a long tail, fasten off.
How to crochet the foot (make 2)
- R1:
ch 5, 3scin the 2nd chain from the hook, 3scin 1 stitch, 2sc,sc inc,sl st. - R2:
ch 1, 10sc,sl st, leave a long tail, fasten off.
How to crochet the ear (make 2)
ch 4, work 2hdcin the 3rd chain from the hook, leave a long tail, fasten off.
How to crochet the tail
Stuff with fiberfill as you crochet.
- R1: Magic ring, 6
sc,sl st. - R2:
ch 1, 6sc inc,sl st. - R3:
ch 1, (sc,sc inc) 6 times,sl st. - R4-6:
ch 1, 18sc,sl st. - R7:
ch 1, (sc,sc2tog) 6 times,sl st. - R8:
ch 1, 4sc, 4scin BLO, 4sc,sl st. - R9-11:
ch 1, 12sc,sl st. - R12:
ch 1, 4sc, 4scin FLO of R8, 4sc,sl st. - R13:
ch 1,sc2tog, 10sc,sl st. - R14:
ch 1, 11sc,sl st. - R15:
ch 1, 9sc,sc2tog,sl st. - R16:
ch 1, 10sc,sl st. - R17:
ch 1,sc2tog, 8sc,sl st. - R18:
ch 1, 9sc,sl st. - R19:
ch 1, 7sc,sc2tog,sl st. - R20:
ch 1, 8sc,sl st, leave a long tail, fasten off.
Assembly
- Create the eye sockets by pulling between rows 6 and 7 on both sides of the head, then insert the safety eyes.
- Position the ears with stitch markers and sew them onto the head.
- Position the body with stitch markers and sew it to the head.
- Position the arms with stitch markers on both sides of the body and sew them in place.
- Position the legs with stitch markers at the bottom of the body and sew them in place.
- Sew the tail onto the back of the body.
- Using black yarn (2 strands), embroider the squirrel's nose on the head to complete your project.
Tip: before sewing each piece on, view the squirrel from the front and from the side. Small shifts in ear and arm position change the character of a tiny amigurumi.
Optional & Creative Ideas
- Customize colors: swap Brown 55 for a grey or red-brown for a grey squirrel or red squirrel, and keep the cream panel for contrast.
- Make a keychain: sew a small loop of yarn or a keyring to the top of the head or the back of the body for a bag charm.
- Embroidered eyes: for gifts to babies and toddlers, replace the safety eyes with black yarn embroidery between rows 6 and 7.
- Autumn display: pair the squirrel with small crocheted acorns, like those in the cover photo (they are not part of this pattern), or leaves for a seasonal shelf or table scene.
- Scale it up: use a thicker cotton and a larger hook for a bigger squirrel. Stitch counts stay the same, but the pieces will need extra stuffing.
Final Thoughts
This squirrel looks complicated because of the color panels, but each piece is small and quick, and the payoff is a personality-filled little animal. Take your time on the head color changes and the eye placement, and the rest will fall into place.
Patterns and instructions on OpenCrochet are for personal use. Please do not redistribute copies of this content; share the page link instead.