Free Crochet Spider Pattern – Amigurumi Tarantula Tutorial
Make this cute striped tarantula with our free crochet spider pattern. Step-by-step amigurumi tutorial.
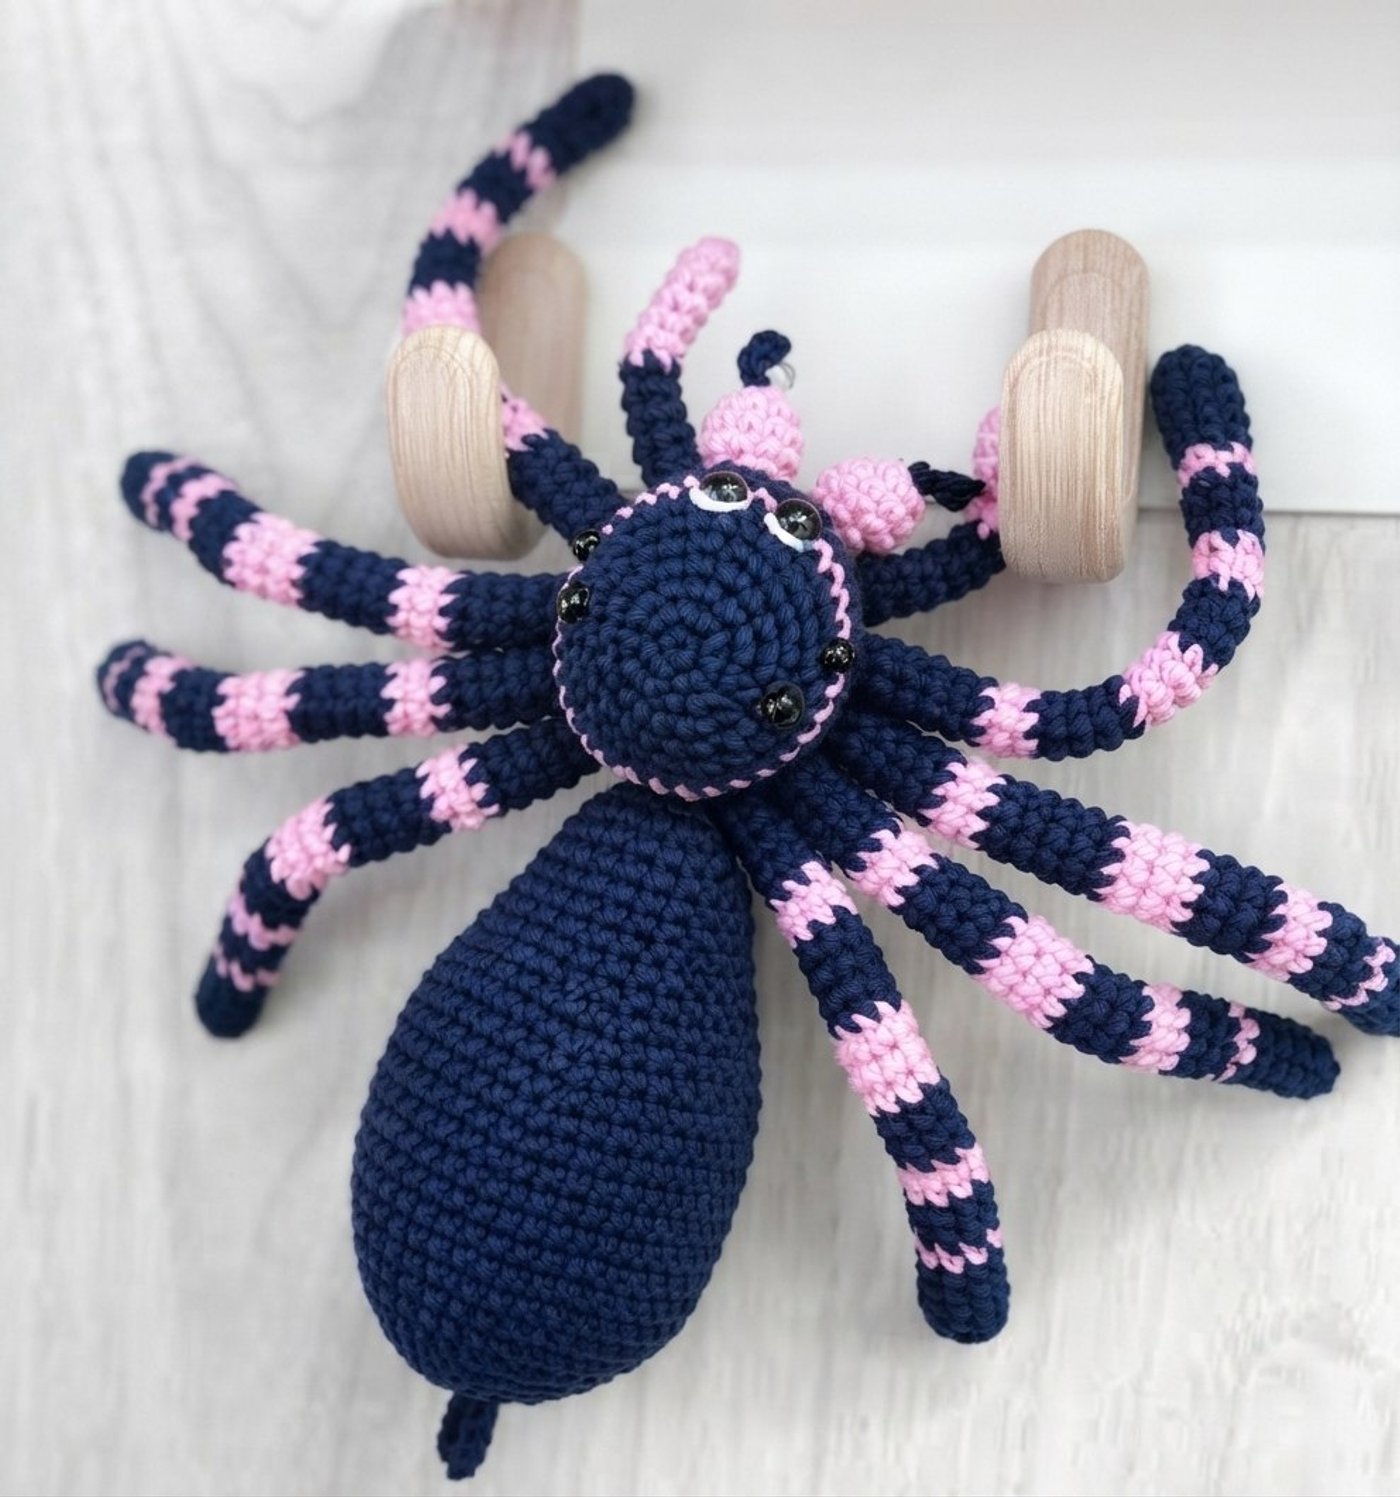
Free crochet spider pattern: make an adorable striped amigurumi tarantula with eight posable legs.
This free crochet spider pattern makes a cuddly navy and pink tarantula that is about 20 cm wide and weighs roughly 65 g. It is worked in rounds with a 3.0mm hook and combed cotton yarn, and the wire-supported legs let you pose it any way you like. The pattern comes with step-by-step photos for every part, so it is a great project if you already know the basics of amigurumi.
Good to know: Every round is joined with a slip stitch and started with ch 1. The ch 1 does not count as a stitch. Stitch counts are given at the end of each round in brackets.
Materials Needed
- Yarn: Loopara 5ply combed cotton in Pink 19, Blue 46 and White 60, plus a little black yarn for the spinnerets
- 3.0mm hook
- Scissors, stitch marker, tweezers and yarn needle
- Fiber fill
- Eyes and position beads
- Molding strips (or craft wire) and pliers
Color Guide
- Main color: Blue 46
- Stripes, chelicarae and pedipalp tips: Pink 19
- Spinnerets: black yarn
Tip: Change colors on the last stitch of the round. Work the final sc of the round until two loops remain on the hook, then pull the new color through and slip stitch to join with the new color.
Step-by-Step Tutorial
How to Crochet the Head (Make 1)
Start with Blue 46.
- R1: MR, ch 1, 5 sc in ring, sl. (5)
- R2: ch 1, sc inc in each st around, sl. (10)
- R3: ch 1, (sc, sc inc) 5 times, sl. (15)
- R4: ch 1, (sc, sc inc, sc) 5 times, sl. (20)
- R5: ch 1, (3 sc, sc inc) 5 times, sl. (25)
- R6: ch 1, (2 sc, sc inc, 2 sc) 5 times, sl. (30)
- R7: ch 1, (5 sc, sc inc) 5 times, change to pink, sl. (35)
- R8: ch 1, 35 sc, change back to main color, sl. (35)
- R9: ch 1, (3 sc, sc inc, 3 sc) 5 times, sl. (40)
- R10-11: ch 1, 40 sc, sl. (40)
- R12: ch 1, (6 sc, sc2tog) 5 times, sl. (35)
- R13: ch 1, (5 sc, sc2tog) 5 times, sl. (30)
- R14: ch 1, (4 sc, sc2tog) 5 times, sl. (25)
- R15: ch 1, (3 sc, sc2tog) 5 times, sl. (20)
- R16: ch 1, (2 sc, sc2tog) 5 times, sl. (15)
Leave a long tail for sewing and set the head aside. Stuff it firmly before closing.
How to Crochet the Abdomen (Make 1)
Work the whole abdomen in Blue 46.
- R1: MR, ch 1, 6 sc in ring, sl. (6)
- R2: ch 1, sc inc in each st around, sl. (12)
- R3: ch 1, (sc, sc inc) 6 times, sl. (18)
- R4: ch 1, (sc, sc inc, sc) 6 times, sl. (24)
- R5: ch 1, (3 sc, sc inc) 6 times, sl. (30)
- R6: ch 1, (2 sc, sc inc, 2 sc) 6 times, sl. (36)
- R7: ch 1, (17 sc, sc inc) 2 times, sl. (38)
- R8: ch 1, (18 sc, sc inc) 2 times, sl. (40)
- R9: ch 1, 40 sc, sl. (40)
- R10: ch 1, (9 sc, sc inc) 4 times, sl. (44)
- R11: ch 1, 44 sc, sl. (44)
- R12: ch 1, (5 sc, sc inc, 5 sc) 4 times, sl. (48)
- R13-14: ch 1, 48 sc, sl. (48)
- R15: ch 1, (10 sc, sc2tog) 4 times, sl. (44)
- R16-17: ch 1, 44 sc, sl. (44)
- R18: ch 1, (9 sc, sc2tog) 4 times, sl. (40)
- R19: ch 1, 40 sc, sl. (40)
- R20: ch 1, (8 sc, sc2tog) 4 times, sl. (36)
- R21: ch 1, (7 sc, sc2tog) 4 times, sl. (32)
- R22: ch 1, (6 sc, sc2tog) 4 times, sl. (28)
- R23: ch 1, 28 sc, sl. (28)
- R24: ch 1, (5 sc, sc2tog) 4 times, sl. (24)
- R25: ch 1, (sc2tog, 10 sc) 2 times, sl. (22)
- R26: ch 1, 22 sc, sl. (22)
- R27: ch 1, (sc2tog, 9 sc) 2 times, sl. (20)
- R28: ch 1, 20 sc, sl. (20)
- R29: ch 1, (2 sc, sc2tog) 5 times, sl. (15)
- R30: ch 1, (sc, sc2tog) 5 times, sl. (10)
Stuff the abdomen firmly, close the small opening and fasten off.
How to Crochet the Legs (Make 8)
Each leg is a narrow striped tube of 8 stitches. Start with Blue 46 and follow the stripe sequence below.
- R1: MR, 6 sc in ring, sl. (6)
- R2: ch 1, (2 sc, sc inc) 2 times, sl. (8)
- R3-6: ch 1, 8 sc, sl. Change to pink on the last sl of R6.
- R7: ch 1, 8 sc in pink, sl. Change to main color on the last sl.
- R8-10: ch 1, 8 sc in blue, sl. Change to pink on the last sl of R10.
- R11-12: ch 1, 8 sc in pink, sl. Change to main color on the last sl of R12.
- R13-15: ch 1, 8 sc in blue, sl. Change to pink on the last sl of R15.
- R16-18: ch 1, 8 sc in pink, sl. Change to main color on the last sl of R18.
- R19-22: ch 1, 8 sc in blue, sl. Change to pink on the last sl of R22.
- R23-24: ch 1, 8 sc in pink, sl. Change to main color on the last sl of R24.
- R25-29: ch 1, 8 sc in blue, sl. (8)
Fasten off, leaving a long tail for sewing. Repeat to make 8 legs in total.
How to Crochet the Chelicarae (Make 2)
Work in Pink 19.
- R1: MR, ch 1, 5 sc, sl. (5)
- R2: ch 1, sc inc in each st around, sl. (10)
- R3-4: ch 1, 10 sc, sl. (10)
Fasten off with a long tail and stuff lightly.
How to Crochet the Fangs (Make 2)
- With Blue 46, ch 4. Leave a long tail so you can sew the fang onto the chelicara.
How to Crochet the Pedipalps (Make 2)
- R1-6: in pink, ch 1, 6 sc, sl. (6)
- R7-11: change to main color (blue), ch 1, 6 sc, sl. (6)
Fasten off with a long tail for sewing.
How to Crochet the Spinnerets (Make 2)
- With black yarn, ch 6, then work 5 sl starting in the 2nd ch from the hook.
Assembly
- Prepare all parts. Lay out the head, abdomen, 8 legs, 2 chelicarae, 2 fangs, 2 pedipalps and 2 spinnerets. Once assembled, the main body should weigh about 65.2 g and measure about 20 cm wide.
- Stuff the head and abdomen with fiber fill. Stuff firmly so the shapes hold well.
- Close the head opening and sew the head to the abdomen. Secure the threads and trim them close to the seam.
- Attach the chelicarae and fangs. Insert a fang into each chelicara, secure it, and sew the chelicara to the front of the head. Repeat for the second one.
- Attach the pedipalps. Insert a piece of wire support into each pedipalp, find the correct position on the head (use position beads or pins to test) and sew on firmly.
- Attach the legs. Insert wire support into a leg, find its position on the sides of the head and secure it firmly.
- Repeat for the remaining legs, four on each side, keeping the spacing even.
- Attach the spinnerets to the end of the abdomen with a few stitches.
- Assemble the eyes. Sew on the white parts of the eyes.
- Finish the face. Use a small amount of glue to secure the eye pupils to the head. Adjust the leg positions and your spider is complete!
Safety note: If the spider is for a small child, skip the eyes with backs and wire and embroider the eyes instead, and use only soft stuffing inside the legs.
Finished Size
Approximately 20 cm wide with the 3.0mm hook and Loopara 5ply combed cotton. Using thicker yarn and a bigger hook will give you a bigger spider.
Happy crocheting! If you love this free crochet spider pattern, save it for Halloween and share your finished spider with us.
Optional & Creative Ideas
- Customize Your Colors: Swap the navy and pink for classic black and orange for Halloween, or try green and yellow for a jungle-inspired tarantula.
- Make a Mini Spider: Use thinner yarn and a smaller hook to make a keychain-sized spider, and skip the wire in the legs.
- Try a Fuzzy Look: Work the body in a soft, fluffy yarn for a furry tarantula feel.
- Turn It Into a Decoration: Hang your spider from a thread for a Halloween garland, or perch it on a shelf or a door frame for a fun surprise.
- Add Extra Details: Embroider a small pattern on the abdomen or add extra rows of stripes to the legs.
Final Thoughts
This free crochet spider pattern is a fun way to practice color changes, small shaping and wire-supported assembly, and the finished tarantula is charming rather than creepy. Take your time positioning the legs and pedipalps, and enjoy posing your new eight-legged friend.
Patterns and instructions on OpenCrochet are for personal use. Please do not redistribute copies of this content; share the page link instead.