Free Little Pink Bear Crochet Keychain Pattern with Heart
Free little pink bear crochet keychain pattern. Make this cute amigurumi bear hugging a heart. Step-by-step, beginner-friendly guide.
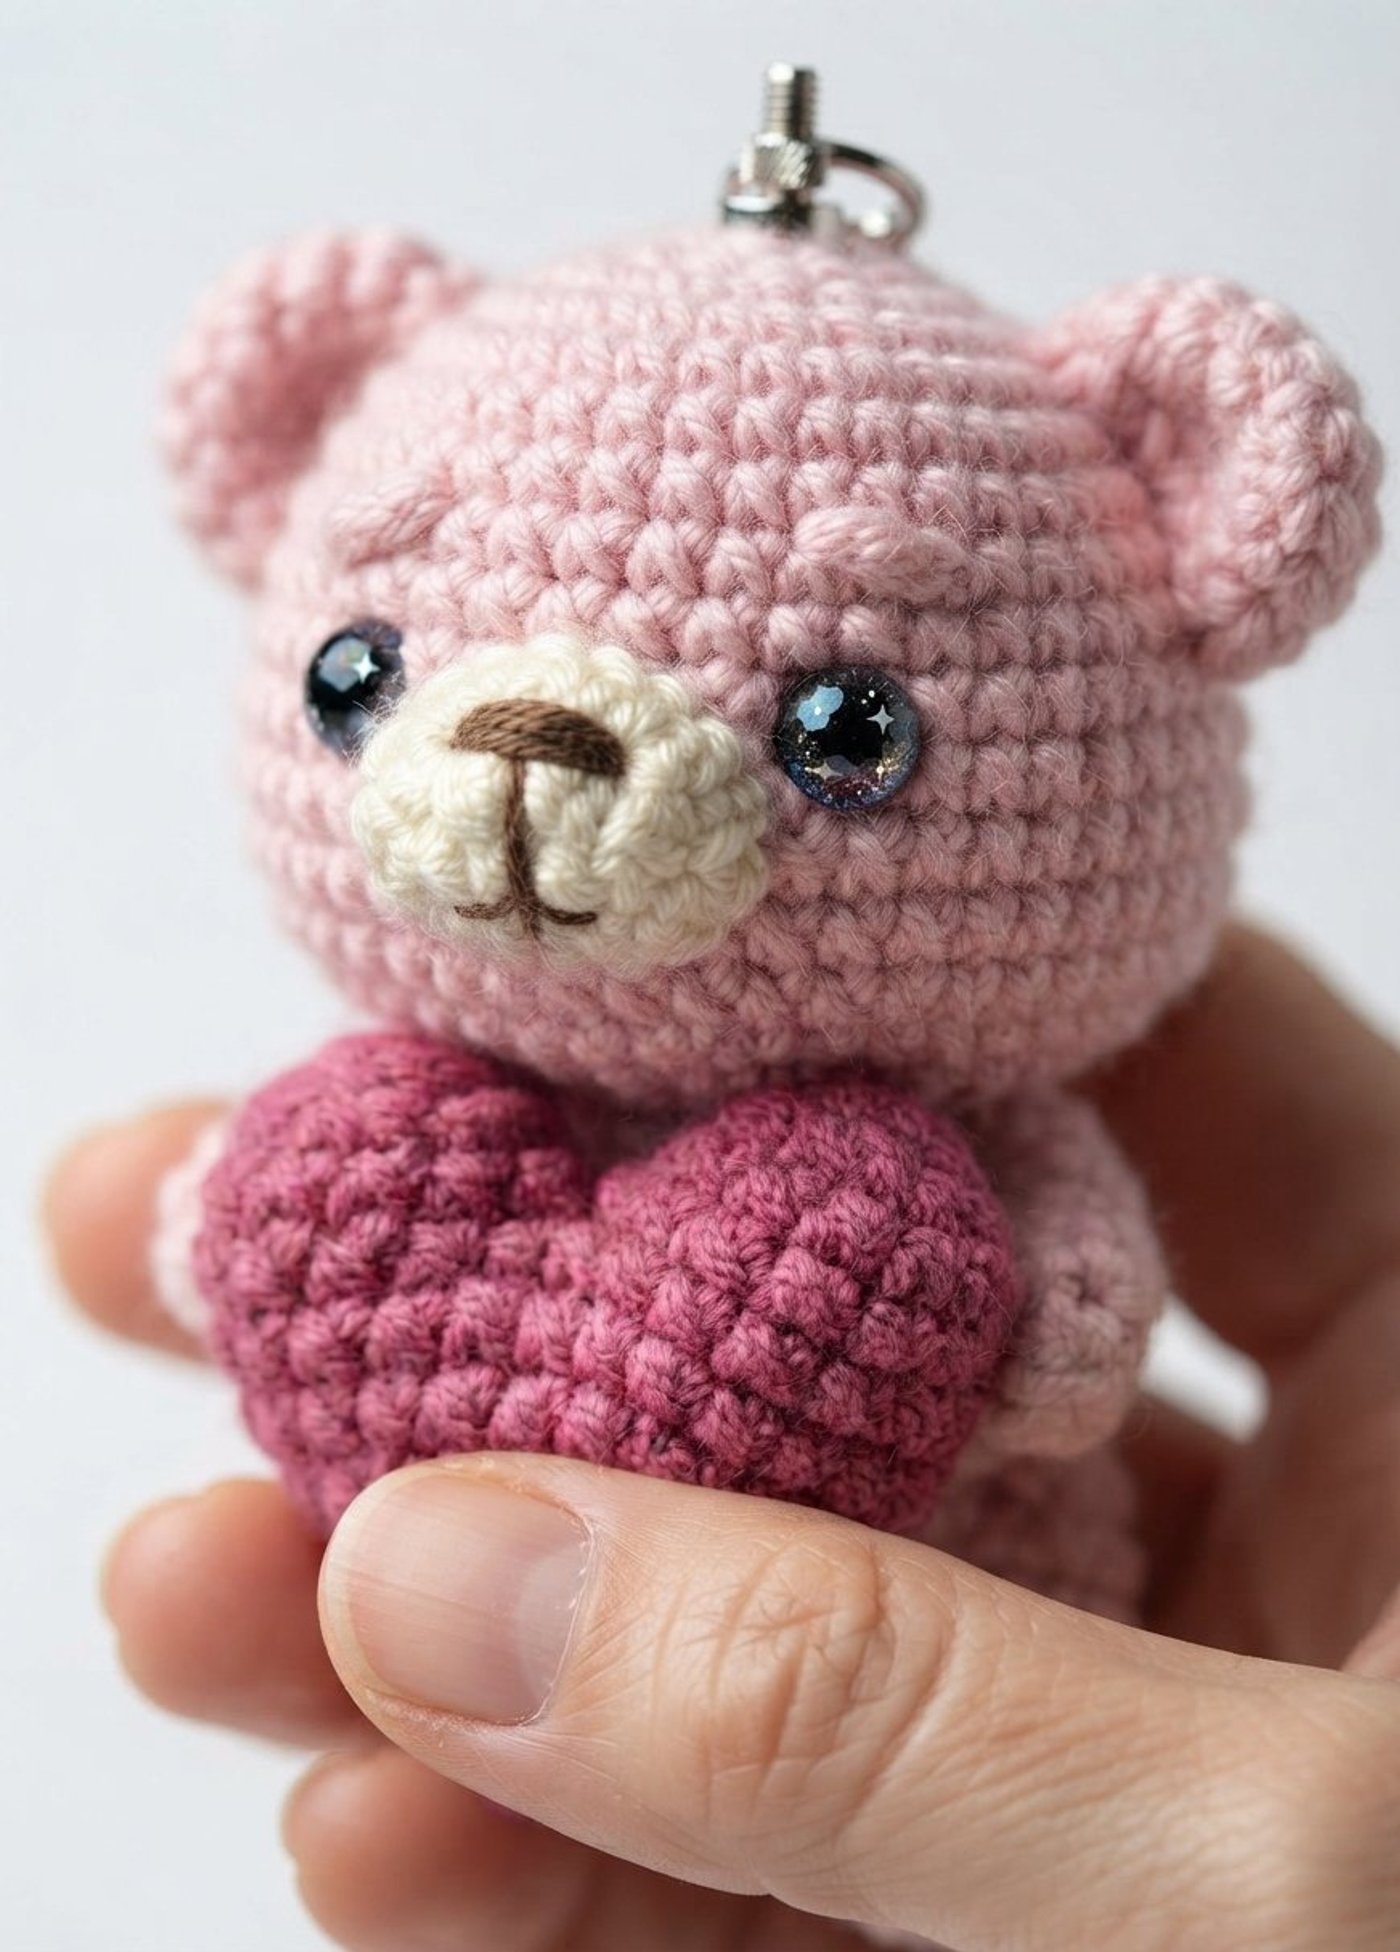
Make a tiny, huggable bear with this free crochet keychain pattern, worked in the round with a 2.2mm hook.
This little pink bear is worked in amigurumi style with soft 4 ply Milkcotton yarn. He has a cream muzzle, black safety eyes, and an electric pink heart to hold. It makes a sweet gift for Valentine's Day, birthdays, or anyone who loves handmade keepsakes.
Good to know: All pieces are worked in continuous rounds (spiral) unless stated otherwise. Use a stitch marker to mark the first stitch of each round and move it up as you go. Stuff firmly as you work, using small amounts of fiberfill.
Finished Size
The bear is palm-sized, roughly 3 to 3.5 inches (8 to 9 cm) tall. Exact size depends on your yarn and tension.
Head
Work with pink yarn and a 2.2mm hook.
- Rnd 1: sc 6 into MR. (6)
- Rnd 2: inc x6. (12)
- Rnd 3: (sc 1, inc) x6. (18)
- Rnd 4: sc 1, inc, (sc 2, inc) x5, sc 1. (24)
- Rnd 5: (sc 3, inc) x6. (30)
- Rnd 6-7: sc 30. (30)
- Rnd 8: sc 3, (sc 2, inc) x3, sc 6, (sc 2, inc) x3, sc 3. (36)
- Rnd 9: sc 36. (36)
- Rnd 10: sc 3, (sc 2, inc) x4, sc 6, (sc 2, inc) x4, sc 3. (44)
- Rnd 11-14: sc 44. (44)
- Rnd 15: sc 3, (sc 2, dec) x4, sc 6, (sc 2, dec) x4, sc 3. (36)
Safety eyes: Insert the 5mm safety eyes between Rnd 10 and Rnd 11, with 7 stitches between them. Secure the backs before you keep stuffing.
- Rnd 16: sc 2, dec, (sc 4, dec) x5, sc 2. (30)
- Rnd 17: (sc 3, dec) x6. (24)
- Rnd 18: in BLO, sc 1, dec, (sc 2, dec) x5, sc 1. (18)
Stuff the head firmly now. You will crochet the body from the front loops left on Rnd 18, so keep the head open a little longer if you need more room to stuff.
- Rnd 19: (sc 1, dec) x6. (12)
- Rnd 20: dec x6. (6)
Cut the yarn and close the gap.
Body
Work with pink yarn.
- Rnd 1: join to the FLO sts at Rnd 18 of the head with a standing sc, sc 24. (24)
- Rnd 2-4: sc 24. (24)
- Rnd 5: (sc 3, inc) x6. (30)
- Rnd 6: sc 30. (30)
- Rnd 7: (sc 3, dec) x6. (24)
- Rnd 8: sc 1, dec, (sc 2, dec) x5, sc 1. (18)
- Rnd 9: (sc 1, dec) x6. (12)
- Rnd 10: dec x6. (6)
Stuff the body, cut the yarn, and close the gap.
Arms (make two)
Work with pink yarn.
- Rnd 1: sc 6 into MR. (6)
- Rnd 2-5: sc 6. (6)
- Rnd 6: sl st 3, sc 3. (6)
Cut the yarn and make an INV BO. Arms are lightly stuffed or left unstuffed.
Legs (make two)
Work with pink yarn.
- Rnd 1: sc 6 into MR. (6)
- Rnd 2: inc x6. (12)
- Rnd 3: sc 4, dec x2, sc 4. (10)
- Rnd 4: sc 10. (10)
- Rnd 5: sc 4, dec, sc 4. (9)
- Rnd 6: (sc 1, dec) x3. (6)
Stuff lightly, cut the yarn, and close the gap.
Muzzle
Work with cream white yarn.
- Rnd 1: sc in the second st from hook, dc 2, sc 1, sc 3 in the last st. On the other side of the chain, sc 3, inc. (12)
- Rnd 2: sc 12. (12)
Cut the yarn and make an INV BO.
Tip: The original pattern does not state the starting chain. A ch 6 gives the stitch counts above and totals 12 stitches.
Ears (make two)
Note: The original pattern mentions ears in the assembly but does not give instructions. This is a simple suggested ear that suits the small head.
Work with pink yarn.
- Rnd 1: sc 6 into MR. (6)
- Rnd 2: inc x6. (12)
- Rnd 3: sc 12. (12)
Cut the yarn, leaving a long tail for sewing. Do not stuff. Flatten the ear before sewing.
Eyebrows (make two)
With pink yarn, ch 3. (3)
Cut the yarn and leave a long tail for sewing.
Love (Heart)
Work with electric pink yarn.
Part 1
- Rnd 1: sc 6 into MR. (6)
- Rnd 2: inc x6. (12)
- Rnd 3: sc 12. (12)
Cut the yarn and make an INV BO.
Part 2
Repeat Rnd 1 to Rnd 3 for Part 2, but do not cut the yarn.
Joining the Two Parts
- Rnd 4: connect the two parts together. Join to Part 1 and sc 12 to Part 2. (24)
- Rnd 5-6: sc 24. (24)
Stuff as you go.
- Rnd 7: (sc 2, dec) x6. (18)
- Rnd 8: sc 18. (18)
- Rnd 9: (sc 1, dec) x6. (12)
- Rnd 10: dec x6. (6)
Close the gap and weave in the tail.
Assembly
- Sew the muzzle at Rnd 9-12 of the head, between both eyes.
- Embroider the nose on the muzzle with dark brown thread.
- Sew the ears to the top sides of the head between Rnd 6-10.
- Sew the eyebrows 2 stitches above the eyes.
- Sew both legs to the sides of the body between Rnd 7-8.
- Sew both arms to the sides of the body between the FLO stitches and Rnd 1.
- Sew the heart to the front of the body, between the arms, so the bear looks like he is hugging it.
- Attach a keychain clasp with a small loop of yarn at the top of the head (optional).
Helpful Tips
- Use a 2.2mm hook and keep your tension tight so the stuffing does not show through.
- Insert the safety eyes before you close the head, and check the placement before securing the backs.
- Stuff firmly but evenly for a smooth, round head.
- Use pins to hold the muzzle, ears, and limbs in place before sewing.
Optional & Creative Ideas
- Customize Your Colors: Try a blue, lilac, or mint bear, or use classic brown yarn for a teddy look. Keep the heart in a contrasting color so it stands out.
- Turn It Into a Gift Set: Make a few in different colors and give them as party favors, Valentine's Day gifts, or wedding favors.
- Add a Bag Charm or Ornament: Swap the keychain clasp for a ribbon loop to hang the bear on a bag zipper, backpack, or Christmas tree.
- Personalize the Heart: Embroider a tiny initial on the heart, or make it a different color for each recipient.
- Make a Bigger Version: Use thicker yarn, a larger hook, and bigger safety eyes for a cuddly amigurumi bear. Keep the same stitch counts.
- Add Accessories: Crochet a tiny bow, scarf, or flower crown for extra charm.
Final Thoughts
This little pink bear is a quick, rewarding project that works up small but has a lot of personality. Once you've made one, you'll want to make a whole bunch in every color. Happy crocheting!
Patterns and instructions on OpenCrochet are for personal use. Please do not redistribute copies of this content; share the page link instead.