

Purple Dragon Amigurumi Crochet Pattern with Wings & Belly
Crochet a sitting purple dragon amigurumi with wings, a striped belly, spikes and toenails. Cotton sport-weight pattern with full rounds.
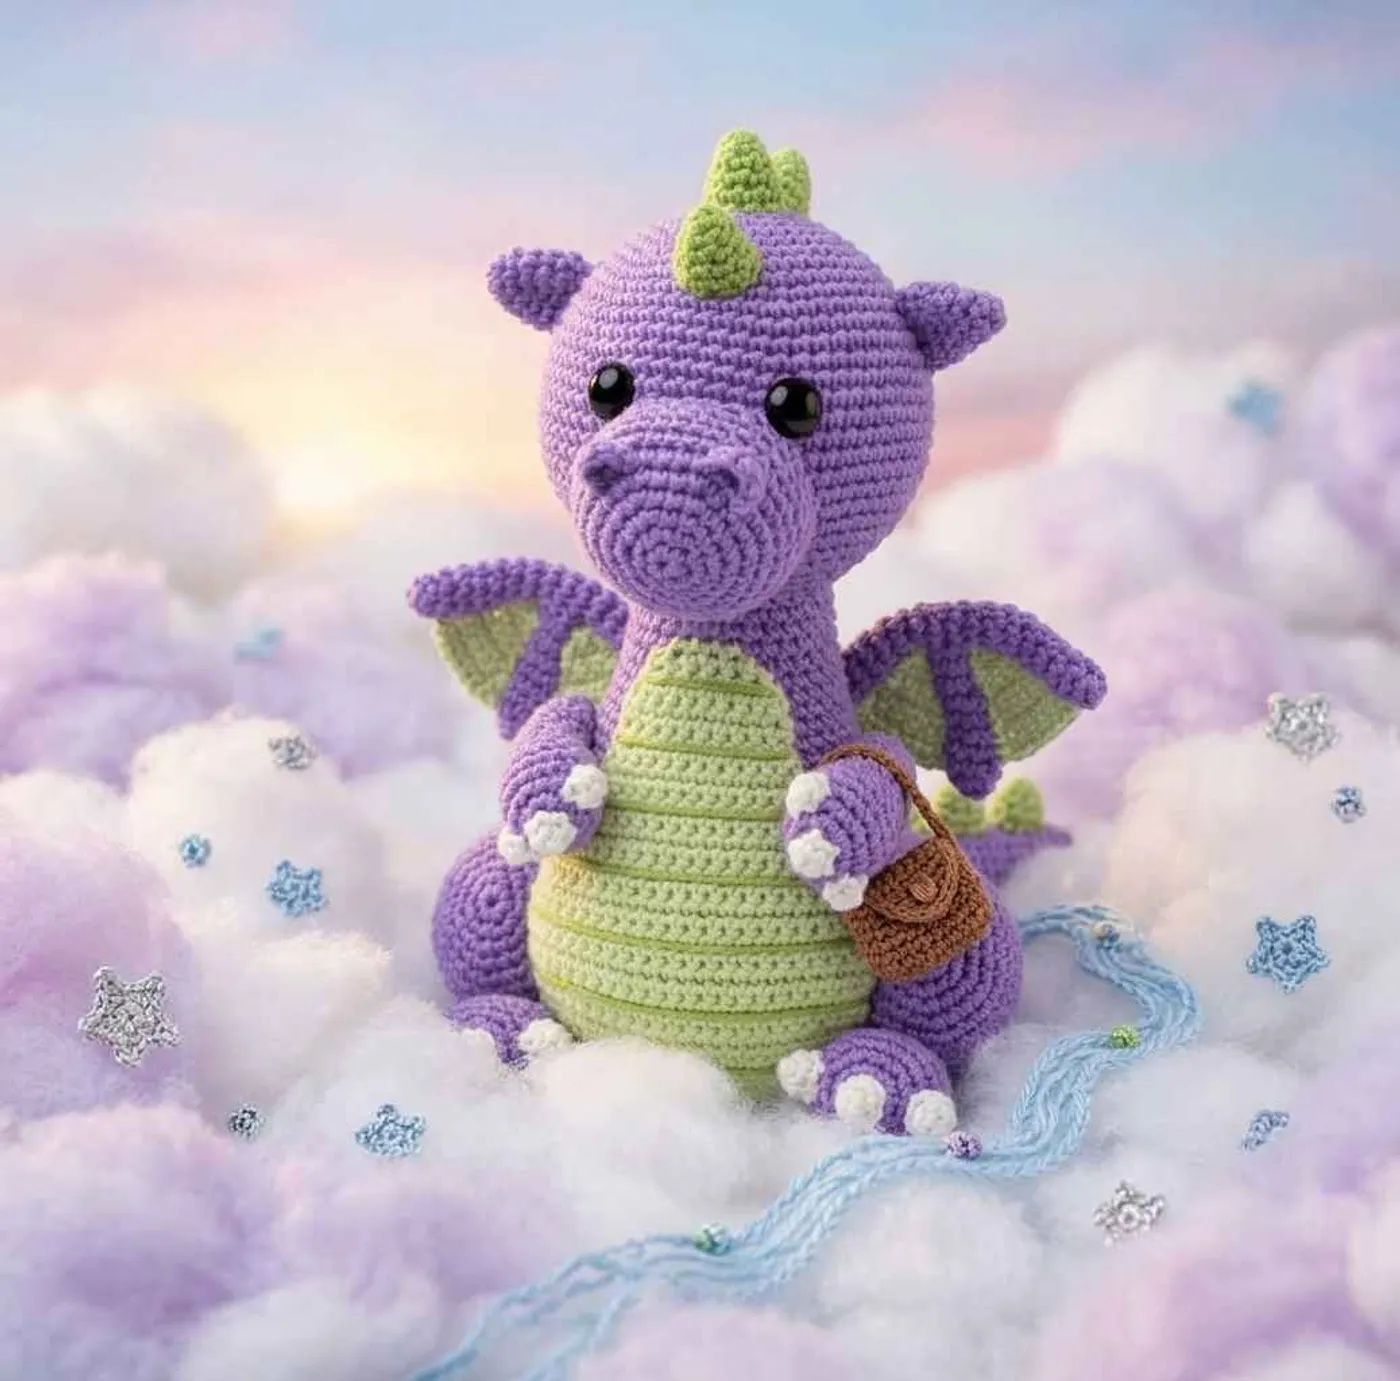
This is a sitting purple dragon that is built in separate pieces and sewn together: a big round head, a pear-shaped body, a rounded snout with two little nostrils, ears, a flat light green belly with embroidered stripes, a long tail, chubby haunches, legs, arms, wings and a row of green spikes.
5 mm hook and is about 20 cm (8 inches) tall. Its friendly look comes from the large 12 mm safety eyes, the snout that sits right under them and the white toenails on its feet and hands.
It suits crocheters who already know the magic ring, increases and decreases and are happy to sew on many small parts, since there are about 44 pieces in total, most of them small.
Plan your sewing order and use pins before stitching anything permanently, because each piece has a round range given for where it goes. The yarn and quantities below come from the original pattern, and all stuffing is polyester fiberfill.
Finished size
With the original cotton sport-weight yarn and a 2.5 mm hook the dragon is about 20 cm (8 inches) tall. A thicker yarn and bigger hook will make it larger, and thinner yarn will make it smaller, but you will need to scale the eye size and keep the placement rounds in mind.
Yarn substitution
- Purple (main color): about 140 g of cotton sport-weight yarn. Cotton gives crisp stitches and holds the shape well.
- Green and light green: about 30 g and 15 g. Light green is used for the belly, and green for the spikes, wing webs and the belly stripes.
- White: about 6 g for the toenails.
- Hook: 2.5 mm. Crochet tightly so the filling does not show through the stitches.
- Different yarn: if you change yarn weight, check that the round ranges for sewing on the pieces still look right on your finished head and body.
Common mistakes
- Placing the eyes late: insert the 12 mm safety eyes between rounds 16 and 17 of the head, 9 stitches apart, before you stuff the head. The top of the snout should touch the eyes.
- Overstuffing the legs and haunches: the pattern asks for light stuffing on both so they sit nicely against the body.
- Forgetting the neck: add extra filling to the neck before you close the seam between body and head.
- Sewing the belly before the stripes: the belly is sewn to the body between rounds 3 and 36, and the eight green stripes are embroidered on it, about 4 rows apart.
- Mixing up the spike sizes: there are 7 big, 2 medium and 2 small spikes. The big ones go on the head, body and tail, the medium ones on the tail and the small ones at the tail tip.
- Stuffing the ears: the ears are not stuffed. Flatten them before sewing.
Pattern notes
- Work in continuous rounds, except for the nostrils, belly and wing webs, which are worked in rows.
- Leave a long tail on every piece for sewing.
- Where a piece ends with a slip stitch, work sl st in the next stitch before fastening off.
Head (purple)
- Rnd 1:
6 scin a magic ring (6) - Rnd 2:
incin all 6 st (12) - Rnd 3: (
sc,inc) x6 (18) - Rnd 4: (
2 sc,inc) x6 (24) - Rnd 5: (
3 sc,inc) x6 (30) - Rnd 6: (
4 sc,inc) x6 (36) - Rnd 7: (
5 sc,inc) x6 (42) - Rnd 8: (
6 sc,inc) x6 (48) - Rnd 9-10:
scin all 48 st (48) - Rnd 11: (
7 sc,inc) x6 (54) - Rnd 12-13:
scin all 54 st (54) - Rnd 14: (
8 sc,inc) x6 (60) - Rnd 15-22:
scin all 60 st (60)
Insert the safety eyes between rounds 16 and 17, with 9 stitches between them.
- Rnd 23: (
8 sc,dec) x6 (54) - Rnd 24:
scin all 54 st (54) - Rnd 25: (
7 sc,dec) x6 (48) - Rnd 26: (
6 sc,dec) x6 (42) - Rnd 27: (
5 sc,dec) x6 (36)
Stuff the head with fiberfill and keep stuffing as you go.
- Rnd 28: (
4 sc,dec) x6 (30) - Rnd 29: (
3 sc,dec) x6 (24) - Rnd 30: (
2 sc,dec) x6 (18) - Rnd 31: (
sc,dec) x6 (12) - Rnd 32:
decx6 (6)
Fasten off, leaving a long tail. Weave the tail through the front loop of each remaining stitch, pull tight to close and weave in the end.
Body (purple)
- Rnd 1:
8 scin a magic ring (8) - Rnd 2:
incin all 8 st (16) - Rnd 3: (
sc,inc) x8 (24) - Rnd 4: (
2 sc,inc) x8 (32) - Rnd 5: (
3 sc,inc) x8 (40) - Rnd 6: (
4 sc,inc) x8 (48) - Rnd 7:
scin all 48 st (48) - Rnd 8: (
5 sc,inc) x8 (56) - Rnd 9-11:
scin all 56 st (56) - Rnd 12: (
6 sc,inc) x8 (64) - Rnd 13-19:
scin all 64 st (64) - Rnd 20: (
14 sc,dec) x4 (60) - Rnd 21:
scin all 60 st (60) - Rnd 22: (
8 sc,dec) x6 (54) - Rnd 23: (
7 sc,dec) x6 (48) - Rnd 24:
scin all 48 st (48) - Rnd 25: (
6 sc,dec) x6 (42) - Rnd 26:
scin all 42 st (42) - Rnd 27: (
5 sc,dec) x6 (36) - Rnd 28-30:
scin all 36 st (36) - Rnd 31: (
4 sc,dec) x6 (30) - Rnd 32-37:
scin all 30 st (30)
sl st in the next st and fasten off, leaving a long tail. Stuff the body with fiberfill and sew it between rounds 28 and 29 of the head. Add more fiberfill to the neck before closing the seam.
Snout (purple)
- Rnd 1:
6 scin a magic ring (6) - Rnd 2:
incin all 6 st (12) - Rnd 3: (
sc,inc) x6 (18) - Rnd 4: (
2 sc,inc) x6 (24) - Rnd 5: (
3 sc,inc) x6 (30) - Rnd 6: (
4 sc,inc) x6 (36) - Rnd 7-9:
scin all 36 st (36) - Rnd 10: (
4 sc,dec) x6 (30)
sl st in the next st and fasten off, leaving a long tail. Stuff the snout and sew it between rounds 16 and 27 of the head. The top of the snout should touch the safety eyes.
Nostrils (make 2, purple)
Work in rows.
- Row 1:
3 scin a magic ring,ch 1, turn (3) - Row 2:
incin all 3 st (6)
Fasten off, leaving a long tail. Bend the nostrils slightly and sew them to round 6 of the snout.
Ears (make 2, purple)
- Rnd 1:
4 scin a magic ring (4) - Rnd 2: (
sc,inc) x2 (6) - Rnd 3: (
2 sc,inc) x2 (8) - Rnd 4: (
3 sc,inc) x2 (10) - Rnd 5: (
4 sc,inc) x2 (12) - Rnd 6:
scin all 12 st (12)
sl st in the next st and fasten off, leaving a long tail. Do not stuff. Flatten the ears and sew them between rounds 10 and 16 of the head.
Belly (light green)
Work in rows. Start with ch 7.
- Row 1: start in the 2nd ch from the hook,
scin next 6 ch,ch 1, turn (6) - Row 2:
inc,scin next 4 st,inc,ch 1, turn (8) - Row 3:
inc,scin next 6 st,inc,ch 1, turn (10) - Row 4-5:
scin all 10 st,ch 1, turn (10) - Row 6:
inc,scin next 8 st,inc,ch 1, turn (12) - Row 7:
scin all 12 st,ch 1, turn (12) - Row 8:
inc,scin next 10 st,inc,ch 1, turn (14) - Row 9:
scin all 14 st,ch 1, turn (14) - Row 10:
inc,scin next 12 st,inc,ch 1, turn (16) - Row 11:
scin all 16 st,ch 1, turn (16) - Row 12:
inc,scin next 14 st,inc,ch 1, turn (18) - Row 13:
inc,scin next 16 st,inc,ch 1, turn (20) - Row 14:
scin all 20 st,ch 1, turn (20) - Row 15:
inc,scin next 18 st,inc,ch 1, turn (22) - Row 16-18:
scin all 22 st,ch 1, turn (22) - Row 19:
inc,scin next 20 st,inc,ch 1, turn (24) - Row 20-25:
scin all 24 st,ch 1, turn (24) - Row 26:
dec,scin next 20 st,dec,ch 1, turn (22) - Row 27:
dec,scin next 18 st,dec,ch 1, turn (20) - Row 28:
dec,scin next 16 st,dec,ch 1, turn (18) - Row 29:
dec,scin next 14 st,dec,ch 1, turn (16) - Row 30:
dec,scin next 12 st,dec,ch 1, turn (14) - Row 31:
dec,scin next 10 st,dec,ch 1, turn (12) - Row 32:
dec,scin next 8 st,dec,ch 1, turn (10) - Row 33: skip the first st,
dec,scin next 4 st,dec,sl stin next st (7)
Fasten off, leaving a long tail. Sew the belly to the body between rounds 3 and 36. Use green yarn to embroider eight horizontal stripes on the belly, with about 4 rows between them.
Tail (purple)
- Rnd 1:
6 scin a magic ring (6) - Rnd 2:
incin all 6 st (12) - Rnd 3-4:
scin all 12 st (12) - Rnd 5: (
3 sc,inc) x3 (15) - Rnd 6-8:
scin all 15 st (15) - Rnd 9: (
4 sc,inc) x3 (18) - Rnd 10-13:
scin all 18 st (18) - Rnd 14: (
5 sc,inc) x3 (21) - Rnd 15-20:
scin all 21 st (21) - Rnd 21: (
6 sc,inc) x3 (24) - Rnd 22-26:
scin all 24 st (24) - Rnd 27: (
7 sc,inc) x3 (27) - Rnd 28-32:
scin all 27 st (27) - Rnd 33: (
8 sc,inc) x3 (30) - Rnd 34-35:
scin all 30 st (30) - Rnd 36: (
4 sc,inc) x6 (36) - Rnd 37-38:
scin all 36 st (36) - Rnd 39: (
5 sc,inc) x6 (42) - Rnd 40:
scin all 42 st (42) - Rnd 41: (
6 sc,inc) x6 (48) - Rnd 42:
scin all 48 st (48)
sl st in the next st and fasten off, leaving a long tail. Stuff the tail with fiberfill and sew it to the back of the body between rounds 5 and 23.
Haunches (make 2, purple)
- Rnd 1:
6 scin a magic ring (6) - Rnd 2:
incin all 6 st (12) - Rnd 3: (
sc,inc) x6 (18) - Rnd 4: (
2 sc,inc) x6 (24) - Rnd 5: (
3 sc,inc) x6 (30) - Rnd 6: (
4 sc,inc) x6 (36) - Rnd 7-12:
scin all 36 st (36)
Stuff the haunch lightly and keep stuffing as you go. Be careful not to overstuff.
- Rnd 13: (
4 sc,dec) x6 (30) - Rnd 14: (
3 sc,dec) x6 (24) - Rnd 15:
scin all 24 st (24) - Rnd 16: (
2 sc,dec) x6 (18) - Rnd 17:
scin all 18 st (18) - Rnd 18: (
sc,dec) x6 (12) - Rnd 19:
decx6 (6)
Fasten off, leaving a long tail. Weave the tail through the front loop of each remaining stitch and pull tight to close. Leave a long tail for sewing. Flatten the haunch a bit and sew the haunches on both sides of the body, between rounds 9 and 21.
Legs (make 2, purple)
- Rnd 1:
6 scin a magic ring (6) - Rnd 2:
incin all 6 st (12) - Rnd 3: (
sc,inc) x6 (18) - Rnd 4: (
2 sc,inc) x6 (24) - Rnd 5-8:
scin all 24 st (24)
Stuff the leg lightly and keep stuffing as you go. Do not overstuff.
- Rnd 9: (
2 sc,dec) x6 (18) - Rnd 10: (
sc,dec) x6 (12) - Rnd 11-13:
scin all 12 st (12) - Rnd 14:
decx6 (6)
Fasten off, leaving a long tail. Weave the tail through the front loop of each remaining stitch and pull tight to close. Leave a long tail for sewing.
Toenails for the legs (make 6, white)
- Rnd 1:
4 scin a magic ring (4) - Rnd 2: (
sc,inc) x2 (6)
sl st in the next st and fasten off, leaving a long tail. Sew one nail over round 1 of the leg. Sew the other two nails on both sides of the first one, over rounds 4 and 5. Sew the legs to the haunches.
Arms (make 2, purple)
- Rnd 1:
6 scin a magic ring (6) - Rnd 2:
incin all 6 st (12) - Rnd 3: (
sc,inc) x6 (18) - Rnd 4-6:
scin all 18 st (18)
Stuff the arm with fiberfill and keep stuffing as you go.
- Rnd 7: (
sc,dec) x6 (12) - Rnd 8-13:
scin all 12 st (12) - Rnd 14:
decx6 (6)
Fasten off, leaving a long tail. Weave the tail through the front loop of each remaining stitch and pull tight to close. Leave a long tail for sewing.
Nails for the arms (make 6, white)
- Rnd 1:
5 scin a magic ring (5)
sl st in the next st and fasten off, leaving a long tail. Sew one nail over round 1 of the arm. Sew the other two on both sides of the first one, over rounds 3 and 4. Sew the arms to the body between rounds 26 and 29. Sew the inside of the arms to the body and the belly with a few stitches.
Big spikes (make 7, green)
- Rnd 1:
4 scin a magic ring (4) - Rnd 2: (
sc,inc) x2 (6) - Rnd 3: (
2 sc,inc) x2 (8) - Rnd 4: (
3 sc,inc) x2 (10) - Rnd 5:
scin all 10 st (10)
Fasten off, leaving a long tail. Stuff the spikes lightly and sew them on:
- One spike over rounds 1-2 of the head.
- Two spikes over rounds 6-11 of the head (one at the front, one at the back).
- One spike over rounds 14-19 at the back of the head.
- One spike over rounds 22-27 at the back of the head.
- One spike on the body over rounds 26-32.
- One spike on the tail over rounds 38-42.
Medium spikes (make 2, green)
- Rnd 1:
4 scin a magic ring (4) - Rnd 2: (
sc,inc) x2 (6) - Rnd 3: (
2 sc,inc) x2 (8) - Rnd 4:
scin all 8 st (8)
Fasten off, leaving a long tail. Stuff lightly. Sew one spike over rounds 20-25 of the tail and one over rounds 28-32 of the tail.
Small spikes (make 2, green)
- Rnd 1:
4 scin a magic ring (4) - Rnd 2: (
sc,inc) x2 (6) - Rnd 3:
scin all 6 st (6)
Fasten off, leaving a long tail. Stuff lightly. Sew one spike over rounds 4-9 of the tail and one over rounds 13-18 of the tail.
Wings (make 2)
Long branch (purple):
- Rnd 1:
4 scin a magic ring (4) - Rnd 2: (
sc,inc) x2 (6) - Rnd 3-20:
scin all 6 st (6)
Stuff lightly and fasten off, leaving a long tail for sewing.
Short branch (purple):
- Rnd 1:
4 scin a magic ring (4) - Rnd 2: (
sc,inc) x2 (6) - Rnd 3-8:
scin all 6 st (6)
Stuff lightly and fasten off, leaving a long tail for sewing. Sew the short branch to round 11 of the long branch.
Wing web (green): work in rows. Start with ch 2.
- Row 1: start in the 2nd ch from the hook,
incin this ch,ch 1, turn (2) - Row 2:
incin next st,scin next st,ch 1, turn (3) - Row 3:
scin all 3 st,ch 1, turn (3) - Row 4:
inc,sc,inc,ch 1, turn (5) - Row 5-6:
scin all 5 st,ch 1, turn (5) - Row 7:
inc,scin next 3 st,inc(7)
Fasten off, leaving a long tail. Sew the triangular wing webs between the wing branches. Sew the wings to the back of the body between rounds 28-35, with 6 stitches between the two wings.
Tip: pin every piece in place and check the dragon from the front and sides before you sew anything permanently.
FAQ
What size are the safety eyes and where do they go?
The pattern uses 12 mm safety eyes placed between rounds 16 and 17 of the head, with 9 stitches between them. Fix them before stuffing the head. If the toy is for a very young child, embroider the eyes instead.
How do I stuff the pieces?
Stuff the head, body, snout, tail and arms firmly enough to hold their shape. Stuff the haunches and legs lightly and avoid overstuffing them. Do not stuff the ears. The spikes and wing branches get light stuffing.
How many spikes does the dragon need?
There are 11 spikes: 7 big ones on the head, body and tail, 2 medium ones on the tail and 2 small ones at the tip of the tail.
Can I use a different yarn?
Yes, but the original is written for cotton sport weight with a 2.5 mm hook. A different weight changes the finished size, so check the sewing round ranges on your own pieces.
How do the wings go together?
Each wing has a long purple branch, a short purple branch sewn to round 11 of the long one, and a green triangular web sewn between the two branches.
Optional & Creative Ideas
- Customize colors: make a dragon in blue, red or pink, and pick a contrasting color for the belly, spikes and wing webs.
- Mini dragon: use thinner yarn and a smaller hook for a smaller version, with smaller eyes to match.
- Fewer spikes: skip the small and medium tail spikes for a quicker, simpler tail.
- Safer face: embroider the eyes and nostrils if you are making it for a young child.
- Gift set: make a few dragons in different color combinations to give as a matching set.
Final Thoughts
This dragon takes time because of its many pieces, but each one is simple, and careful pinning before sewing is what gives it its upright, cheerful pose.
Patterns and instructions on OpenCrochet are for personal use. Please do not redistribute copies of this content; share the page link instead.


