Penguin Crochet Pattern with Knitted Hat and Scarf
Crochet a amigurumi penguin with a sleepy face, then dress it in a knitted hat and scarf or crochet headphones.
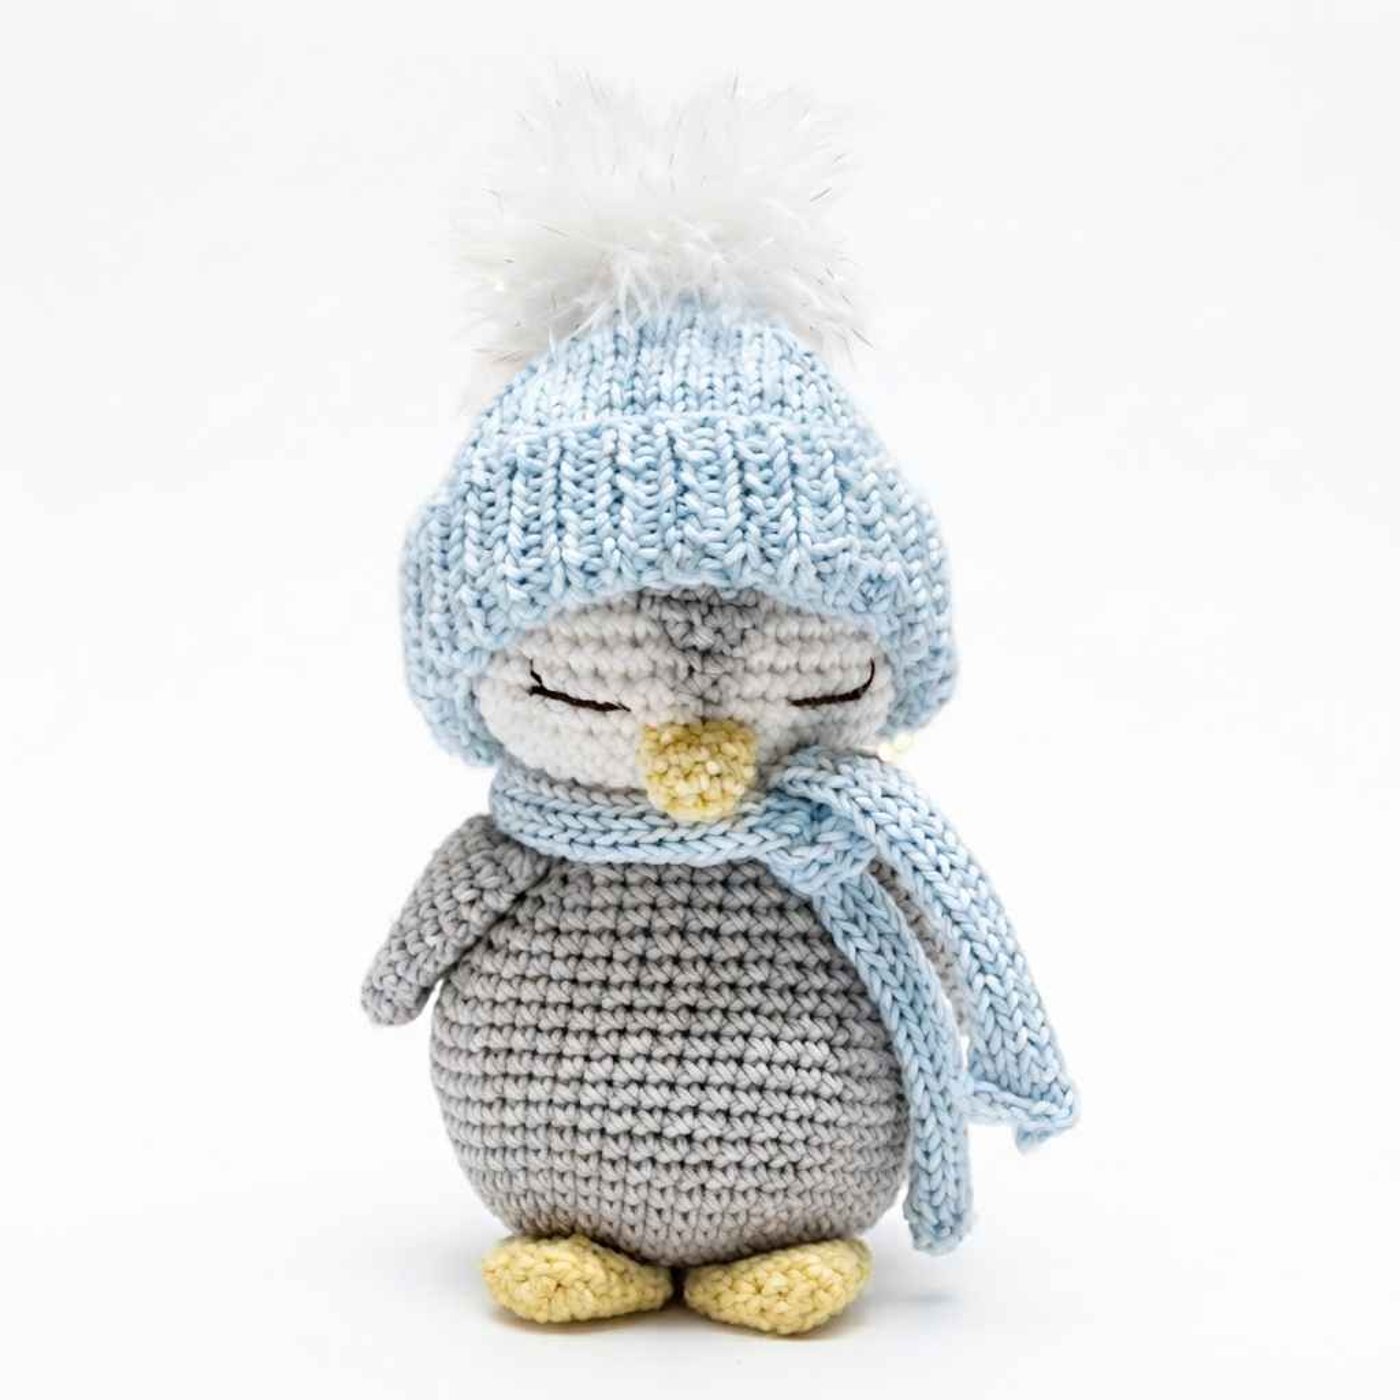
This sleepy little penguin is a pocket-sized amigurumi that stands about 13-14 cm (5-5.5 in) tall. It is worked in a 2.25 mm hook with fine cotton-blend yarn, so the stitches are tight and the body holds a rounded, plump shape. What sets it apart from a generic penguin is the face: a white head front is joined to a gray or pink back piece, and a small wedge of that second color is crocheted in turned rows to form the pointed forehead marking. The eyes are embroidered as closed, curved lines, which gives the toy its calm, drowsy look and keeps it free of hard parts.
The pattern is for crocheters who are comfortable with working in the round, invisible decreases and a few turned rows. Knitting is only needed if you choose the boy outfit (a ribbed hat with a pompom and a long striped scarf). If you do not knit, the girl outfit is entirely crochet: a mohair-style scarf and a pair of round headphones. The finished penguin makes a good winter gift, Christmas ornament-sized toy or shelf decoration.
Finished size
- Height: about 13-14 cm (5-5.5 in) with the materials listed.
- The head is about 20 cm around after stuffing, which is the circumference the knitted hat is sized for.
- Size will change if you use thicker yarn or a larger hook. Check your hat against the head before sewing the seam.
Yarn substitution
- The body is worked in a fingering to light sport weight cotton blend (about 160 m per 50 g). Any similar cotton or cotton-acrylic yarn works at this hook size.
- Keep the fabric firm. Cotton blends have little stretch, so use a small hook (2.25 mm) so the filling does not show through.
- For the white head front, choose a yarn of the same weight and fiber as the body so both pieces stuff and sew evenly.
- For the beak and feet, use a smooth cotton in a contrasting color (mustard on gray, dark gray on pink).
- For the hat and scarf, any wool, semi-wool or acrylic yarn works. Match your knitting gauge to the stated 3 sts / 5 rounds = 1 cm so the hat fits the 20 cm head. A mohair-type yarn gives the girl scarf its soft, fluffy look.
Common mistakes
- Understuffing the head. The head is meant to be tightly stuffed. A soft head sags and distorts the face wedge.
- Sewing the colored back piece before checking the fit. The pattern says to try the back piece on the white head first, because your filled head may be taller or shorter than the original. The last round (R17) of the colored piece may not be needed.
- Miscounting the turned rows for the wedge. Count 18 stitches back from the end of the last round and enter the hook in the 19th stitch loop. Chain 1 at the start, then work each row one stitch shorter than the last.
- Skipping the invisible decrease. Regular decreases leave gaps that show the filling. Use the front-loop-only invisible decrease.
- Sewing the wings in the wrong place. The wings go between rounds 24 and 25 of the body. Sewing them higher makes the penguin look shrugged.
- Making the hat too tight. The hat is meant to cover the head circumference of 20 cm. Block it lightly and test it on the head before sewing the back seam.
FAQ
Is this penguin safe for small children?
The eyes are embroidered with black thread, so there are no safety eyes or other hard parts. The hat, pompom and headphones are sewn on and can be left off for a very young child. Check that all seams are tight and the filling is secure before gifting.
How firmly should I stuff the penguin?
Stuff as you go. The head and body should be tightly stuffed so they keep their round shape. The wings, feet and tail are small and need only a little filling, or none at all. The headphones are stuffed lightly while you sew them on, until you reach the look you want.
Do I need to change colors during the pattern?
The head front is worked in white. The second head piece and the body are in the main color (gray or pink). The beak and feet use the contrast yarn. For the boy scarf, change color every 7th row to create the stripes.
What if my head and back piece do not match in height?
That is expected. Because stuffing changes the size, the pattern allows you to skip R17 of the colored head piece. Pin the colored piece on the filled white head before sewing.
Can I make the pink version?
Yes. Use the pale pink body yarn and dark gray for the beak and feet, and follow the same instructions. The girl accessories (scarf and headphones) suit this version.
Pattern notes
- Do not join rounds. Work in a continuous spiral unless the pattern says otherwise.
- Use a stitch marker or a piece of yarn to mark the beginning of the round.
- Fasten off with a needle join for a neat finish.
- Stuff as you go.
Tip: Count stitches at the end of every increase and decrease round. Small penguins show miscounts quickly.
Head (white front)
Work with white yarn.
- R1: 6
scin MR (6) - R2: 6
inc(12) - R3: (1
sc,inc) *6 (18) - R4: (2
sc,inc) *6 (24) - R5: (3
sc,inc) *6 (30) - R6: (4
sc,inc) *6 (36) - R7: (5
sc,inc) *6 (42) - R8: (6
sc,inc) *6 (48) - R9-16: 48
sc(8 rounds) (48) - R17: (6
sc,dec) *6 (42) - R18: (5
sc,dec) *6 (36) - R19: (4
sc,dec) *6 (30) - R20: (3
sc,dec) *6 (24),slst
Fasten off and leave a long end for sewing. Stuff the head tightly.
Head (back piece in gray or pink)
- R1: 6
scin MR (6) - R2: 6
inc(12) - R3: (1
sc,inc) *6 (18) - R4: (2
sc,inc) *6 (24) - R5: (3
sc,inc) *6 (30) - R6: (4
sc,inc) *6 (36) - R7: (5
sc,inc) *6 (42) - R8: (6
sc,inc) *6 (48) - R9-17: 48
sc(9 rounds) (48)
Fasten off and leave a long end for sewing. R17 may not be needed if your stuffed head is a different height.
Face wedge (turned rows)
Count forward 18 stitches from the end of the last round. Insert the hook in the 19th stitch loop and work:
- R1: ch 1, 7
sc, turn (8) - R2: from the second
sc, 7sc, turn (7) - R3: from the second
sc, 6sc, turn (6) - R4: from the second
sc, 5sc, turn (5) - R5: from the second
sc, 4sc, turn (4) - R6: from the second
sc, 3sc, turn (3) - R7: from the second
sc, 2sc, turn (2)
Secure and hide the end. Try the colored piece on the white head, pin, then sew.
Beak (1 part)
- R1: 8
scin MR (8) - R2: 8
sc(8) - R3: 8
sc,slst(8)
Fasten off and leave a long end. Sew the beak right under the wedge-shaped part of the face.
Body (main color, 1 part)
- R1: 6
scin MR (6) - R2: 6
inc(12) - R3: (1
sc,inc) *6 (18) - R4: (2
sc,inc) *6 (24) - R5: (3
sc,inc) *6 (30) - R6: (4
sc,inc) *6 (36) - R7: (5
sc,inc) *6 (42) - R8: (6
sc,inc) *6 (48) - R9: (7
sc,inc) *6 (54) - R10-16: 54
sc(7 rounds) (54) - R17: (16
sc,dec) *3 (51) - R18: (15
sc,dec) *3 (48) - R19: (14
sc,dec) *3 (45) - R20: (13
sc,dec) *3 (42) - R21: (12
sc,dec) *3 (39) - R22: (11
sc,dec) *3 (36) - R23: (10
sc,dec) *3 (33) - R24: (9
sc,dec) *3 (30) - R25: (8
sc,dec) *3 (27) - R26: (7
sc,dec) *3 (24),slst
Secure and hide the end. Stuff the body tightly, then sew it to the head.
Wings (make 2)
- R1: 6
scin MR (6) - R2: (1
sc,inc) *3 (9) - R3: 9
sc(9) - R4: (2
sc,inc) *3 (12) - R5: (3
sc,inc) *3 (15) - R6: (4
sc,inc) *3 (18) - R7: 18
sc(18) - R8: (5
sc,inc) *3 (21) - R9-11: 21
sc(3 rounds) (21)
Fold the wing in half and crochet 10 sc through both layers to close it. Fasten off and leave a long end. Sew the wings between rounds 24 and 25 of the body.
Feet (make 2)
- R1: 7
scin MR (7) - R2: 7
inc(14) - R3-7: 14
sc(5 rounds) (14)
Fold in half and crochet 6 sc to close. Fasten off and leave a long end. Sew to the body about 1-2 stitches apart.
Tail (1 part)
- R1: 6
scin MR (6) - R2: (1
sc,inc) *3 (9) - R3: 9
sc(9) - R4: (2
sc,inc) *3 (12)
Fold in half and crochet 5 sc to close. Fasten off, leave a long end and sew to the back of the body as shown in the photo.
Eyes
Embroider two small curved closed-eye lines with black thread on the white face, above the beak.
Boy outfit: knitted hat and scarf
Yarn used: Nako Paris (white no. 208) and Alize Baby Wool (mint no. 114), 2.5 mm needles. Gauge: 3 sts / 5 rounds = 1 cm. The hat is sized for a 20 cm head.
Hat
Cast on 60 sts.
- Row 1 (RS): K1, then repeat (K1, P1) across to the last st, K1.
- Row 2: P1, then repeat (K1, P1) across to the last st, P1.
- Repeat these 2 rows (K1, P1 ribbing) until the work measures 12 rows, ending on a Row 2.
- Continue in stocking stitch until the work measures 14 rows, ending on a purl row.
Shape the crown:
- Row 1 (RS): edge st, K1, K2tog, K14, K2tog, K1, K2tog, K14, K2tog, K1, K2tog, K15, K2tog, P1 (54 sts)
- Row 2 and every alternate row: purl
- Row 3: edge st, K1, K2tog, K12, K2tog, K1, K2tog, K12, K2tog, K1, K2tog, K13, K2tog, P1 (48 sts)
- Row 5: edge st, K1, K2tog, K10, K2tog, K1, K2tog, K10, K2tog, K1, K2tog, K11, K2tog, P1 (42 sts)
- Row 7: edge st, K1, K2tog, K8, K2tog, K1, K2tog, K8, K2tog, K1, K2tog, K9, K2tog, P1 (36 sts)
- Row 9: edge st, K1, K2tog, K6, K2tog, K1, K2tog, K6, K2tog, K1, K2tog, K7, K2tog, P1 (30 sts)
- Row 11: edge st, K1, K2tog, K4, K2tog, K1, K2tog, K4, K2tog, K1, K2tog, K5, K2tog, P1 (24 sts)
- Row 13: edge st, K1, K2tog, K2, K2tog, K1, K2tog, K2, K2tog, K1, K2tog, K3, K2tog, P1 (18 sts)
Break the yarn, leaving a long end. Thread it through the remaining 18 sts, draw up and fasten securely. Sew the back seam, reversing the seam halfway through the ribbing so the cuff turns back neatly. Embroider small white checkmark stitches at random as decoration.
Pompom: wind yarn around 3 fingers about 80 times. Remove, tie tightly in the center, cut through each side of the loops and trim to a round shape. Sew to the top of the hat.
Scarf
Cast on 8 sts.
- Row 1 (RS): edge st, K6, P1
- Row 2: purl
- Repeat these 2 rows until the work measures 102 rows, ending on a Row 2. Change color every 7th row.
Girl outfit: crochet scarf and headphones
Yarn: mohair-type yarn (50 g / 200 m) for the scarf and Alize Softy (50 g / 115 m), color 55, for the headphones.
Scarf
Chain 71.
- R1: 70
sc, ch 1, turn - R2-3: 70
sc, ch 1, turn - R4: 70
sc
Secure and hide the end.
Headphones (make 2)
- R1: 6
scin MR (6) - R2: 6
inc(12) - R3: (1
sc,inc) *6 (18),slst - R4: ch 1, 18
scin BLO,slst(18) - R5: change to Alize Softy, ch 1, 18
sc,slst(18)
Secure and hide the end on one headphone. On the other, leave the main color thread after the last round and chain 20 (adjust the chain length to the head circumference and the position you want), then join it to the second headphone. Cut and fasten off. Sew the headphones on the head, stuffing each lightly while you sew until you like the shape.
Tip: Pin the headphones and band in place before sewing so both ear cups sit at the same height.
Optional & Creative Ideas
- Customize colors: Try a pale blue body with a white head front and a coral beak for a snowy look, or use pastel colors for a nursery display.
- Make a set: Crochet one gray penguin with the boy outfit and one pink penguin with the girl outfit as a matching pair.
- Add a hanging loop: Sew a short loop of yarn to the top of the hat or head to turn the penguin into a Christmas tree ornament.
- Change the scarf: Knit the scarf in stripes of two or three colors, or crochet the girl scarf in a different length for a longer or shorter wrap.
- Dress it for the season: Skip the winter gear and add a small crocheted bow tie or a knitted beanie in a summer color.
- Personalize the face: Embroider tiny pink cheeks with a few stitches of thread for a sweeter expression.
Final Thoughts
This penguin works up quickly and is a satisfying project for practicing invisible decreases, turned rows and simple knitted accessories. Take your time with the face wedge and the stuffing, and the finished toy will have a plump, calm look that suits the cozy hat and scarf.
Patterns and instructions on OpenCrochet are for personal use. Please do not redistribute copies of this content; share the page link instead.