Crochet Halloween Ghost Amigurumi Pattern: Witch, Pumpkin Hat and Bookworm Ghosts
Crochet three cute standing ghost dolls with striped legs, boots and Halloween props
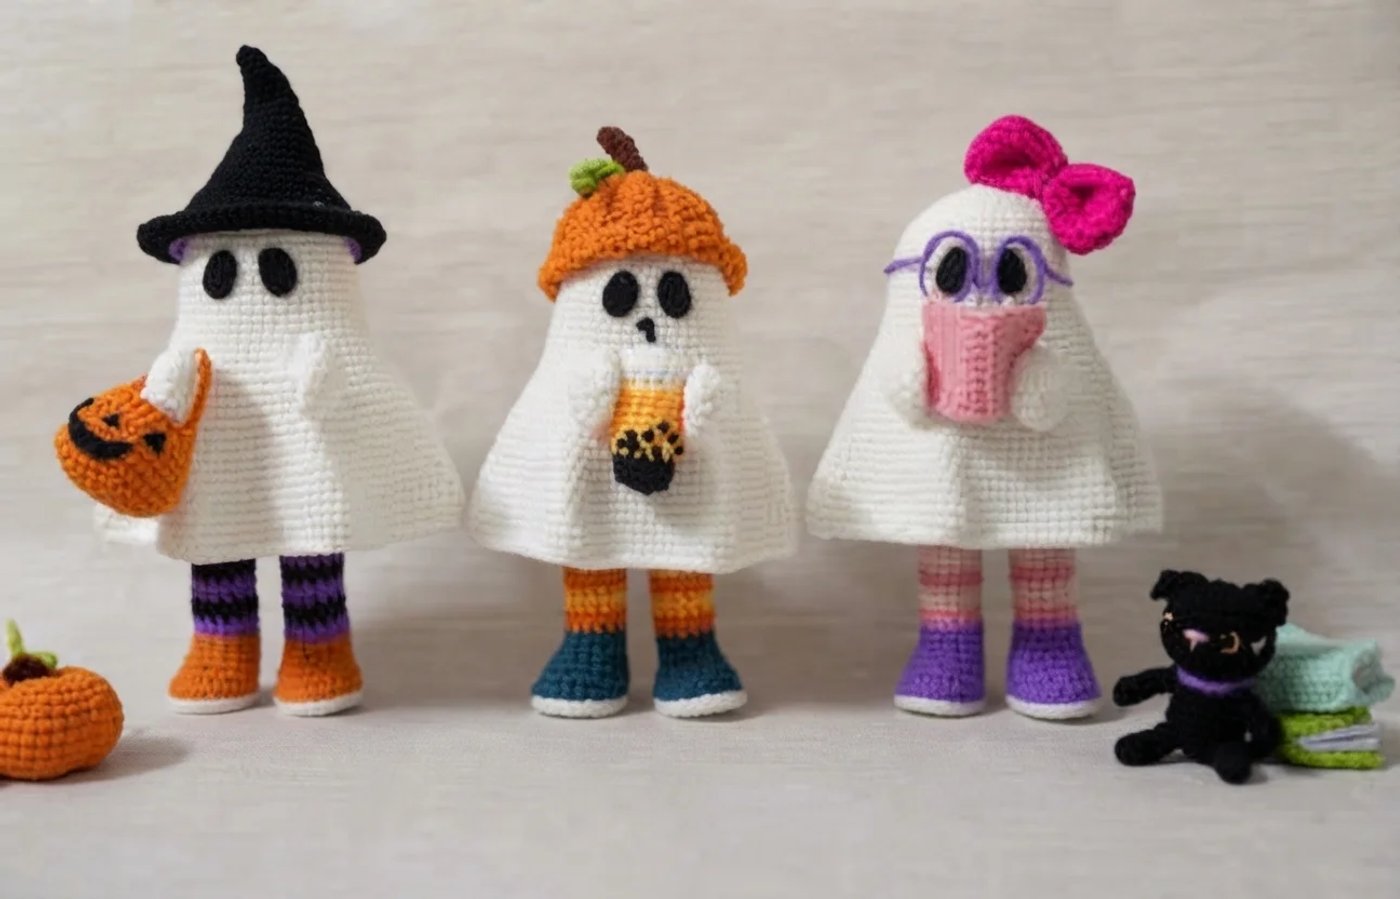
This pattern makes a small family of standing amigurumi ghosts that look like children trick-or-treating. Each one is a white sheet-style ghost with a bell-shaped body, little striped stockings, chunky boots, and tiny arms. The ghost is made in one piece from the top down, and the legs are made separately and sewn in under the hem. You can dress each ghost differently: a witch hat with a purple band and a mini pumpkin candy basket, a ruffled pumpkin beanie with a boba milk tea, or a pink bow with a little book. It suits crocheters who are comfortable with magic rings, working in the round, changing colors, and doing some assembly. It is a good project for a Halloween shelf or mantel, or as a handmade gift.
The pattern uses a 3 mm hook with fine 2.5 mm wool, so the stitches are tight and the fabric holds its bell shape. Most of the work is plain sc in rounds. The more technical parts are the boots (worked flat in turned rounds with a heel shaping), the two-leg join, and the small accessories.
Finished size
The pattern doesn't give a measurement. With the yarn and hook above, the finished ghost should be about 8-10 in (20-25 cm) tall including the legs, with a hem about 5 in (13 cm) across. The witch hat adds roughly 2-3 in (5-7 cm). Props like the basket, book and boba cup are palm-sized miniatures. Your size will vary with your tension and yarn weight, so measure your first few rounds of the body before committing.
Yarn substitution
- Same look: any fine to sport weight wool or acrylic that works well with a 3 mm hook. The tight fabric is what lets the bell shape stand without stuffing.
- Bigger ghost: use DK or worsted yarn with a 3.5-4 mm hook. Everything scales up, but the legs will get thick, so you may want to use fewer stripes.
- Colors: use a bright white or cream for the body. Pick contrasting colors for boots and stripes so they show against the white. Keep the stripe colors to two, as in the original orange and yellow, for a clean look.
- Keep the same yarn weight and hook for all parts, or the accessories won't fit the ghost.
Common mistakes
- Skipping the beads: the moisture-absorbing beads in the boots are what let the ghost stand. Add them before you close the boot and before you start the leg stripes.
- Loose tension: the bell shape and hems only hold if your stitches are tight. If your fabric is floppy, go down a hook size.
- Losing count in the long increase rounds: the head and body goes up to 108 stitches. Use a stitch marker at every 6th increase section.
- Numbering glitches in the source pattern: the hand's last round is labeled Rd 6 but is really Rd 8, and the witch hat skips Rd 21 (purple starts at Rd 22). Follow the order in the instructions, not the labels, and check your stitch counts.
- Uneven stripe jogs: change color on the last stitch of a round so stripes stay straight. Carry the unused yarn inside the leg.
- Wire sticking out: wrap the straw wire completely and bend the ends back so they can't poke through the fabric.
FAQ
How do I make the ghost stand up?
Fill the boot with moisture-absorbing beads (in a small bag or stuffed in with a little stuffing), then stuff the legs and body. The weight in the feet is what keeps the doll upright, so don't skip it.
Is this safe for kids?
The felt features, glued parts and wire straw make this a decorative piece, not a toy for small children. For a child-safe version, embroider the eyes, skip the wire, and sew accessories on firmly.
How do the color changes work in the legs?
After the white sole and the blue boot, you alternate orange and yellow every 2 rounds for 8 rounds of stripes, ending with orange. Switch on the last stitch of each round and carry the unused color up inside the leg.
How do I attach the head/body to the legs?
Join the two legs with a round of sc around the first leg, 2 ch, sc around the second leg. Work 3 more shaping rounds of hdc, then 7 plain rounds, stuff the leg area and sew the body closed.
Can I make just one ghost?
Yes. The ghost body, legs and hands are the same for all three. Pick one of the hats or accessories and make just that one.
Ghost body (head and sheet)
Use white yarn and a 3 mm hook. Work in continuous rounds.
- Rd 1: 6
scin a magic ring (6) - Rd 2: 6
inc(12) - Rd 3: (1
sc,inc) x 6 (18) - Rd 4: (2
sc,inc) x 6 (24) - Rd 5: (3
sc,inc) x 6 (30) - Rd 6: (4
sc,inc) x 6 (36) - Rd 7: (5
sc,inc) x 6 (42) - Rd 8: (6
sc,inc) x 6 (48) - Rd 9-18: 48
sc(48) - Rd 19: (7
sc,inc) x 6 (54) - Rd 20: 54
sc(54) - Rd 21: (8
sc,inc) x 6 (60) - Rd 22: 60
sc(60) - Rd 23: (9
sc,inc) x 6 (66) - Rd 24: 66
sc(66) - Rd 25: (10
sc,inc) x 6 (72) - Rd 26: 72
sc(72) - Rd 27: (11
sc,inc) x 6 (78) - Rd 28: 78
sc(78) - Rd 29: (12
sc,inc) x 6 (84) - Rd 30: 84
sc(84) - Rd 31: (13
sc,inc) x 6 (90) - Rd 32: 90
sc(90) - Rd 33: (14
sc,inc) x 6 (96) - Rd 34: 96
sc(96) - Rd 35: (15
sc,inc) x 6 (102) - Rd 36: 102
sc(102) - Rd 37: (16
sc,inc) x 6 (108) - Rd 38: 108
sc(108) - Rd 39: (16
sc,dec) x 6 (102) - Rd 40: (15
sc,dec) x 6 (96)
Cut the yarn and fasten off. Cut two oval eyes from black felt and glue them on at the face, about at rounds 15-17.
Tip: the final decrease rounds make the hem flare slightly and curl in, which gives the ghost its soft wavy skirt edge.
Legs and body (make 2 legs, then join)
Boot and sole
Start with white yarn.
- Rd 1:
ch6. Starting in the 2nd chain from the hook, 4sc, 4scin the last chain, work down the other side of the chain with 4sc, 1inc(14) - Rd 2: 1
inc, 4sc, 4inc, 4sc, 1inc(20) - Rd 3: 8
sc, 4inc, 7sc, 1inc(25) - Rd 4-5: 25
slst(25)
Switch to blue (or teal) yarn.
- Rd 6: 25
slst(25) - Rd 7:
ch1, 9sc, 7hdc, 9sc, join with aslst(25) - Rd 8:
ch1, 9sc, (dec,sc) x 3, 7sc, join with aslst(22) - Rd 9:
ch1, 6sc, (dec,sc) x 4, 4sc, join with aslst(18) - Rd 10:
ch1, 5sc, (dec,sc) x 3, 4sc, join with aslst(15) - Rd 11:
ch1, 7sc, 1dec, 6sc, join with aslst(14) - Rd 12: 14
sc(14)
Stuff moisture-absorbing beads into the shoe part so the foot stands securely.
Striped stocking
Work 14 sc in every round, switching colors as listed:
- Rd 13-14: orange
- Rd 15-16: yellow
- Rd 17-18: orange
- Rd 19-20: yellow
- Rd 21-22: orange
- Rd 23-24: yellow
- Rd 25-26: orange
- Rd 27-28: yellow
- Rd 29-30: orange
Make a second leg the same way, but don't fasten off the second one.
Join the two legs
- Rd 1: 4
scaround the 1st leg,ch2, 26scaround the 2nd leg (continue to work around both legs) - Rd 2: 12
hdc, 4inc hdc, 13hdc, 4inc hdc(41) - Rd 3: 25
hdc,dec hdc, 14hdc(40) - Rd 4-10: 40
hdc(40)
Stuff the legs and lower body, then use yarn to sew the opening closed. Sew the finished legs under the ghost body so only the stockings and boots show below the hem.
Hands (make 2)
Use white yarn.
- Rd 1: 6
scin a magic ring (6) - Rd 2: 6
inc(12) - Rd 3: (
sc,inc) x 6 (18) - Rd 4-6: 18
sc(18) - Rd 7: (
sc,dec) x 6 (12) - Rd 8 (labeled Rd 6 in the original): 6
dec(6)
Fold in half, leave a long yarn tail, and use it to attach the hand to the side of the ghost.
Witch hat
Start with black yarn.
- Rd 1: 6
scin a magic ring (6) - Rd 2-3: 6
sc(6) - Rd 4: (
sc,inc) x 6 (9) (as written) - Rd 5: 3
sc, 4sc blo, 2sc(9) - Rd 6: 7
sc, 2inc(11) - Rd 7: 2
inc, 9sc(13) - Rd 8-9: 13
sc(13) - Rd 10: 5
inc, 8sc(18) - Rd 11: (2
sc,inc) x 6 (24) - Rd 12: 24
sc(24) - Rd 13: 12
sc, 10sc blo, 2sc(24) - Rd 14: (
sc,inc) x 6, 12sc(30) - Rd 15-16: 30
sc(30) - Rd 17: (4
sc,inc) x 6 (36) - Rd 18: (2
sc,inc) x 12 (48) - Rd 19: 26
sc, 20sc blo, 2sc(48) - Rd 20: (2
sc,inc) x 6, 30sc(54)
Switch to purple yarn.
- Rd 22-23: 54
sc(54) (the original skips Rd 21; work these as the next two rounds)
Switch to black yarn.
- Rd 24:
blo(8sc,inc) x 6 (60) - Rd 25: 60
sc(60) - Rd 26: (
sc,inc) x 20 (80)
Cut the yarn and fasten off.
Pumpkin candy basket
Start with orange yarn.
- Rd 1: 6
scin a magic ring (6) - Rd 2: 6
inc(12) - Rd 3: (1
sc,inc) x 6 (18) - Rd 4: (2
sc,inc) x 6 (24) - Rd 5: (3
sc,inc) x 6 (30) - Rd 6: (4
sc,inc) x 6 (36) - Rd 7-8: 36
sc(36) - Rd 9: (4
sc,dec) x 6 (30) - Rd 10: 30
sc(30) - Rd 11: (3
sc,dec) x 6 (24) - Rd 12: 24
sc(24)
ch 18 for the handle and attach it with a slst to the opposite side of the opening. Cut the eyes, nose and mouth for a jack-o'-lantern face from black felt and glue them to the basket.
Bow
Start with pink yarn.
- Rd 1:
ch30 - Rd 2:
slstto join with the first chain into a circle,ch, 30hdc,slst(30) - Rd 3:
ch, (2hdc,inc hdc) x 10,slst(40) - Rd 4:
ch, (2hdc,dec hdc) x 10,slst(30) (the original lists 40; the decrease brings it back to 30) - Rd 5-6:
ch, 30hdc,slst(30)
Cut a long yarn tail. Pinch the middle and wrap tightly, then sew through to secure it and shape the bow.
Book
Cover (make in any color)
- Rd 1:
ch10,hdcinto the 2nd chain from the hook and across: 9hdc(9) - Rd 2-9:
ch, 9hdc(9) - Rd 10: 2
ch, 9dc flo(9) - Rd 11:
ch, 9hdc blo(9) - Rd 12-18:
ch, 9hdc(9)
Secure and cut the yarn. Rounds 10-11 form the spine so the cover folds.
Pages
Cut rectangles from felt, fold them in half, and sew them to the cover with thread.
Pumpkin hat
Crown
Start with orange yarn. Work back and forth in rows.
- Rd 1:
ch15 - Rd 2:
ch, 13dc(13) - Rd 3-21:
ch, 13dcin alternate rows: work every odd round (3, 5, 7 ... 21) in the back loop only (blo) and every even round (4, 6, 8 ... 20) in both loops (13)
Join the two short ends together with 13 slst, then gather the top closed to form the pumpkin dome.
Stem
Start with brown yarn.
- Rd 1: 5
scin a magic ring (5) - Rd 2-4: 5
sc(5) - Rd 5: 4
sc,inc(6) - Rd 6: 5
sc,inc(7) - Rd 7: 7
sc(7)
Sew the stem to the top of the hat.
Leaf
Start with green yarn. ch 15. Into the 2nd chain from the hook work 3 dc, 2 hdc, 2 sc, 2 slst. Fasten off and sew the leaf onto the stem.
Milk tea (boba) cup
- Rd 1: black yarn, 6
scin a magic ring (6) - Rd 2: 6
inc(12) - Switch to yellow. Rd 3: (3
sc,inc) x 3 (15) - Rd 4-8: 15
sc(15) - Switch to white. Rd 9: 15
sc blo(15) - Rd 10: (4
sc,inc) x 3 (18) - Rd 11:
blo(4sc,dec) x 3 (12) - Rd 12: 12
sc(12)
Cut the yarn, thread a needle through the 12 stitches, insert the straw, and pull tight. Wrap black yarn around a piece of wire to make the straw. Add a few black yarn knots near the bottom for the tapioca pearls.
Assembly
- Glue or embroider the felt eyes onto the ghost body.
- Sew the legs and boots under the hem, centered, so the doll balances.
- Attach the hands to the sides, leaving a gap to place a prop in one of them.
- Add the hat or bow, and the prop for each ghost: basket, boba cup or book.
Optional & Creative Ideas
- Customize colors: make a pastel ghost family with lilac, mint and peach stockings, or go classic with black and white stripes.
- Add more props: crochet a tiny candy corn, a mini broom or a bat to hold in the hand.
- Make a coven: change the hat and bow to make each ghost a different character: witch, vampire, bookworm or a beanie-wearing ghost with pom-pom.
- Display idea: stand them on a shelf with a mini pumpkin and a small crocheted black cat for a Halloween mantel scene.
- Gift packaging: place the ghost in a small box or bag with its prop and a handwritten tag.
Final Thoughts
The fun of this pattern is in the details: the tight bell-shaped skirt, the stripy stockings and the little props that give each ghost its own personality. Take your time with the boots and the leg join, as they determine how well the ghost stands, and then have fun dressing each one.
Patterns and instructions on OpenCrochet are for personal use. Please do not redistribute copies of this content; share the page link instead.