

Lovely Worm Amigurumi Crochet Pattern with Green Hood and Antennae
Crochet a palm-sized worm doll with a cream face, lime green hood and bobbly antennae.
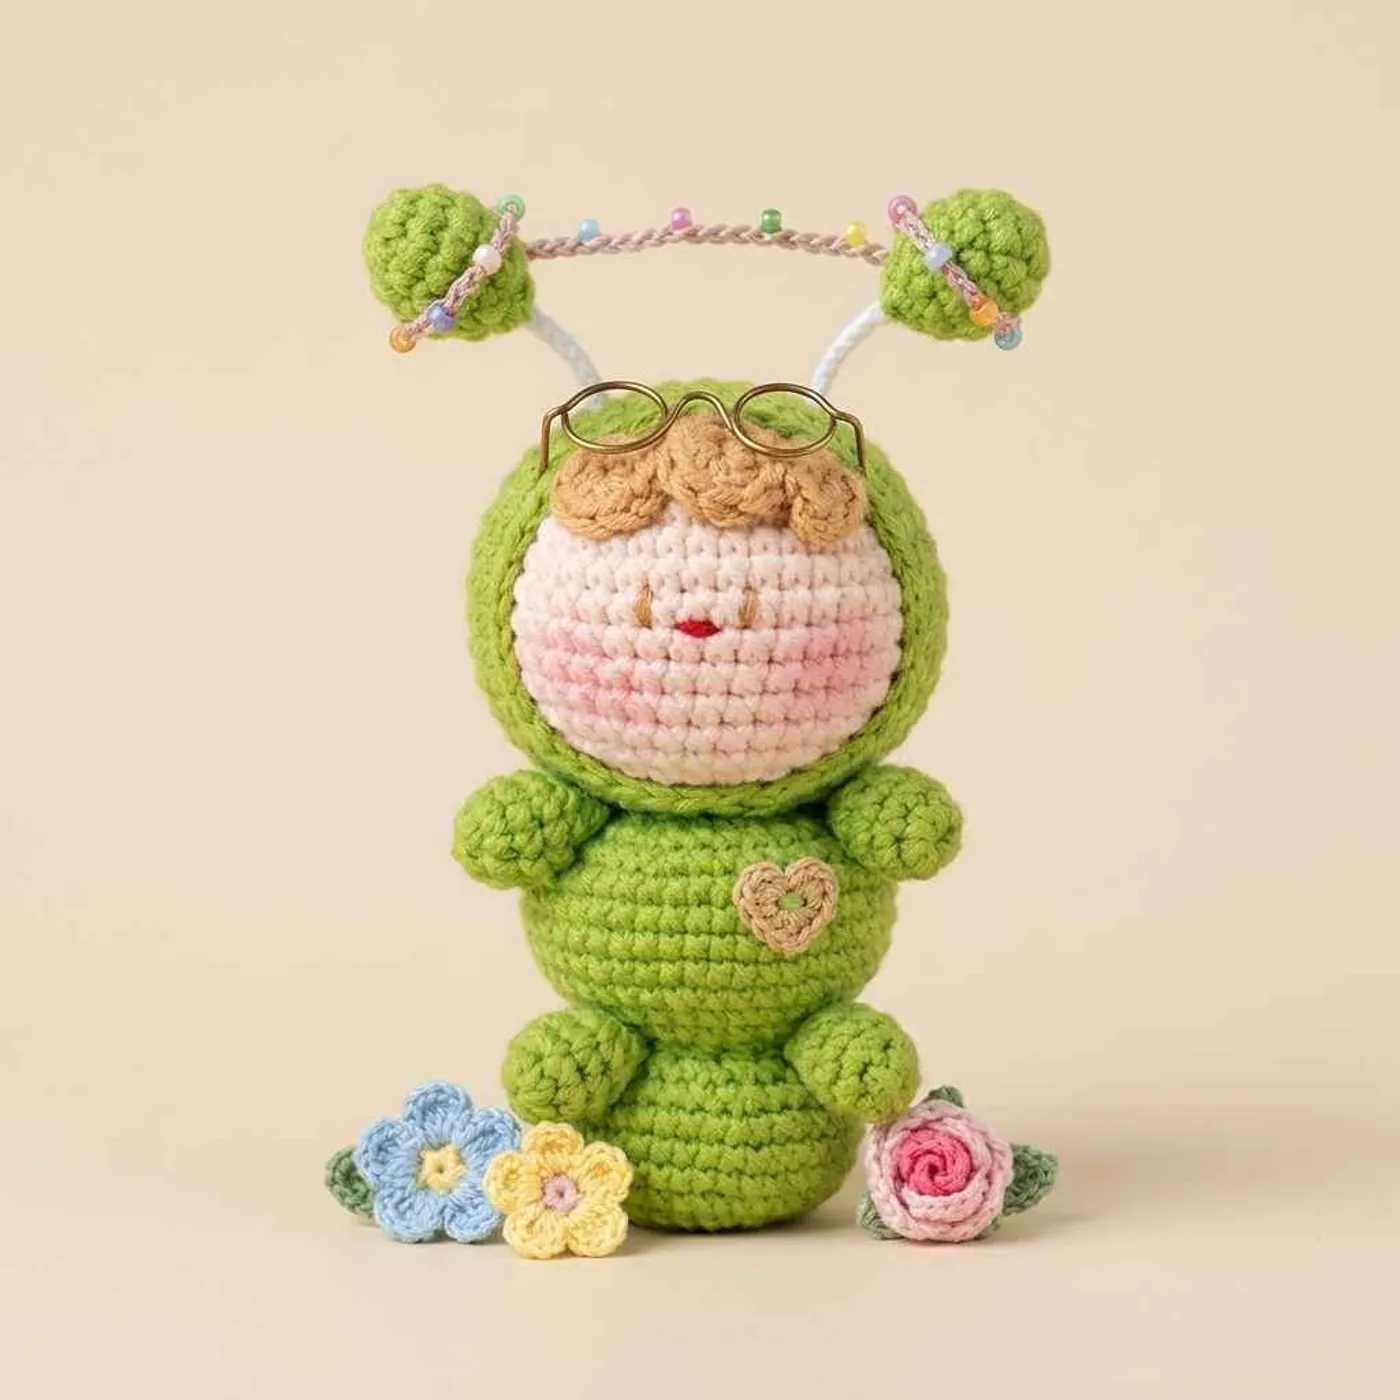
This lovely worm crochet pattern makes a little doll dressed as a cheerful green bug.
A round cream face with rosy cheeks and a tuft of tan hair peeks out of a lime green hood, two bobbly antennae stand up on white stems, and the body is made of two plump green segments with tiny arms and legs.
In the photo the finished worm fits in the palm of a hand, so it works as a desk buddy, a bag charm or a small gift. Every piece is worked in continuous rounds of single crochet with simple increases and decreases, which makes it a relaxed project for a confident beginner.
What makes it different from a plain ball amigurumi is the separate hood: you crochet a second cup that fits over the stuffed head and narrows at the edge so it frames the face. The two-bulb body, made in one piece with a narrow waist, gives the worm its segmented look.
Tip: The PDF does not list yarn, hook, eye or stem materials. The materials below are suggestions based on the photo, not from the designer.
Finished size
The PDF gives no measurements. Based on the photo, the finished worm is roughly 9–11 cm (3.5–4.5 in) tall to the top of the hood, plus the antennae, when worked in DK or light worsted cotton with a 2.5–3 mm hook. Thicker yarn and a bigger hook will make a larger doll.
Yarn substitution
The sample looks like a smooth cotton yarn, which keeps the stitches crisp and the face clean. Any DK or light worsted cotton, cotton-acrylic or acrylic will work.
- Lime green for the hood, body, arms, legs and antennae. Any bright color works if you want a different bug.
- Cream or skin color for the head (face).
- Tan or light brown for the hair.
Avoid fuzzy or chenille yarn for the head and hood, because the hood edge needs clear stitches to sit neatly around the face.
Common mistakes
- Mixing up the two increase rounds. R4 and R6 use the staggered repeat (sc, inc, sc) and (2 sc, inc, 2 sc). This keeps the head and hood round instead of hexagonal, so don't replace them with plain (3 sc, inc).
- Making the hood too short. The hood repeats the head up to R14, then adds two plain rounds and two decrease rounds. Skipping R15–R16 leaves the hood too shallow to cover the back of the head.
- Closing the body waist before stuffing. The body narrows to 12 stitches at R10. Stuff the first bulb firmly before R10, because the opening is tiny afterward.
- Under-stuffing the arms and legs. They are only 3 rounds long. Push a small pinch of stuffing in with the back of the hook so they stay round.
FAQ
How does the hood stay on the head?
The hood is the same size as the head for the first 14 rounds, then decreases to 30 stitches at the edge. Slide it over the back of the stuffed head so the face shows through the opening, then sew around the hood edge to the head.
What are the white antenna stems made of?
The PDF does not say. In the photo the stems look like short white cords. You can use a white pipe cleaner or covered craft wire inserted into each antenna ball, or a few strands of white yarn wrapped tightly. For a toy for a baby or small child, skip any wire and use a crocheted white chain or a firmly sewn yarn cord instead.
Are there eyes on the sample?
The photo shows a simple face with no visible safety eyes, just a small red mouth and pink cheeks. You can embroider small closed eyes with black yarn, or add tiny safety eyes if the toy is not for a young child.
How is the hair made?
The hair piece is just 6 sc in a magic ring. Make a few of these small circles in tan and sew them across the forehead, just under the hood edge, so they look like curls.
Pattern
Work in continuous rounds and mark the first stitch of each round.
Head
Cream (skin color).
- R1: 6 sc in magic ring [6]
- R2: (inc) repeat 6 times [12]
- R3: (sc, inc) repeat 6 times [18]
- R4: (sc, inc, sc) repeat 6 times [24]
- R5: (3 sc, inc) repeat 6 times [30]
- R6: (2 sc, inc, 2 sc) repeat 6 times [36]
- R7: (5 sc, inc) repeat 6 times [42]
- R8–R14: 42 sc [42]
- R15: (5 sc, dec) repeat 6 times [36]
- R16: (2 sc, dec, 2 sc) repeat 6 times [30]
- R17: (3 sc, dec) repeat 6 times [24]
- R18: (sc, dec, sc) repeat 6 times [18]
- Stuff the head.
- R19: (sc, dec) repeat 6 times [12]
- R20: (dec) repeat 6 times [6]
- Finish stuffing, fasten off and leave a tail for sewing.
Hood
Lime green.
- R1–R14: work the same as R1–R14 of the head [42]
- R15–R16: 42 sc [42]
- R17: (5 sc, dec) repeat 6 times [36]
- R18: (2 sc, dec, 2 sc) repeat 6 times [30]
- Fasten off and leave a long tail for sewing.
Tip: Try the hood on the head before fastening off. The decrease rounds should pull the edge in just enough to frame the face.
Body
Lime green. The body is one piece with two round segments.
- R1: 6 sc in magic ring [6]
- R2: (inc) repeat 6 times [12]
- R3: (sc, inc) repeat 6 times [18]
- R4: (sc, inc, sc) repeat 6 times [24]
- R5: (3 sc, inc) repeat 6 times [30]
- R6–R8: 30 sc [30]
- R9: (3 sc, dec) repeat 6 times [24]
- R10: (dec) repeat 12 times [12]
- Stuff the first segment.
- R11: 12 sc [12]
- R12: (sc, inc) repeat 6 times [18]
- R13: (sc, inc, sc) repeat 6 times [24]
- R14: (3 sc, inc) repeat 6 times [30]
- R15: (2 sc, inc, 2 sc) repeat 6 times [36]
- R16–R19: 36 sc [36]
- R20: (2 sc, dec, 2 sc) repeat 6 times [30]
- R21: (3 sc, dec) repeat 6 times [24]
- Stuff the second segment.
- R22: (dec) repeat 12 times [12]
- R23: 12 sc [12]
- Finish stuffing, fasten off and leave a tail for sewing.
Hands and legs (make 4)
Lime green.
- R1: 6 sc in magic ring [6]
- R2–R3: 6 sc [6]
- Stuff lightly, fasten off and leave a tail for sewing.
Hair
Tan or light brown. Make as many as you like (the photo shows several small curls).
- 6 sc in magic ring, pull the ring tight, fasten off and leave a tail for sewing.
Antennae (make 2)
Lime green.
- R1: 6 sc in magic ring [6]
- R2: (inc) repeat 6 times [12]
- R3: 12 sc [12]
- Stuff.
- R4: (dec) repeat 6 times [6]
- Finish stuffing, fasten off and leave a tail for sewing.
Assembly
The PDF ends after the pieces, so these assembly steps follow the finished photo.
- Sew the hair curls across the top of the face, near the front of the head.
- Slide the hood over the back of the head so the face shows through the opening and the hair sits just under the hood edge. Sew the hood edge to the head all the way around.
- Sew the narrow top of the body (R23 end) under the head.
- Sew two hands to the sides of the upper body segment and two legs to the front of the lower segment.
- Attach each antenna ball to a short white stem and fix the stems to the top of the hood.
- Embroider a small mouth in red or pink and add pink blush to the cheeks.
Your lovely worm is complete!
Optional & Creative Ideas
- Customize colors: Make a pink, yellow or blue worm, or change the hair color to match a friend.
- Keychain version: Sew a keyring to the top of the hood for a bag charm.
- Bug family: Use the same hooded head with different bodies to make a ladybug or bee.
- Safe for little ones: Embroider the face and use crocheted stems instead of wire.
Final Thoughts
The lovely worm is a quick, cheerful make built from single crochet rounds only. The separate hood is a simple trick that turns a basic ball head into a cute costumed doll.
Patterns and instructions on OpenCrochet are for personal use. Please do not redistribute copies of this content; share the page link instead.


