

Crochet Sloth Amigurumi Pattern with Color-Change Face
Crochet a sitting sloth amigurumi with a face worked in color changes, bendy wired arms and pale toes.
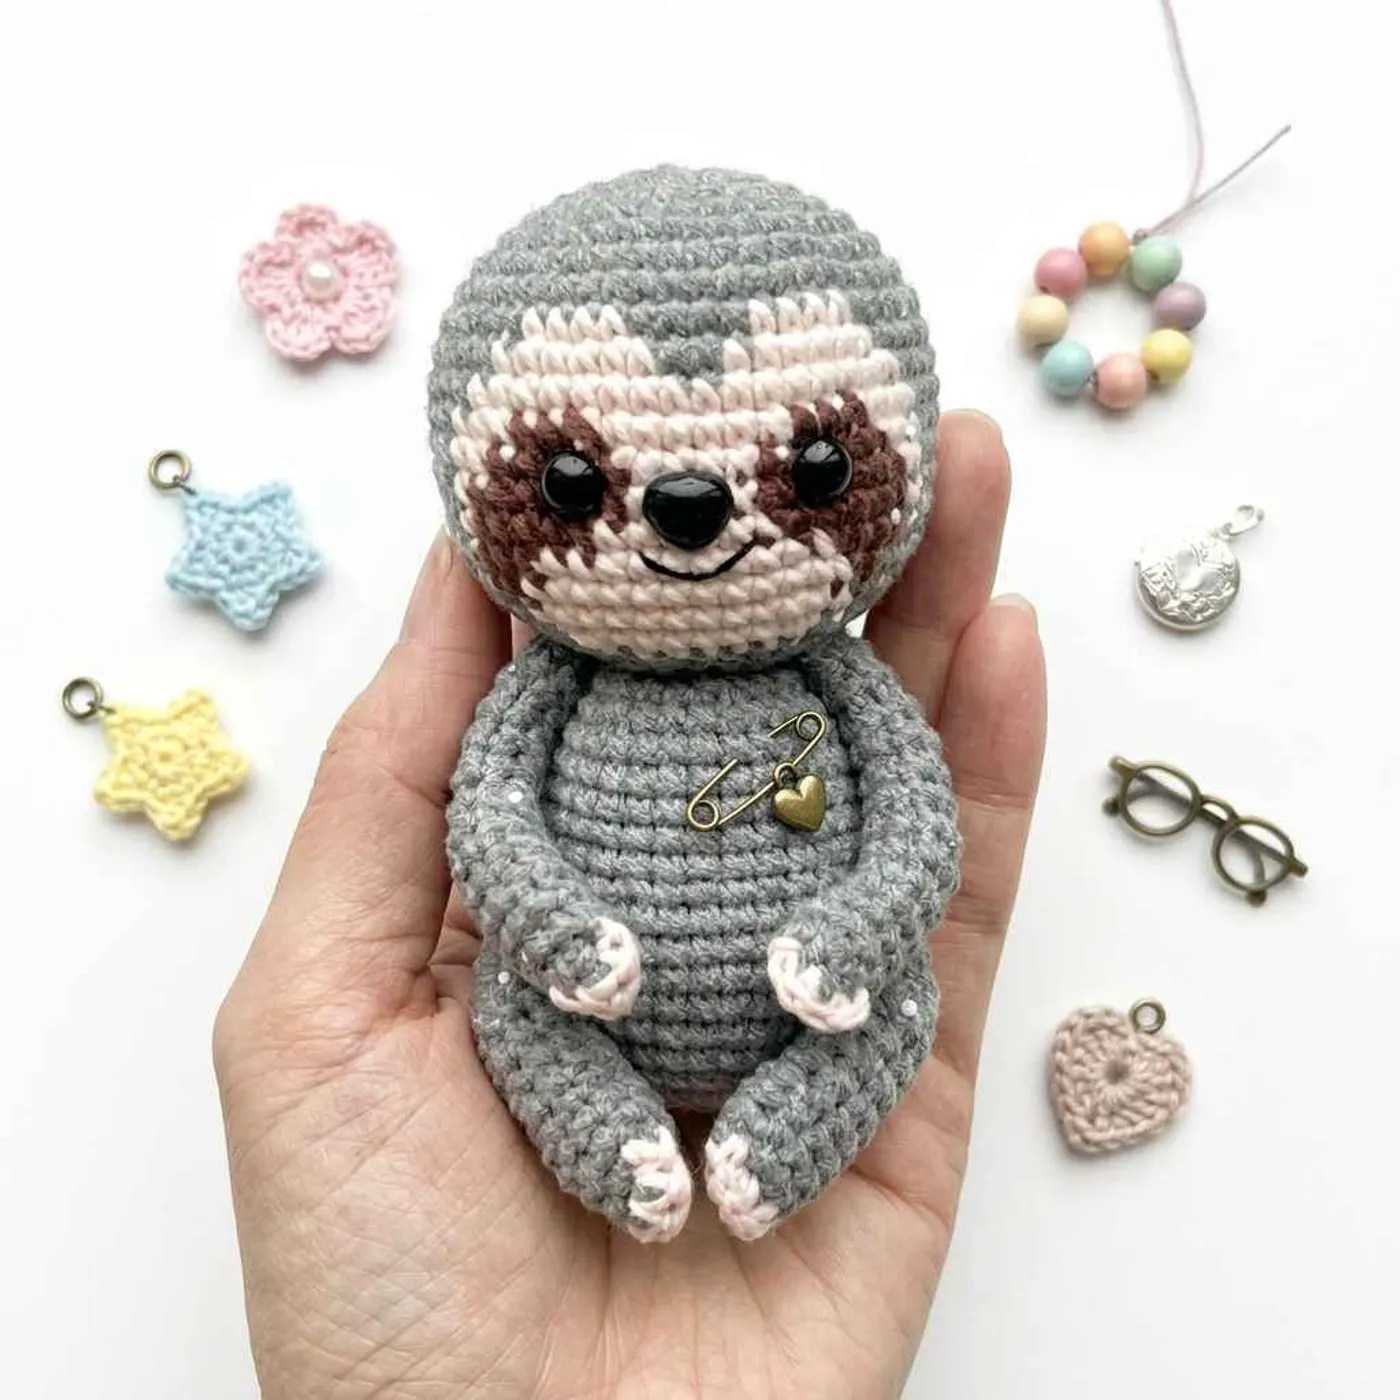
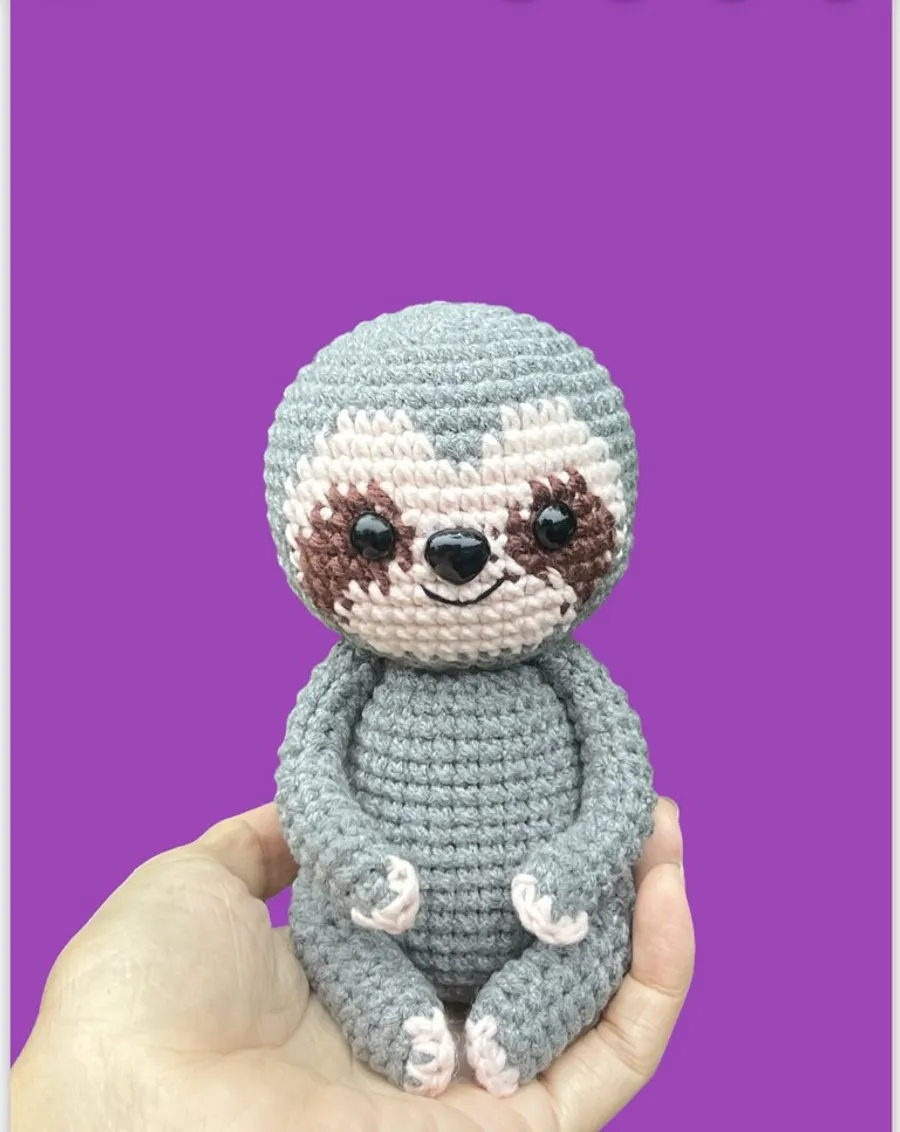
This crochet sloth is a sweet sitting amigurumi with a big round grey head, a creamy face mask and the classic brown eye patches that make sloths look so sleepy and kind. Long bendy arms rest on the tummy, and little pale toes and fingers peek out at the ends.
The head is the star of the pattern. The face is worked right into the head with simple color changes, round by round, so there is no felt and no sewn-on face patch. The body is a plain grey tube, and the arms have a thin wire inside so you can pose them.
You need fine yarn in grey, a skin or cream color and brown, a 2.5 mm hook and 8–10 mm safety eyes. It suits an advanced beginner who is happy to carry colors across a few rounds.
The pattern is written in US crochet terms.
Finished size
The designer does not give an exact size. In the photos the sloth sits in the palm of an adult hand, so it is roughly 5–6 in (13–15 cm) tall when made with fine yarn and a 2.5 mm hook.
The head is 49 stitches around at its widest, which is bigger than the body (35 stitches). That large head is what gives the sloth its cute, chunky look.
Materials overview
- Fine yarn (about 2 mm thick) in grey, skin or cream, and brown
- 2.5 mm crochet hook
- Safety eyes, 8–10 mm
- Fiberfill stuffing
- Thin steel wire or pipe cleaners for the arms
- Yarn needle, scissors and a stitch marker
Yarn substitution
The sample uses a fine cotton-style yarn. Any smooth sport-weight or light fingering cotton works well, because the color changes on the face show up clearly in cotton.
You can use DK yarn with a 3 mm hook for a bigger sloth. Keep the hook small for your yarn so the stuffing does not show through.
For the face, pick a light cream or pale pink and a medium brown with good contrast. A very dark brown also works and makes the eye patches stand out more.
Stitch notes
- Color changes: in rounds 9–19 of the head, change color in the last pull-through of the stitch before the new color. Carry the unused yarn inside the head.
- Spiral rounds: work in a continuous spiral and move your stitch marker up every round.
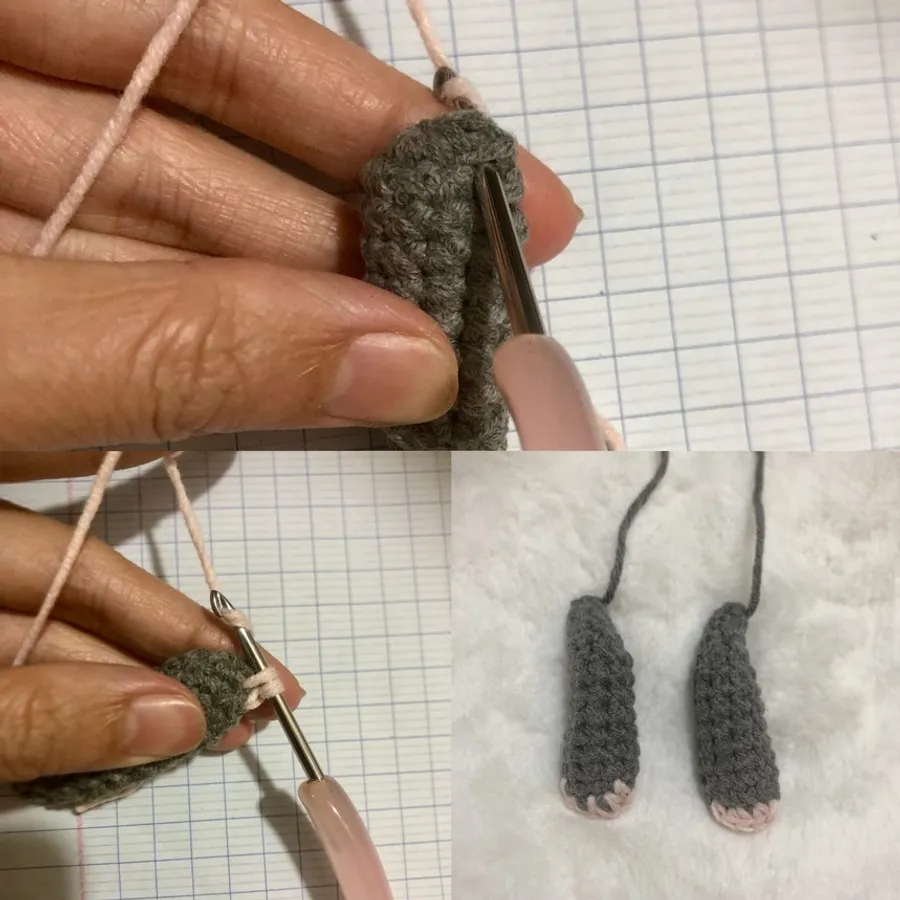
- Toes and fingers: these are worked into the finished leg or arm, between round 1 and round 2, as a small row of sc in skin color.
Common mistakes
- Losing your place in the face rounds: count each color block carefully. Write the round number on paper and tick it off, because one extra stitch moves the whole mask.
- Pulling carried yarn too tight: if the floats inside are tight, the face puckers. Keep the carried strand loose.
- Eyes in the wrong spot: place the safety eyes inside the brown patches before you close the head, and check both sides look even.
- Wire poking out: bend the ends of the wire into a small loop and wrap them with tape before you put them into the arms.
- Head too heavy: stuff the body firmly so it can hold the big head without tipping.
FAQ
Is this sloth safe for a baby?
Not as written. The wire in the arms and the safety eyes are not safe for small children. For a baby, skip the wire and embroider the eyes with yarn.
How do I make the face?
The face is worked into the head with color changes in rounds 9–19. Grey, skin and brown blocks are counted out in each round, so the mask grows as you go.
The pattern says the arms are green and the body white and green. Is that right?
The written headings say white and green, but every photo shows a grey body and grey arms. Use the same grey as the head unless you want a fun color twist.
Do I need the wire?
No. The wire only lets you bend and pose the arms. Without it the arms hang down softly, which is fine for a cuddle toy.
How do I attach the parts?
The original pattern has no assembly section. The steps at the end of this tutorial are based on the photos.
Head
Start with grey yarn.
- Rnd 1: 7 sc in a magic ring. (7)
- Rnd 2: inc in each st around. (14)
- Rnd 3: (sc, inc) 7 times. (21)
- Rnd 4: (2 sc, inc) 7 times. (28)
- Rnd 5: (3 sc, inc) 7 times. (35)
- Rnd 6: (4 sc, inc) 7 times. (42)
- Rnd 7: (5 sc, inc) 7 times. (49)
- Rnd 8: sc in each st around. (49)
Face color changes
- Rnd 9: 18 sc grey, 4 sc skin, 4 sc grey, 4 sc skin, 19 sc grey. (49)
- Rnd 10: 17 sc grey, 6 sc skin, 2 sc grey, 6 sc skin, 18 sc grey. (49)
- Rnd 11: 16 sc grey, 16 sc skin, 17 sc grey. (49)
- Rnd 12: 15 sc grey, 3 sc skin, 3 sc brown, 6 sc skin, 3 sc brown, 3 sc skin, 16 sc grey. (49)
- Rnd 13: 15 sc grey, 2 sc skin, 5 sc brown, 4 sc skin, 5 sc brown, 2 sc skin, 16 sc grey. (49)
- Rnd 14: 15 sc grey, 1 sc skin, 6 sc brown, 4 sc skin, 6 sc brown, 1 sc skin, 16 sc grey. (49)
- Rnd 15: 15 sc grey, 1 sc skin, 5 sc brown, 6 sc skin, 5 sc brown, 1 sc skin, 16 sc grey. (49)
- Rnd 16: 16 sc grey, 3 sc brown, 10 sc skin, 3 sc brown, 17 sc grey. (49)
- Rnd 17: 16 sc grey, 1 sc brown, 12 sc skin, 1 sc brown, 18 sc grey. (49)
- Rnd 18: (5 sc, dec) 2 times and 3 sc in grey, dec in skin, 10 sc in skin, dec in skin, (4 sc, dec) 3 times in grey. (42)
- Rnd 19: (4 sc, dec) 2 times and 4 sc in grey, dec in skin, 6 sc in skin, dec in skin, (6 sc, dec) 2 times in grey. (36)
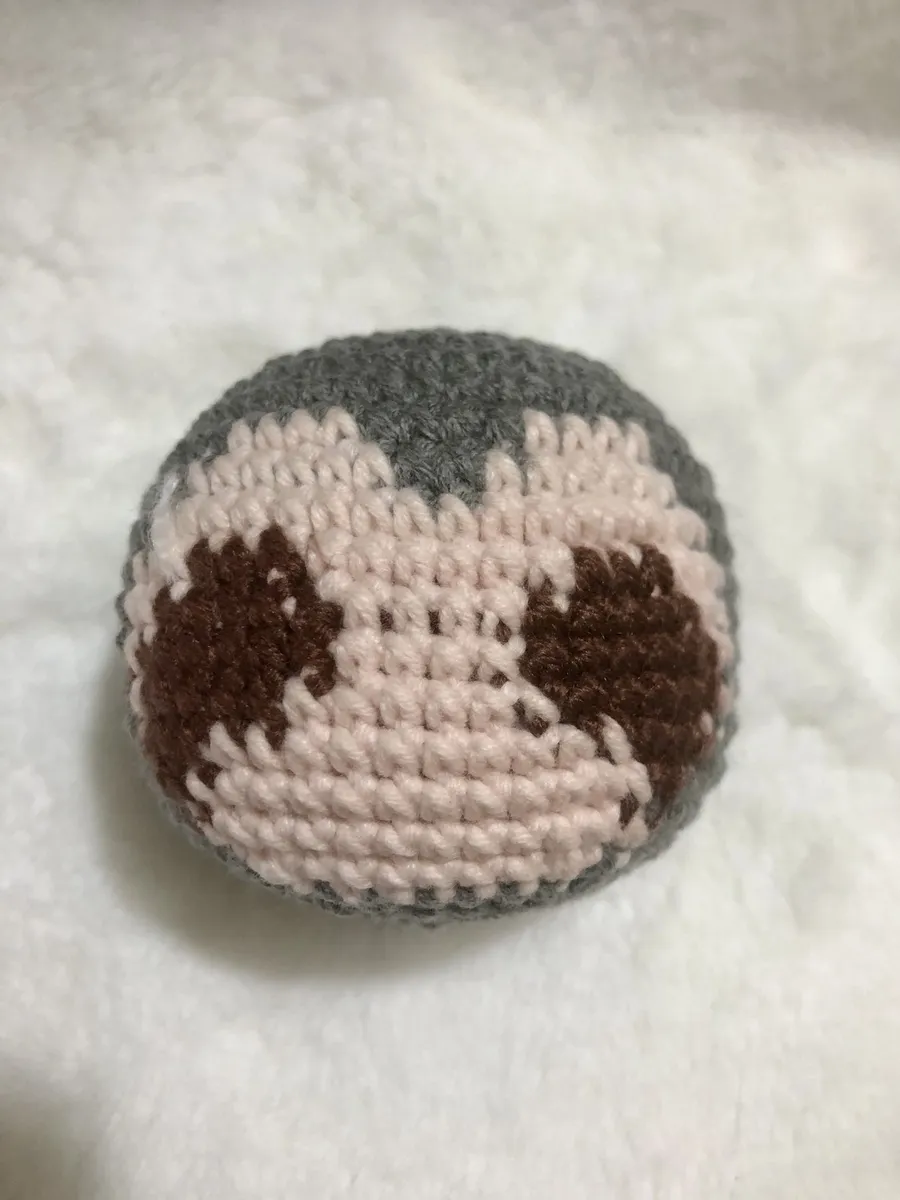
Tip: Insert the safety eyes inside the brown patches now, between rounds 13 and 15, before the head gets too small to reach inside.
Closing the head
Continue in grey only.
- Rnd 20: (4 sc, dec) 6 times. (30)
- Rnd 21: (3 sc, dec) 6 times. (24)
- Rnd 22: (2 sc, dec) 6 times. (18)
Stuff the head firmly.
- Rnd 23: (sc, dec) 6 times. (12)
- Rnd 24: dec 6 times. (6)
Fasten off and close the hole.
Legs (make 2)
Use grey yarn.
- Rnd 1: 6 sc in a magic ring. (6)
- Rnd 2: (sc, inc) 3 times. (9)
- Rnd 3–9: sc in each st around (7 rounds). (9)
- Rnd 10: 5 sc, dec 2 times. (7)
- Rnd 11: 5 sc, dec. (6)
- Rnd 12: 4 sc, dec. (5)
Fasten off and leave a tail for sewing. Stuff the leg lightly.
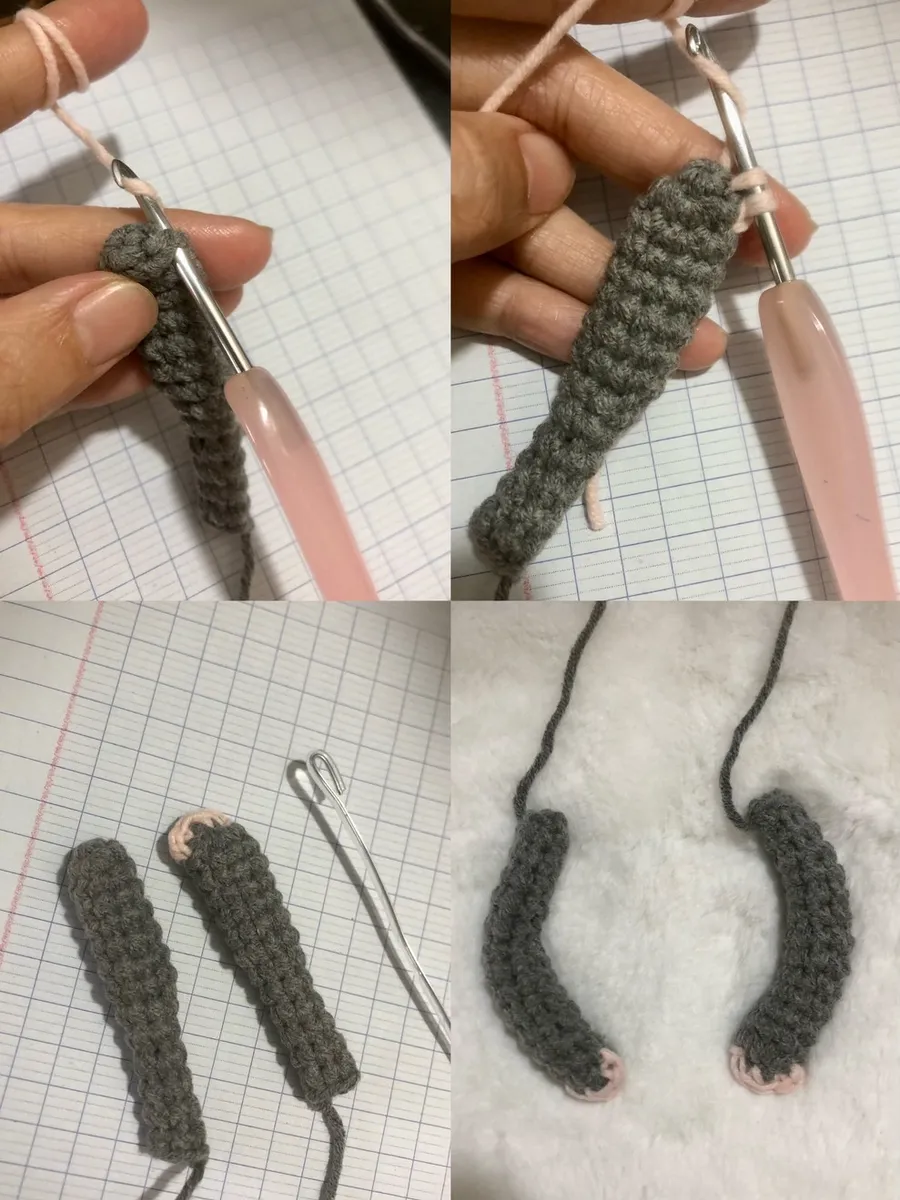
Toes: with skin color, insert the hook between round 1 and round 2 at the tip of the leg and work 4 sc. Fasten off and weave in the ends.
Body
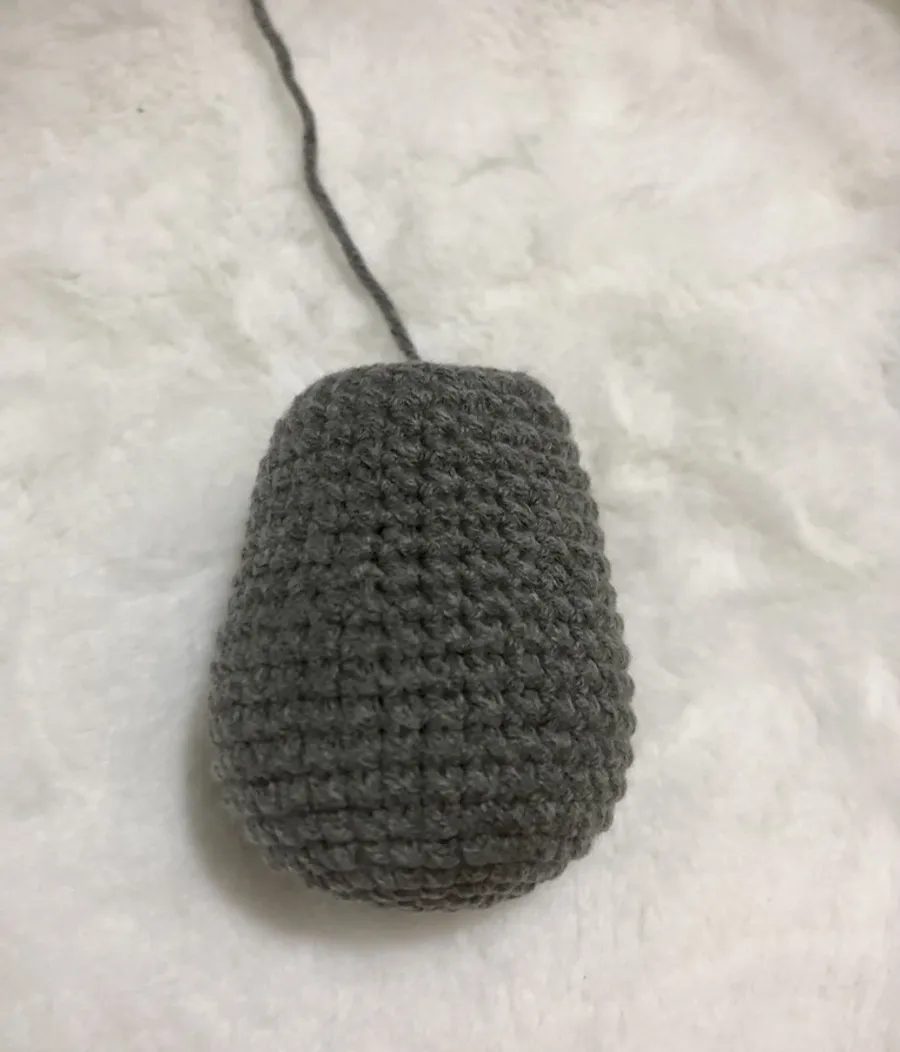
Use grey yarn (the photos show the body in the same grey as the head).
- Rnd 1: 7 sc in a magic ring. (7)
- Rnd 2: inc in each st around. (14)
- Rnd 3: (sc, inc) 7 times. (21)
- Rnd 4: (2 sc, inc) 7 times. (28)
- Rnd 5: (3 sc, inc) 7 times. (35)
- Rnd 6–12: sc in each st around (7 rounds). (35)
- Rnd 13: (5 sc, dec) 5 times. (30)
- Rnd 14–18: sc in each st around (5 rounds). (30)
- Rnd 19: (8 sc, dec) 3 times. (27)
- Rnd 20: (7 sc, dec) 3 times. (24)
Fasten off and leave a long tail for sewing the body to the head. Stuff firmly.
Arms (make 2)
Use grey yarn (the written heading says green, but the photos show grey).
- Rnd 1: 4 sc in a magic ring. (4)
- Rnd 2: inc in each st around. (8)
- Rnd 3–8: sc in each st around (6 rounds). (8)
- Rnd 9: (2 sc, dec) 2 times. (6)
- Rnd 10–14: sc in each st around (5 rounds). (6)
Fasten off and leave a tail for sewing.
Fingers: with skin color, insert the hook between round 1 and round 2 at the tip of the arm and work 3 sc. Fasten off and weave in the ends.
Insert a piece of wire into the arm so you can bend it. Do not stuff the arms.
Assembly
The original pattern does not include assembly steps. These steps follow the finished photos.
- Sew the open end of the body to the bottom of the head, centered under the face.
- Sew the legs to the bottom front of the body so the sloth sits up, with the toes pointing forward.
- Sew the arms to the sides of the body just under the head.
- Bend the arms forward so the hands rest on the tummy, as in the photos.
- Add a small black safety nose or embroider a nose in black yarn between the eyes, then stitch a small smile under it.
Optional & Creative Ideas
- Baby sloth: Make a second sloth with a smaller hook and thinner yarn and sew it onto the big one's tummy.
- Hanging sloth: Skip the legs' sitting position and bend the wired arms around a branch, a plant pot or a pencil.
- Color twist: Try a cream body with a light brown head for a pale sloth, or a soft pastel for a nursery toy.
- Little accessories: Add a tiny leaf, a flower behind the ear or a mini scarf.
- Baby-safe version: Leave out the wire and embroider the eyes and nose.
Final Thoughts
The color-change face is what makes this sloth special. Take your time on rounds 9 to 19 and the rest of the pattern is simple spiral rounds.
Patterns and instructions on OpenCrochet are for personal use. Please do not redistribute copies of this content; share the page link instead.


