

Capybara with Turtle Backpack Crochet Pattern
Crochet a cozy amigurumi capybara with a green turtle backpack and a bubble tea cup.
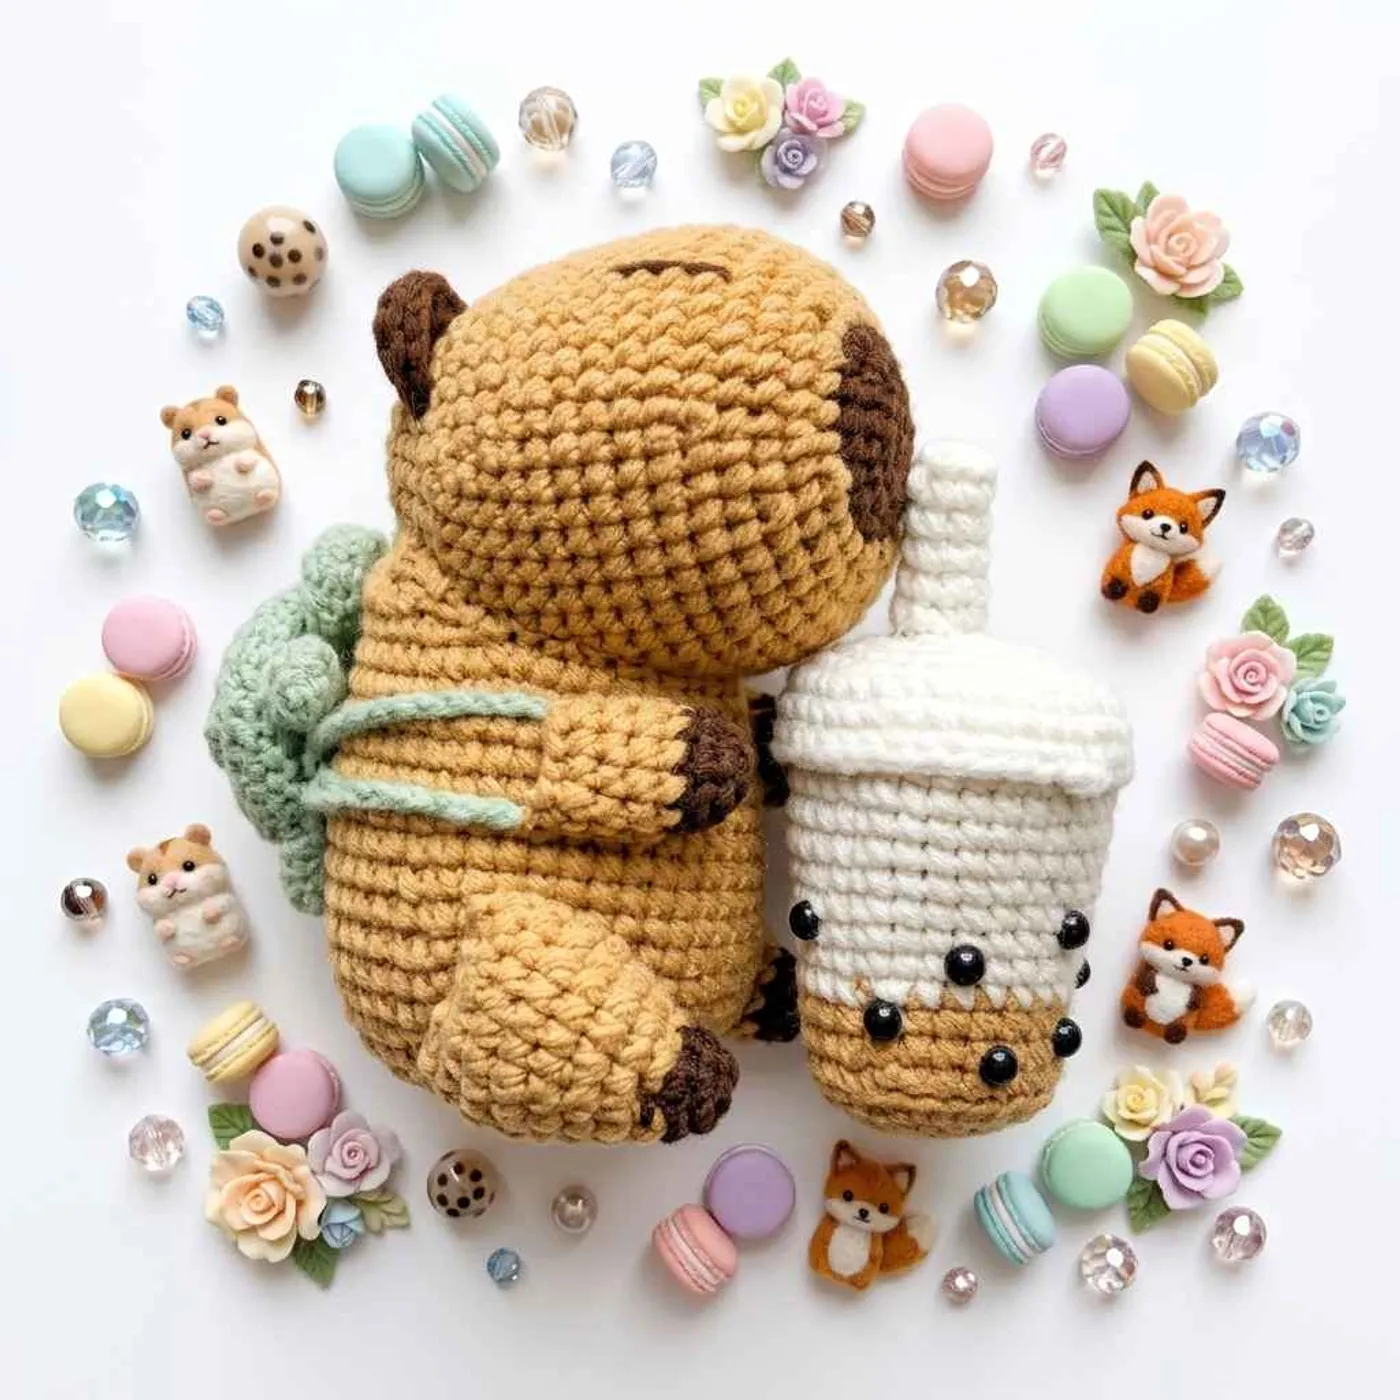
This capybara amigurumi carries a little green turtle on its back like a backpack, and comes with a matching bubble tea cup to hold. The capybara has a warm light-brown body, a dark-brown muzzle, tiny dark ears and dark-brown paws, so it reads as a capybara from across the room.
It is a small, dense toy worked with a 2.0 mm hook and cotton-blend yarn (the designer used YarnArt Jeans). Everything is single crochet in continuous spirals, with a few increases, decreases and one back-loop round on the turtle shell.
What sets it apart from a plain capybara is the set of accessories. The turtle is a stuffed dome with a ruffled shell edge, a head, four legs and a tail, and it hangs from a long chain strap. The bubble tea cup has a white domed lid and a short straw.
The pattern below is in US terms. The capybara head and body both start on a foundation chain, which gives the long, oval capybara shape instead of a round ball.
Finished size
The original pattern does not give a finished size, and the designer notes that the size depends on the yarn you use.
With a sport-weight cotton blend like YarnArt Jeans and a 2.0 mm hook, expect a compact, palm-sized toy. Thicker yarn and a bigger hook will give a larger capybara with the same proportions.
Materials overview
- Yarn in light brown (capybara), dark brown (muzzle, ears, paws), green (turtle), white (cup lid and straw) and beige plus light brown (cup)
- 2.0 mm crochet hook
- 8 mm safety eyes
- Toy stuffing, sewing needle, pins and scissors
Yarn substitution
YarnArt Jeans is a 55% cotton / 45% acrylic sport-weight yarn with crisp stitch definition. Any smooth cotton or cotton-acrylic in sport or light DK weight is a good swap.
Milk cotton or a 4-ply cotton works well for the turtle and the cup, because the shell ruffle and the cup's straight sides look neater in a firm yarn. Avoid fuzzy yarns for the capybara if you want the muzzle edge to stay sharp.
If you move up to DK or worsted yarn, go up to a 2.5–3.5 mm hook, but keep the fabric tight so the stuffing does not show.
Common mistakes
- Working only one side of the foundation chain. The head and body start on a chain. Work along one side, put 4 sc in the last chain, then continue down the other side, or the pieces will not become ovals.
- Forgetting the color change on the head. The muzzle is the first three rounds in dark brown. Switch to light brown at the end of Rnd 3.
- Treating the body as a closed round at the end. From Rnd 19 the body is worked in turned rows to shape the neck opening. Turn and skip stitches exactly as written.
- Skipping the back-loop round on the turtle. Rnd 7 in BLO leaves the front loops of Rnd 6 free. You need them to add the ruffled shell edge later.
- Overstuffing the legs and arms. These pieces are small and open-ended. A light stuffing keeps them easy to sew flat against the body.
FAQ
Is this capybara safe for babies?
The pattern uses 8 mm safety eyes. For a baby or toddler, embroider the eyes with black yarn instead and sew every part on very securely.
How do I attach the turtle backpack?
Sew the turtle's head, legs and tail under the shell edge. Then chain 80 for the strap and thread it through the turtle's legs with a sewing needle, so it loops over the capybara like a backpack.
Can I skip the bubble tea cup?
Yes. The cup is a separate accessory that is not sewn to the capybara, so you can leave it out or make it later as a set.
What about the black dots on the cup?
The photo shows black boba pearls on the cup, but the pattern does not include them. Small black French knots or tiny safety beads (not for babies) give the same look.
Tip: Use invisible decreases everywhere. The designer recommends them, and they keep the small pieces smooth.
Abbreviations used (US terms)
- ch = chain
- sc = single crochet
- inc = single crochet increase (2 sc in one st)
- dec = single crochet decrease (invisible decrease recommended)
- hdc = half double crochet
- dc = double crochet
- BLO / FLO = back loop only / front loop only
- st(s) = stitch(es)
- sl st = slip stitch
- MR = magic ring
Head
Start with dark brown. Ch 5, turn and start in the second ch. Work in a continuous spiral and mark the last st.
- Rnd 1: inc, 2 sc, 4 sc in the last ch, 2 sc, inc. (12)
- Rnd 2: 2 inc, 2 sc, 4 inc, 2 sc, 2 inc. (20)
- Rnd 3: (2 sc, inc, 2 sc) x 4. (24) Change to light brown.
- Rnd 4: (3 sc, inc) x 6. (30)
- Rnd 5: (2 sc, inc, 2 sc) x 6. (36)
- Rnd 6: (inc, 5 sc) x 6. (42)
- Rnd 7: 42 sc. (42)
- Rnd 8: (3 sc, inc, 3 sc) x 6. (48)
- Rnd 9–15: 48 sc. (48)
- Rnd 16: (3 sc, dec, 3 sc) x 6. (42)
- Rnd 17: 42 sc. (42)
- Rnd 18: (5 sc, dec) x 6. (36)
- Rnd 19: 36 sc. (36)
- Rnd 20: (2 sc, dec, 2 sc) x 6. (30)
- Rnd 21: 30 sc. (30)
- Rnd 22: (dec, 3 sc) x 6. (24)
- Rnd 23: (sc, dec, sc) x 6. (18) Insert the 8 mm safety eyes and stuff.
- Rnd 24: (dec, sc) x 6. (12)
- Rnd 25: dec x 6. (6) Fasten off.
Ears (make 2)
With dark brown, make a MR.
- Rnd 1: 5 sc in the MR. (5) Do not sl st. Turn, ch 1.
- Rnd 2: inc x 5. (10)
Fasten off, leaving a long tail for sewing.
Body
With light brown, ch 8 and start in the second ch. Work in a continuous spiral and mark the last st.
- Rnd 1: inc, 5 sc, 4 sc in the last ch, 5 sc, inc. (18)
- Rnd 2: 2 inc, 5 sc, 4 inc, 5 sc, 2 inc. (26)
- Rnd 3: (sc, inc) x 2, 2 sc, inc, 2 sc, (sc, inc) x 4, 2 sc, inc, 2 sc, (sc, inc) x 2. (36)
- Rnd 4: (sc, inc, 4 sc) x 6. (42)
- Rnd 5: 42 sc. (42)
- Rnd 6: (3 sc, inc, 3 sc) x 6. (48)
- Rnd 7–17: 48 sc. (48)
- Rnd 18: 10 sc, (dec, 3 sc) x 3, 22 sc. The original gives no stitch count for this round.
- Row 19: sl st, ch 1, turn, skip the sl st, skip 1 st, 19 sc, dec. (20)
- Row 20: dec, 16 sc, dec. (18)
- Row 21: dec, 14 sc, dec. (16)
Fasten off, leaving a long tail for sewing.
Arms (make 2)
With dark brown, make a MR and work in a continuous spiral.
- Rnd 1: 6 sc in the MR. (6)
- Rnd 2: (inc, sc) x 3. (9)
- Rnd 3: 9 sc. (9) Change to light brown.
- Rnd 4–7: 9 sc. (9)
Fasten off, leaving a long tail for sewing.
Legs (make 2)
With dark brown, make a MR and work in a continuous spiral.
- Rnd 1: 6 sc in the MR. (6)
- Rnd 2: 3 inc, 3 sc. (9)
- Rnd 3: 9 sc. (9) Change to light brown.
- Rnd 4: (inc, 2 sc) x 3. (12)
- Rnd 5: 6 sc, (sc, inc) x 3. (15)
- Rnd 6: 6 sc, (inc, 2 sc) x 3. (18)
- Rnd 7–9: 18 sc. (18)
- Rnd 10: (dec, 7 sc) x 2. (16)
Fasten off, leaving a long tail for sewing.
Turtle backpack
Shell
With green, make a MR and work in a continuous spiral.
- Rnd 1: 8 sc in the MR. (8)
- Rnd 2: inc x 8. (16)
- Rnd 3: (sc, inc) x 8. (24)
- Rnd 4: (inc, 3 sc) x 6. (30)
- Rnd 5–6: 30 sc. (30)
- Rnd 7 (BLO): (dec, 3 sc) x 6. (24)
- Rnd 8: (dec, sc) x 8. (16) Stuff.
- Rnd 9: dec x 8. (8) Fasten off.
Shell edge
Join green in the free front loop of Rnd 6.
- Rnd 1: 30 sc. (30)
- Rnd 2: 30 sc. (30) Fasten off.
Turtle head
With green:
- Rnd 1: 6 sc in a MR. (6)
- Rnd 2: (inc, sc) x 3. (9)
- Rnd 3: 9 sc. (9)
- Rnd 4: (dec, sc) x 3. (6)
Fasten off, leaving a long tail for sewing.
Turtle legs (make 4)
With green:
- Rnd 1: 4 sc in a MR. (4)
- Rnd 2: (sc, inc) x 2. (6)
- Rnd 3: 6 sc. (6) Fasten off.
Turtle tail
With green, ch 4, turn and start in the second ch: sl st, 2 sc. Fasten off.
Bubble tea cup
Cup
- Rnd 1: 6 sc in a MR with light brown. (6)
- Rnd 2: inc x 6. (12)
- Rnd 3: (sc, inc) x 6. (18)
- Rnd 4: (2 sc, inc) x 6. (24)
- Rnd 5 (BLO): 24 sc. (24)
- Rnd 6–7: 24 sc. (24) The original says "24 inc" here, but Rnd 8 needs 24 sts, so work plain sc.
- Rnd 8: (7 sc, inc) x 3. (27) Change to beige.
- Rnd 9–10: 27 sc. (27)
- Rnd 11: (8 sc, inc) x 3. (30)
- Rnd 12–13: 30 sc. (30)
- Rnd 14: (9 sc, inc) x 3. (33)
- Rnd 15: 33 sc. (33)
- Rnd 16: (10 sc, inc) x 3. (36)
- Rnd 17: 36 sc. (36)
Lid
With white:
- Rnd 1: 6 sc in a MR. (6)
- Rnd 2: inc x 6. (12)
- Rnd 3: (sc, inc) x 6. (18)
- Rnd 4: (2 sc, inc) x 6. (24)
- Rnd 5: (3 sc, inc) x 6. (30)
- Rnd 6: (4 sc, inc) x 6. (36)
- Rnd 7 (BLO): 36 sc. (36)
- Rnd 8–9: 36 sc. (36)
Straw
With white:
- Rnd 1: 6 sc in a MR. (6)
- Rnd 2: 6 sc. (6) Keep working plain rounds until the straw is as long as you like.
Stuff the cup, sew the lid on top and attach the straw to the center of the lid.
Assembly
- Sew the ears between Rnd 18 and Rnd 20 of the head, with 6 sts between them.
- Sew the body to the head between Rnd 10 and Rnd 24 of the head.
- Sew the arms and legs to the body.
- Sew the turtle's head, four legs and tail under the shell edge.
- Make the strap: ch 80 and use a sewing needle to thread it through the turtle's legs. Loop it around the capybara's arms like backpack straps.
Tip: Pin the head, ears and turtle in place first and check the capybara sits upright before you sew anything permanently.
Optional & Creative Ideas
- Customize colors: Make the turtle in teal or mint, or swap the bubble tea cup for a pink strawberry milk version.
- Add boba pearls: Embroider black French knots around the bottom of the cup like in the photo.
- Keychain version: Make the turtle on its own in thinner yarn and add a keyring loop to the shell.
- Swap the backpack: Use the same strap to carry a tiny duck, frog or bag instead of the turtle.
- Seasonal set: Add a small scarf or hat to the capybara for a winter gift.
Final Thoughts
This capybara is a fun make because the accessories tell a little story. The turtle backpack and bubble tea cup turn a simple oval toy into a gift people remember.
Patterns and instructions on OpenCrochet are for personal use. Please do not redistribute copies of this content; share the page link instead.


