

Hedgehog Amigurumi Crochet Pattern with Loop Stitch Spines
Crochet a hedgehog with a shaggy loop stitch spine coat and movable arms and legs. US terms, sport yarn, tips and FAQ.
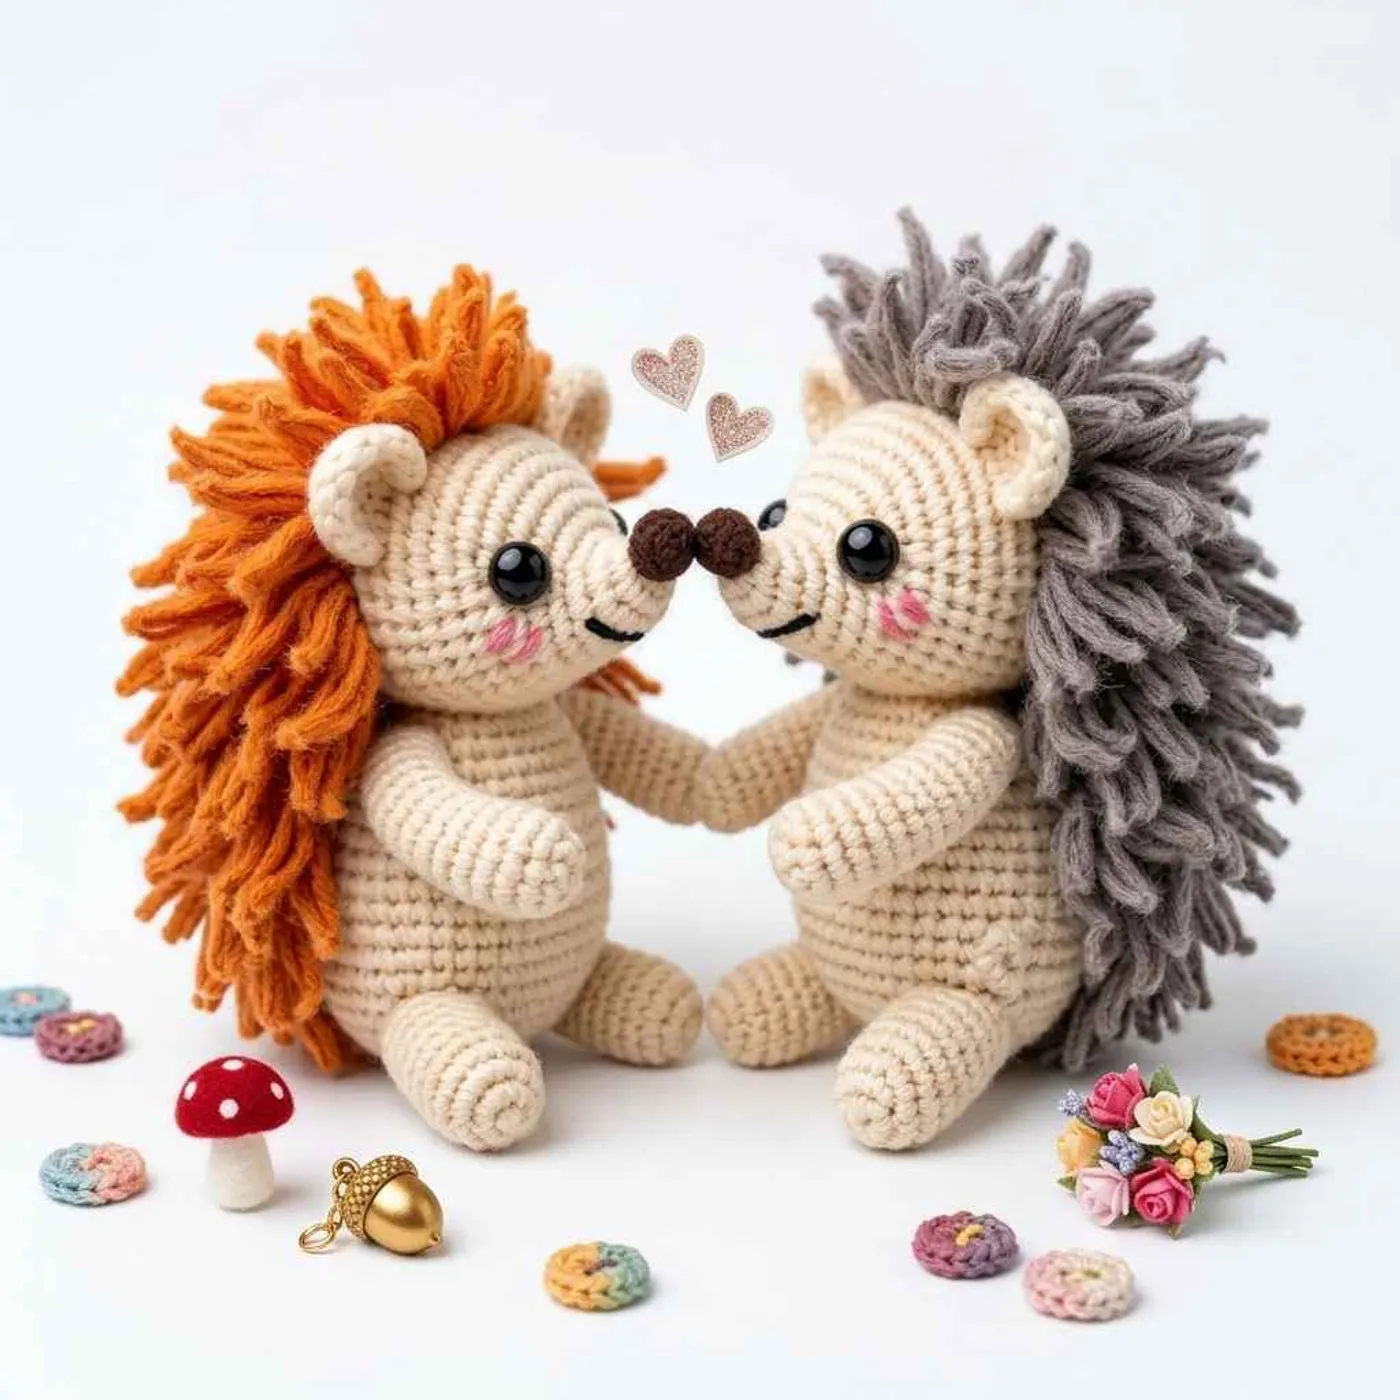
This hedgehog amigurumi is a small, sitting plush with a cream body and a thick coat of shaggy spines. On the cover there are two of them holding hands: one with bright orange spines and one with soft grey spines, both with rosy cheeks and a little dark brown nose.
It is made in sport weight yarn with a 2.2 mm hook, so the finished hedgehog is only about 4 in (10 cm) tall when sitting. That makes it a sweet pocket-size gift, a desk buddy or a matching pair for friends.
What makes this pattern different is the spine piece. Instead of sewing on dozens of small spikes, you crochet one flat panel in rows of single crochet loop stitch, then wrap it over the back of the head and body. The loops can be left as they are or cut for a fluffier look.
The arms and legs have tiny toes made with clusters of double crochet, and they are joined with yarn through the body so they can move. The pattern is written in US terms.
Finished size
The finished hedgehog is about 4 in (10 cm) tall when sitting, using sport weight yarn (Daruma iroiro) and a 2.2 mm hook.
A thicker yarn and bigger hook will give a larger hedgehog. Keep the hook small enough that the fabric stays tight.
Materials overview
- Sport weight yarn in 3 colors: white or cream for the body (about 17 g), light brown or light grey for the spines (about 10 g), dark brown for the ears and nose (about 2 g)
- 2.2 mm crochet hook (close to US B-1)
- 5 mm safety eyes (2)
- Fiberfill stuffing and a yarn needle
Yarn substitution
The sample uses Daruma iroiro, a fine wool yarn. Any sport weight yarn works, and the designer says you can make it with any yarn you like.
For the spines, a yarn with a bit of halo or a slightly fuzzy wool looks especially good, because the loops fluff up. Orange, grey, light brown and even pastel colors all work.
If you switch to a DK or worsted yarn, go up to a 3–3.5 mm hook and use slightly bigger eyes. The hedgehog will grow to roughly 5–6 in.
Gauge
Gauge is not critical for a toy. Work tightly enough that the stuffing does not show between the stitches.
Common mistakes
- Overstuffing the arms and legs. The designer jokes that a firmly stuffed hedgehog will look "so buff." Stuff the arms softly, and only the foot part of the legs firmly.
- Making the loops uneven. Wrap every loop around the same finger (the designer uses the middle finger) so the spines are all the same length.
- Sewing the spines down all the way around. Leave the edge free over the ears, arms and legs so they can still move.
- Placing the eyes too far apart. Count 8 stitches between the eyes. The body section says rounds 8–9 and the assembly section says rounds 7–8, so pin them first and pick the spot that looks best on your piece.
- Cutting the tails too short. Leave about 8 in (20 cm) on each piece, and about 12 in (30 cm) on the spines, for sewing.
FAQ
Can I use safety eyes for a baby?
Safety eyes can come loose. For a baby or toddler, embroider the eyes with black yarn instead.
Do I have to cut the loops on the spines?
No. The loops look great as they are. Cutting them is optional and gives a softer, shaggier coat, like the orange hedgehog on the cover.
How do the arms and legs move?
They are not sewn flat. You pass the yarn through the arm, through the body and through the other arm, then tie the ends tightly. This lets the limbs rotate a little.
When should I attach the safety eyes?
Attach them while the body is still open, after round 29 and before the decrease rounds.
Pattern notes
- Body, ears and the leg tubes are worked in continuous rounds. Use a stitch marker.
- Arms, legs and nose start with an oval around a foundation chain. The "ch 1" counts as a stitch.
- The spines are worked flat in rows. Each row starts with ch 1.
[ ] … timesmeans repeat the instructions inside the brackets.
Body
Use MC (white or cream).
Rnd 1: Start with an adjustable ring, sc 6 (6 sts)
Rnd 2: inc 6 times (12 sts)
Rnd 3: [sc 1, inc] 6 times (18 sts)
Rnd 4: [inc, sc 2] 6 times (24 sts)
Rnd 5: [sc 3, inc] 6 times (30 sts)
Rnd 6: [sc 2, inc, sc 2] 6 times (36 sts)
Rnds 7–11: sc 36 (36 sts)
Rnd 12: [inc, sc 5] 6 times (42 sts)
Rnds 13–17: sc 42 (42 sts)
Rnd 18: [inc, sc 6] 6 times (48 sts)
Rnds 19–23: sc 48 (48 sts)
Rnd 24: [inc, sc 7] 6 times (54 sts)
Rnds 25–29: sc 54 (54 sts)
Tip: If you use safety eyes, attach them now, with 8 sts between them (see Assembly).
Rnd 30: [dec, sc 7] 6 times (48 sts)
Rnd 31: [dec, sc 6] 6 times (42 sts)
Rnd 32: [dec, sc 5] 6 times (36 sts)
Rnd 33: [dec, sc 4] 6 times (30 sts)
Rnd 34: [dec, sc 3] 6 times (24 sts)
Rnd 35: [dec, sc 2] 6 times (18 sts)
Rnd 36: [dec, sc 1] 6 times (12 sts)
Stuff the body firmly before it closes.
Rnd 37: dec 6 times (6 sts)
Cut the yarn, leaving a tail of about 8 in (20 cm). Weave it through the front loop of each remaining stitch, pull tight and fasten off.
Arms (make 2)
Use MC.
Rnd 1: Ch 8. Ch 1 (counts as a st), sc in the 2nd ch from the hook, sc 6, sc 4 in the last ch, rotate and work along the other side of the chain, sc 6, inc (20 sts)
Rnd 2: [inc, sc 8, inc] 2 times (24 sts)
Rnd 3: sc 9, [3 dc in the next st, sc 1] 4 times, sc 7 (32 sts)
Rnd 4: sc 32 (32 sts)
Rnd 5: dec, sc 7, [dc3tog, sc 1] 4 times, sc 5, dec (22 sts)
Rnd 6: dec, sc 6, dec 4 times, sc 4, dec (16 sts)
Sl st in the first st. Cut the yarn, leaving a tail of about 8 in (20 cm).
Stuff softly. Join the open edge with whip stitches: insert the needle into the front loop of the next st, then into the sl st, and work 7 more whip stitches, each joining 2 stitches that face each other.
Legs (make 2)
Use MC.
Rnd 1: Ch 6. Ch 1 (counts as a st), sc 1 in the 2nd ch from the hook, sc 4 in the last ch, rotate and work along the other side of the chain, sc 4, inc (16 sts)
Rnd 2: [inc, sc 6, inc] 2 times (20 sts)
Rnd 3: inc, sc 6, [3 dc in the next st, sc 1] 4 times, sc 4, inc (30 sts)
Rnd 4: sc 30 (30 sts)
Rnd 5: sc 8, [dc3tog, sc 1] 4 times, sc 6 (22 sts)
Rnd 6: sc 8, dec 4 times, sc 6 (18 sts)
Rnds 7–12: sc 18 (18 sts)
Stuff the foot firmly and the leg softly.
Rnd 13: [dec, sc 1] 6 times (12 sts)
Rnd 14: dec 6 times (6 sts)
Cut the yarn, leaving a tail of about 8 in (20 cm). Close the end the same way as the body.
Nose
Use MC.
Rnd 1: Ch 3. Ch 1 (counts as a st), inc in the 2nd ch from the hook, sc 1, sc 5 in the last ch, rotate and work along the other side, sc 1, inc (12 sts)
Rnd 2: [sc 1, inc, sc 3] 2 times (16 sts)
Rnds 3–4: sc 16 (16 sts)
Cut the yarn, leaving a tail of about 8 in (20 cm).
Spines
Use CC1 (light brown, light grey or any spine color). Work in rows. Make every sc loop around your middle finger so all the loops are the same length.
Row 1: Ch 21, inc in the 2nd ch from the hook, sc 18, inc (22 sts)
Row 2: ch 1, sc loop 22 (22 sts)
Row 3: ch 1, inc, sc 20, inc (24 sts)
Row 4: ch 1, sc loop 24 (24 sts)
Rows 5–12: Repeat this pair of rows 4 times: ch 1, sc 24; then ch 1, sc loop 24 (24 sts)
Row 13: ch 1, dec, sc 20, dec (22 sts)
Row 14: ch 1, sc loop 22 (22 sts)
Row 15: ch 1, sc 22 (22 sts)
Row 16: ch 1, sc loop 22 (22 sts)
Row 17: ch 1, dec, sc 18, dec (20 sts)
Row 18: ch 1, sc loop 20 (20 sts)
Row 19: ch 1, sc 20 (20 sts)
Row 20: ch 1, sc loop 20 (20 sts)
Row 21: ch 1, dec, sc 16, dec (18 sts)
Row 22: ch 1, sc loop 18 (18 sts)
Row 23: ch 1, sc 18 (18 sts)
Row 24: ch 1, sc loop 18 (18 sts)
Row 25: ch 1, dec, sc 14, dec (16 sts)
Row 26: ch 1, sc loop 16 (16 sts)
Row 27: ch 1, sc 16 (16 sts)
Row 28: ch 1, sc loop 16 (16 sts)
Row 29: ch 1, dec, sc 12, dec (14 sts)
Row 30: ch 1, sc loop 14 (14 sts)
Row 31: ch 1, dec, sc 10, dec (12 sts)
Row 32: ch 1, sc loop 12 (12 sts)
Row 33: ch 1, [dec, sc 2, dec] 2 times (8 sts)
Row 34: ch 1, sc loop 8 (8 sts)
Row 35: skip 1 st, sl st 7 (7 sts)
Cut the yarn, leaving a long tail of about 12 in (30 cm).
Ears (make 2)
Use CC2 (dark brown).
Rnd 1: Start with an adjustable ring, sc 6 (6 sts)
Rnd 2: inc 6 times (12 sts)
Rnd 3: sc 12 (12 sts)
Rnd 4: [dec, sc 1] 4 times (9 sts)
Cut the yarn, leaving a tail of about 8 in (20 cm).
Assembly
- Nose: Stuff the nose lightly and sew it to the body between rounds 7 and 13.
- Face: Place the eyes between rounds 7 and 8 of the body, with 8 sts between them. Embroider the tip of the nose with CC2.
- Ears: Sew the ears between rounds 4 and 6 of the body.
- Arms: With MC on a needle, go through the 6th foundation chain of one arm, then through the body between rounds 17 and 18, then through the second arm. Come back the same way and tie both yarn ends tightly.
- Legs: Attach them the same way as the arms. Go under the 3rd round from the end of each leg and through the body between rounds 29 and 30.
- Spines: Sew the last row of the spines to round 4 of the body. Let the panel cover the ears, arms and legs, and do not sew the edges down over them, so they can still move.
Tip: Once the spines are on, you can cut the loops for a fluffier coat. It is completely optional.
Optional & Creative Ideas
- Matching pair: Make one with orange spines and one with grey spines, like on the cover, and pose them holding hands.
- Pastel hedgehog: Use pink, lilac or mint for the spines for a nursery-friendly version.
- Cut or uncut: Leave the loops for a curly look, or cut them all for a soft, shaggy coat.
- Rosy cheeks: Add a little pink blush or two tiny pink stitches under the eyes.
- Seasonal touch: Tuck a small crocheted apple, leaf or mushroom into its arms for an autumn display.
Final Thoughts
This little hedgehog is all about the loop stitch spine panel, which gives it a real fuzzy coat with very little sewing. Make one, then make a friend for it in a different spine color.
Patterns and instructions on OpenCrochet are for personal use. Please do not redistribute copies of this content; share the page link instead.


