

Baby Corgi Crochet Pattern: Chunky Amigurumi Puppy
Crochet a chunky baby corgi. Easy amigurumi with a cream blaze, ears and tail.
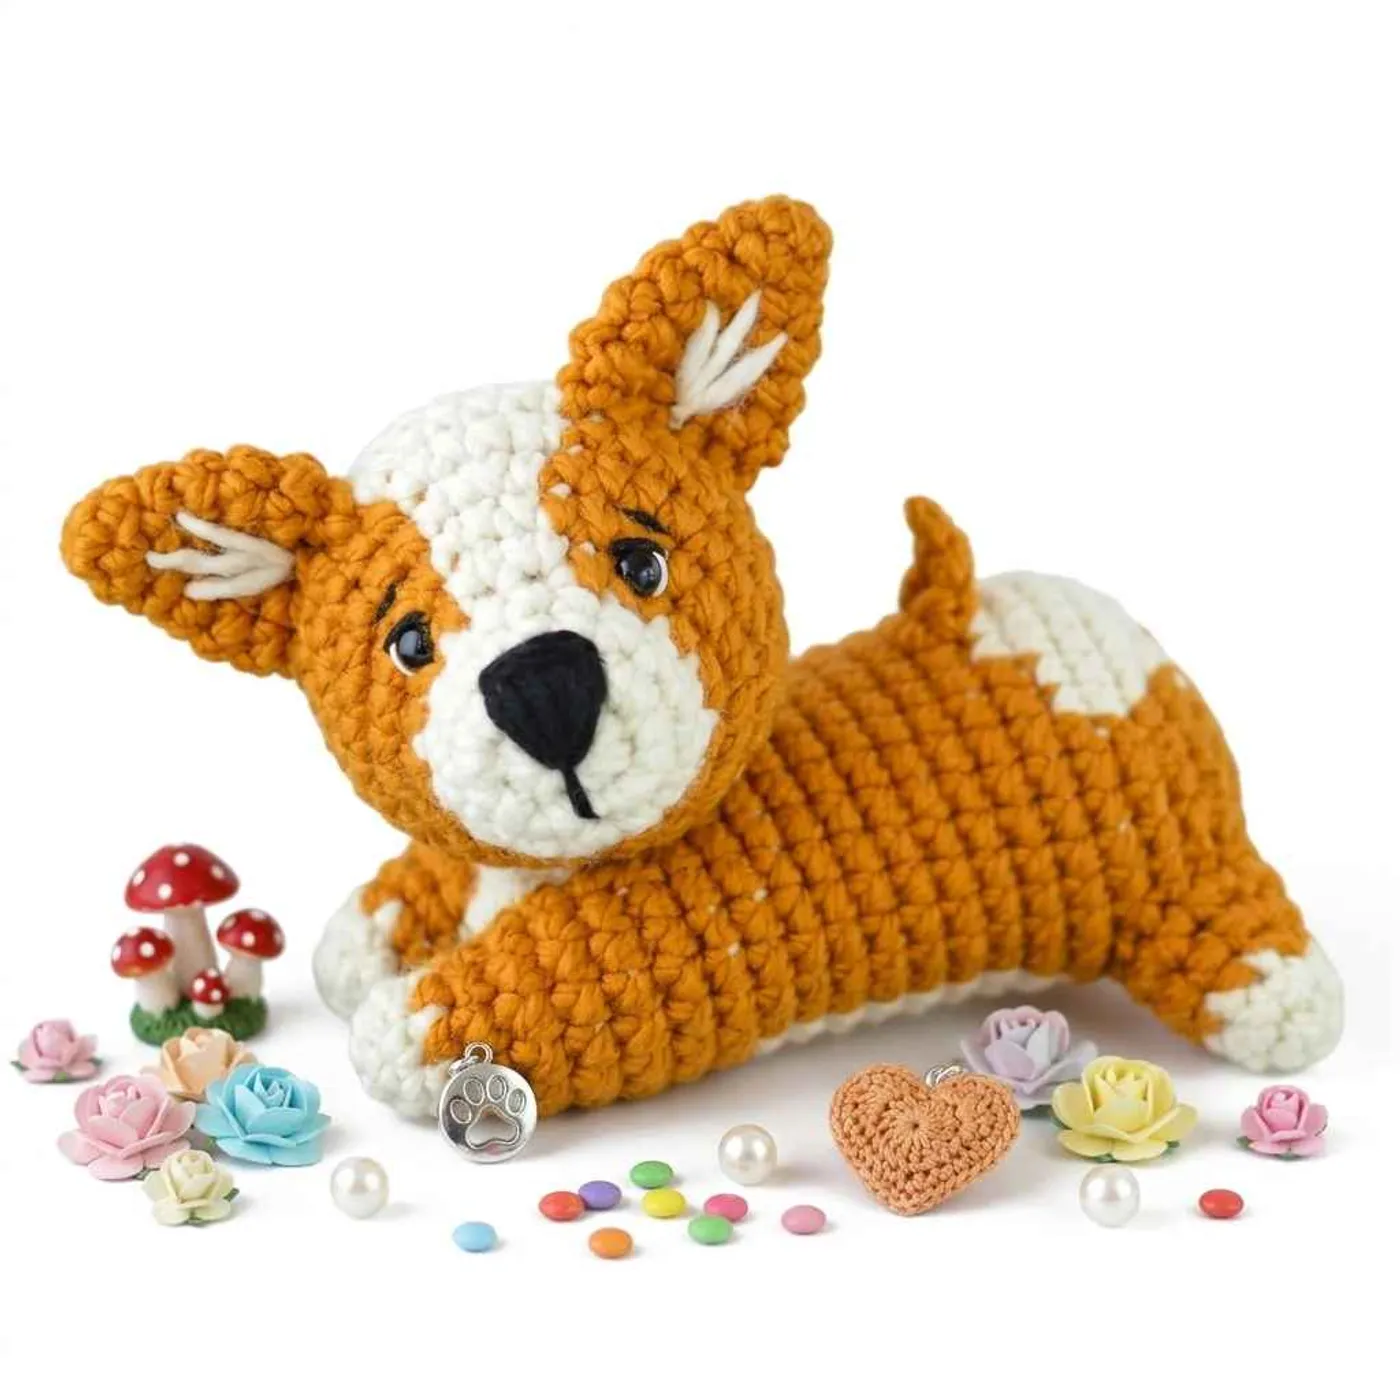
About this baby corgi crochet pattern
This baby corgi is a chunky amigurumi puppy in two colors: a warm orange body and a cream face blaze, chest, paws and tail tip. It lies in a relaxed, stretched-out pose, with its head up and its ears standing tall.
It is worked with a 7 mm hook and a thick, soft yarn, so each piece grows quickly. The finished dog is about 19 cm tall and 26.5 cm long, which makes it a good size to hold on your lap or to display on a shelf.
The corgi is made from seven pieces: the front legs and body in one piece, the head, two back legs, two ears and a tail. Most of the pieces are worked in joined rounds, and only the tail is worked back and forth in rows.
The spots of cream on the body and head come from changing yarn color inside the round. You carry the unused color along the inside of the piece, and you cut it only when the pattern tells you to.
The face is finished with embroidery: white and black floss around the safety eyes, straight eyebrows, a black nose and cream lines inside the ears.
Safety note: This piece is not a toy. Never leave a baby or child unattended with this project.
Finished size
The finished corgi is about 7 1/2 in. (19 cm) tall and 10 1/2 in. (26.5 cm) long.
The gauge is 10 sc and 10 rnds = about 4 in. (10 cm). Check your gauge before you begin, because a looser fabric makes the corgi larger and lets the stuffing show.
Yarn substitution
The pattern uses Lion Brand Wool-Ease Thick & Quick, one ball of cream (A, Fisherman) and one ball of orange (B, Butterscotch). Any super bulky yarn that gives the same gauge with a 7 mm hook will work.
Choose two colors with clear contrast, such as cream and orange, so the blaze, chest and paws stand out. A smooth yarn also shows the color changes more neatly.
If you use a thinner yarn and a smaller hook, the corgi will be smaller, and you should choose smaller safety eyes to match.
Common mistakes
- Carrying the yarn too tightly. Keep the unused color loose along the inside of the piece, or the fabric will pucker at the color changes.
- Miscounting the color blocks. Many rounds have two or three color sections. Count each block and check the total at the end of the round.
- Cutting color A too early. Keep A attached until the pattern says to cut it, near the end of the body and the head.
- Adding the eyes too late. Fit the safety eyes before you stuff the head, between rounds 5 and 6, about 7 stitches apart.
- Under-stuffing. Stuff firmly and in stages. Begin stuffing the body after round 16, and finish before the last rounds close the opening.
FAQ
How do I change colors inside the round?
Work the last stitch of the old color until two loops remain on the hook. Yarn over with the new color and draw it through both loops. Then continue with the new color and carry the other color on the wrong side.
What is the invisible join?
After the last stitch of a round, drop the loop from the hook. Insert the hook from the wrong side to the right side in the first stitch of the round, pull up the loop, then chain 1 and continue.
When do I insert the safety eyes?
Insert the 10 mm safety eyes on the front of the head between rounds 5 and 6, about 7 stitches apart, before you start stuffing the head.
Is the corgi safe for children?
The pattern says it is not a toy and should not be left with a baby or child unattended. It has plastic safety eyes and embroidered details, so treat it as a decorative piece.
Can I use a different size of yarn?
Yes, as long as you check your gauge. A thicker yarn and a bigger hook make a bigger dog, and a thinner yarn and a smaller hook make a smaller one.
Pattern
Front legs and body
First front leg
With A, make a magic ring.
- Rnd 1 (RS): with A, work
6 scin the ring. Invisible join. - Rnd 2: with A, ch 1,
scin each st around. Change to B. Invisible join. - Rnd 3: with B, ch 1,
(sc in next 2 sts, 2 sc in next st)twice. Invisible join (8 sc) - Rnd 4: with B, ch 1,
(sc in next 3 sts, 2 sc in next st)twice. Invisible join (10 sc)
Fasten off.
Second front leg
Make the same as the first leg. Change to A in the last st of Rnd 4 and do not fasten off.
Join the legs
- Rnd 5: with A still attached to the second leg, ch 3 (for the space between the legs). With B, sl st in the first st of the last rnd of the first leg, ch 1,
scin the same st and in the next 9 sts of the first leg. With A, working in the back bumps of the ch 3 between the legs,hdcin the next 3 ch. With B,scin the first st of the second leg following the ch 3 and in the next 9 sts. With A,hdcin each ch of the ch 3 between the legs. Invisible join (26 sts)
Do not fasten off.
Body
- Rnd 6: with A, ch 1,
2 scin the first st. With B,scin the next 8 sts. With A,2 scin the next st,scin the next 3 sts,2 scin the next st. With B,scin the next 8 sts. With A,2 scin the next st,scin the next 3 sts. Invisible join (30 sc) - Rnds 7-8: with A, ch 1,
scin the next 3 sts. With B,scin the next 7 sts. With A,scin the next 7 sts. With B,scin the next 8 sts. With A,scin the next 5 sts. Invisible join. - Rnd 9: with A, ch 1,
scin the next 3 sts. With B,scin the next 22 sts. With A,scin the next 5 sts. Invisible join. - Rnds 10-16: with A, ch 1,
scin the next 4 sts. With B,scin the next 21 sts. With A,scin the next 5 sts. Invisible join.
Begin stuffing the piece, and keep stuffing as you go until it is complete.
- Rnd 17: with A, ch 1,
scin the next 4 sts. With B,2 scin the next st,scin the next 9 sts,2 scin the next st,scin the next 9 sts,2 scin the next st. With A,scin the next 5 sts. Invisible join (33 sc) - Rnd 18: with A, ch 1,
scin the next 3 sts. With B,scin the next 11 sts. With A,scin the next 5 sts. With B,scin the next 10 sts. With A,scin the next 4 sts. Invisible join. - Rnd 19: with A, ch 1,
scin the next 2 sts. With B,scin the next 10 sts. With A,scin the next 9 sts. With B,scin the next 9 sts. With A,scin the next 3 sts, change to B. Invisible join. - Rnd 20: with B, ch 1,
scin the next 12 sts. With A,scin the next 9 sts. With B,scin the next 12 sts. Invisible join. - Rnd 21: with B, ch 1,
scin the next 10 sts,sc2tog,scin the next st. With A,scin the next 8 sts. With B,sc2tog,scin the next 8 sts,sc2tog. Invisible join (30 sc) - Rnd 22: with B, ch 1,
(sc in next 3 sts, sc2tog)twice,scin the next 3 sts. With A,sc2tog,scin the next 3 sts,sc2tog. With B,(sc in next 3 sts, sc2tog)twice. Invisible join (24 sc)
Cut A. Work the rest of the piece with B only.
- Rnd 23: ch 1,
*sc in next 2 sts, sc2tog*, rep from * around. Invisible join (18 sc) - Rnd 24: ch 1,
*sc in next st, sc2tog*, rep from * around. Invisible join (12 sc)
Finish stuffing.
- Rnd 25: ch 1,
*sc2tog*, rep from * around. Invisible join (6 sc)
Fasten off, leaving a long yarn tail. Thread the tail through the top of the sts of the last rnd, pull to close the opening and knot securely.
Head
With A, make a magic ring.
- Rnd 1: with A, work
8 scin the ring. Invisible join. - Rnd 2: with A, ch 1,
2 scin each st around. Invisible join (16 sc) - Rnd 3: with A, ch 1,
scin each st around. Invisible join. - Rnd 4: with A, ch 1,
scin each st around, change to B. Invisible join. - Rnd 5: with B, ch 1,
(sc in next st, 2 sc in next st)3 times,scin the next st. With A,2 scin each of the next 2 sts. With B,(sc in next st, 2 sc in next st)3 times,scin the next st. Invisible join (24 sc) - Rnd 6: with B, ch 1,
(sc in next 2 sts, 2 sc in next st)3 times,scin the next 2 sts. With A,scin the next 3 sts. With B,(sc in next 2 sts, 2 sc in next st)3 times,scin the next st. Invisible join (30 sc) - Rnd 7: with B, ch 1,
scin the next 14 sts. With A,scin the next st,2 scin the next st,scin the next st. With B,scin the next 13 sts. Invisible join (31 sc) - Rnd 8: with B, ch 1,
scin the next 14 sts. With A,2 scin the next st,scin the next 2 sts,2 scin the next st. With B,scin the next 13 sts. Invisible join (33 sc) - Rnd 9: with B, ch 1,
sc2tog,scin the next 12 sts. With A,scin the next 7 sts. With B,scin the next 12 sts. Invisible join (32 sc) - Rnd 10: with B, ch 1,
scin the next 13 sts. With A,scin the next 7 sts. With B,scin the next 12 sts. Invisible join.
Following the package instructions, insert the plastic safety eyes on the front of the head between Rnds 5 and 6, about 7 sts apart. Begin stuffing the piece, and keep stuffing as you go until it is complete.
- Rnd 11: with B, ch 1,
scin the next 13 sts. With A,sc2tog,scin the next 3 sts,sc2tog. With B,scin the next 12 sts. Invisible join (30 sc) - Rnd 12: with B, ch 1,
(sc in next 4 sts, sc2tog)twice,scin the next 2 sts. With A,scin the next 2 sts,sc2tog. With B,(sc in next 4 sts, sc2tog)twice. Invisible join (25 sc)
Cut A. Work the rest of the piece with B only.
- Rnd 13: ch 1,
*sc in next 3 sts, sc2tog*, rep from * around. Invisible join (20 sc) - Rnd 14: ch 1,
*sc in next 2 sts, sc2tog*, rep from * around. Invisible join (15 sc)
Finish stuffing.
- Rnd 15: ch 1,
*sc in next st, sc2tog*, rep from * around. Invisible join (10 sc)
Fasten off, leaving a long tail. Thread the tail through the top of the sts of the last rnd, pull to close the opening and knot securely.
Back legs (make 2)
With A, make a magic ring.
- Rnd 1: with A, work
6 scin the ring. Invisible join. - Rnd 2: with A, ch 1,
scin each st around, change to B. Invisible join.
Cut A. Work the rest of the piece with B only.
- Rnd 3: ch 1,
(sc in next 2 sts, 2 sc in next st)twice. Invisible join (8 sc) - Rnd 4: ch 1,
(sc in next 3 sts, 2 sc in next st)twice. Invisible join (10 sc) - Rnd 5: ch 1,
(sc in next 4 sts, 2 sc in next st)twice. Invisible join (12 sc)
Fasten off, leaving a long tail for sewing. Stuff the legs.
Ears (make 2)
With B, make a magic ring.
- Rnd 1: work
5 scin the ring. Invisible join. - Rnd 2: ch 1,
2 scin the first st,scin the next 4 sts. Invisible join (6 sc) - Rnd 3: ch 1,
(sc in next 2 sts, 2 sc in next st)twice. Invisible join (8 sc) - Rnd 4: ch 1,
(sc in next 3 sts, 2 sc in next st)twice. Invisible join (10 sc) - Rnd 5: ch 1,
(sc in next 4 sts, 2 sc in next st)twice. Invisible join (12 sc) - Rnd 6: ch 1,
scin each st around. Invisible join.
Fasten off, leaving a long tail for sewing.
Tail
The tail is worked back and forth in rows. With B, ch 4.
- Row 1:
sl stin the 2nd ch from the hook,hdcin the next ch,dcin the next ch (3 sts)
Fasten off, leaving a long tail for sewing.
Finishing
Using the photos as a guide, and the yarn tails still attached to the pieces whenever possible, assemble the corgi as follows:
- With white floss, embroider curves along the outer edges of the safety eyes for the whites of the eyes.
- With black floss, embroider curves along the upper edges of the safety eyes, and straight-stitch eyebrows.
- With black yarn or floss, embroider the nose between Rnds 1 and 3 of the head.
- With A, embroider straight lines on the ears.
- With B, sew the ears to the top of the head between Rnds 8 and 10, about 7 sts apart.
- With B, sew the back legs to the body between Rnds 18 and 23.
- With B, sew the tail to the body between Rnds 16 and 17.
- With B, sew the head to the body.
- Weave in all ends.
Optional & Creative Ideas
- Customize colors: Make the corgi in other dog colors, such as gray and white, or black and tan, keeping a strong contrast for the blaze.
- Change the size: Use a thicker yarn and larger safety eyes for a bigger corgi, or a thinner yarn for a smaller one.
- Add an accessory: Crochet a small collar or a scarf in a contrast color.
- Gift idea: Make a pair in different colors as a gift for a dog lover.
Final Thoughts
This corgi is chunky, quick and full of personality. Check your gauge, keep the carried yarn loose, and take your time with the embroidery, because the face is what brings it to life.
Patterns and instructions on OpenCrochet are for personal use. Please do not redistribute copies of this content; share the page link instead.


