

Cute Turtle Crochet Pattern: Amigurumi Keychain
Crochet a tiny green turtle keychain with a yellow belly, shell, hands, legs and tail. Quick beginner amigurumi worked from magic rings.
About this cute turtle crochet pattern
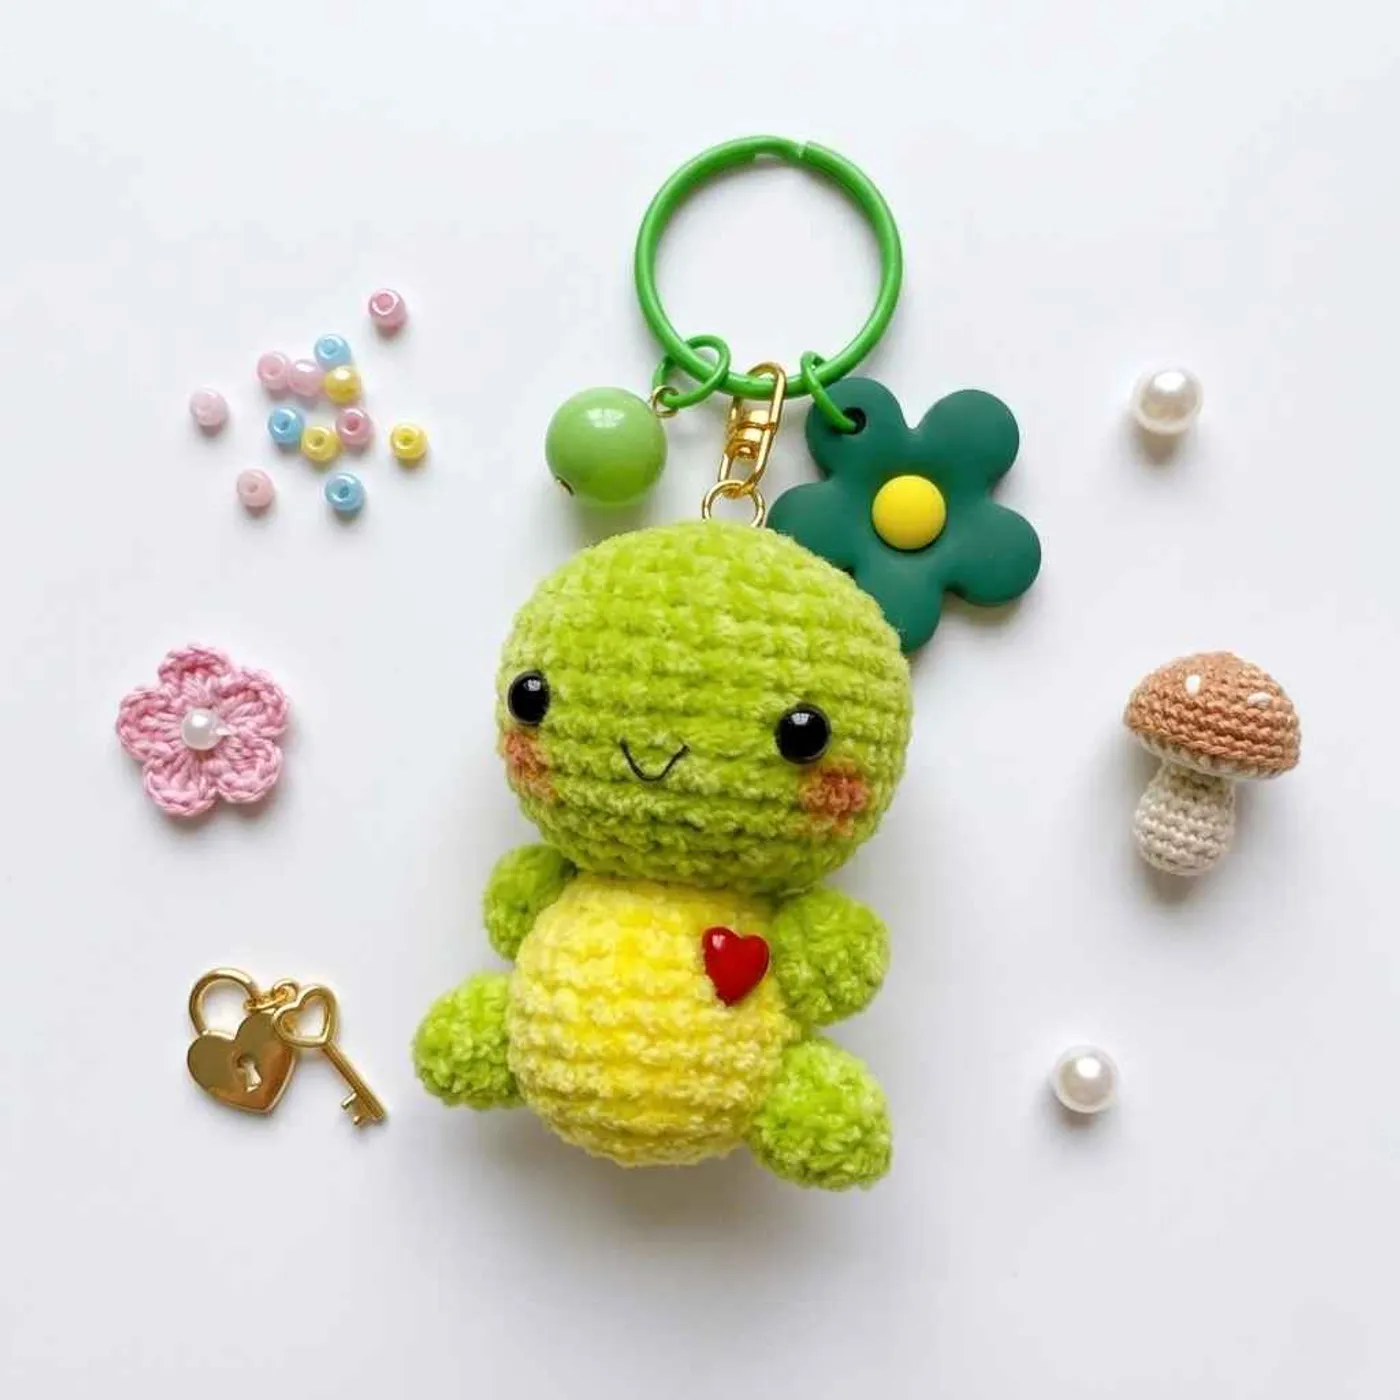
This is a tiny turtle amigurumi with a round green head, a yellow belly, two hands, two legs, a shell and a small tail. In the photo it hangs from a key ring on a bag, with a flower charm and a bead beside it.
Every piece starts from a magic ring and uses only single crochet, increases and decreases. That makes it a good choice if you are new to amigurumi, or if you want a quick project to finish in one sitting.
The turtle is built from separate parts that you sew together at the end: a head, a body, hands, legs, a tortoiseshell and a tail. The photo shows the finished turtle with a smiling embroidered face, pink cheeks and a small red heart on the belly.
As the designer says, you can change the colors and details to suit your taste. A different yarn color, or a different face, will give the turtle its own personality.
The original does not list a hook size, yarn weight or finished size, so the notes below explain how to choose them yourself.
Finished size
The original does not give a size. The photo shows a small keychain that hangs from a bag handle.
The head has 36 stitches at its widest round, and the body has 24. With a fine yarn and a small hook the turtle stays small, and a thicker yarn with a bigger hook gives a larger, softer toy.
Tip: Use the same yarn weight for every piece so that the head, body and limbs stay in proportion.
Yarn substitution
The yarn in the photo has a soft, plush look. Any smooth yarn works, and cotton or a soft acrylic in a fine or sport weight suits a small keychain best.
You need two colors: green for the head, hands, legs, shell and tail, and yellow for the body. Choose a bright yellow and a clear green so the belly stands out.
Use a hook one size smaller than the yarn label suggests. A tight fabric keeps the stuffing inside and gives you a smooth, round shape.
Common mistakes
- Stuffing too little. The head and body are spheres, so push the filling into the curve before the last decrease rounds close the opening.
- Loose increases. Check the stitch total in brackets at the end of each round to keep the shape even.
- Different sizes for the paired pieces. Make the two hands and the two legs the same, and pin them in place before you sew.
- Placing the face too far apart. Pin the eyes and check the face from the front before you fix them.
- Skipping the tails. Leave a long tail on every piece that you sew on, so you can attach it without extra yarn.
FAQ
What is the tortoiseshell piece?
It is a small round piece, 18 stitches around, that forms the shell. The pattern gives you its rounds but not where to sew it, so place it on the back of the body.
Do I need to stuff every part?
Stuff the head and the body. The hands, legs, shell and tail are very small, so stuff them lightly or not at all, depending on the look you want.
How do I turn it into a keychain?
The original does not include keychain instructions. In the photo a green ring and a charm are attached at the top. Sew a loop of yarn or a clasp securely to the top of the head.
Are the eyes safe for small children?
Safety eyes and beads can come loose, so they are not suitable for babies or young children. For a toy, embroider the eyes with black thread.
Can I change the colors?
Yes. The designer suggests changing the colors and details to suit your preferences.
Pattern
Head
- Rnd 1:
6 scin magic ring [6] - Rnd 2:
(inc) x 6[12] - Rnd 3:
(sc, inc) x 6[18] - Rnd 4:
(2 sc, inc) x 6[24] - Rnd 5:
(3 sc, inc) x 6[30] - Rnd 6:
(4 sc, inc) x 6[36] - Rnd 7-11:
36 sc[36] - Rnd 12:
(4 sc, dec) x 6[30] - Rnd 13:
(3 sc, dec) x 6[24] - Rnd 14:
(2 sc, dec) x 6[18] - Rnd 15:
(sc, dec) x 6[12]
Stuff the head. The original does not give a finishing step for the head, so fasten off and leave a tail for sewing.
Body
- Rnd 1:
6 scin magic ring [6] - Rnd 2:
(inc) x 6[12] - Rnd 3:
(sc, inc) x 6[18] - Rnd 4:
(2 sc, inc) x 6[24] - Rnd 5-9:
24 sc[24] - Rnd 10:
(2 sc, dec) x 6[18] - Rnd 11:
(sc, dec) x 6[12]
Stuff the body, then fasten off and leave a tail for sewing.
Hands (make 2)
- Rnd 1:
6 scin magic ring [6] - Rnd 2:
(sc, inc) x 3[9] - Rnd 3:
9 sc[9]
Fasten off and leave a tail for sewing.
Legs (make 2)
- Rnd 1:
6 scin magic ring [6] - Rnd 2:
(sc, inc) x 3[9] - Rnd 3-4:
9 sc[9]
Fasten off and leave a tail for sewing.
Tortoiseshell
- Rnd 1:
6 scin magic ring [6] - Rnd 2:
(inc) x 6[12] - Rnd 3:
(sc, inc) x 6[18] - Rnd 4-5:
18 sc[18]
Fasten off and leave a tail for sewing.
Tail
- Rnd 1:
6 scin magic ring [6] - Rnd 2:
(inc) x 6[12] - Rnd 3-9:
12 sc[12] - Rnd 10:
(2 sc, dec) x 3[9] - Rnd 11-15:
9 sc[9]
Fasten off and leave a tail for sewing.
Assembly
The original does not describe the assembly, so use the photo as a guide.
- Sew the head to the top of the body.
- Sew the hands to the sides of the body, and the legs to the bottom front.
- Sew the tortoiseshell to the back and the tail below it.
- Add the eyes, a small embroidered smile, and pink cheeks if you like.
- Add a small red heart to the belly, and attach a key ring if you want a keychain.
Optional & Creative Ideas
- Customize colors: Make the turtle in other greens, blues or pinks, or use a patterned yarn for the shell.
- Add a small heart: Use felt or embroidery for the heart on the belly, as in the photo.
- Make a set: Crochet several turtles in different colors and hang them on bags or zippers.
- Gift idea: Add a flower charm and a bead to the key ring for a finished gift.
Final Thoughts
This turtle is quick and forgiving, and it is easy to personalize. Keep your stitches tight and the face small and neat, and you will end up with a charming little keychain.
Patterns and instructions on OpenCrochet are for personal use. Please do not redistribute copies of this content; share the page link instead.


