

Baby Puffin Amigurumi Crochet Pattern
Crochet a baby puffin in super bulky yarn with a colorwork white face and belly, striped beak and orange feet.
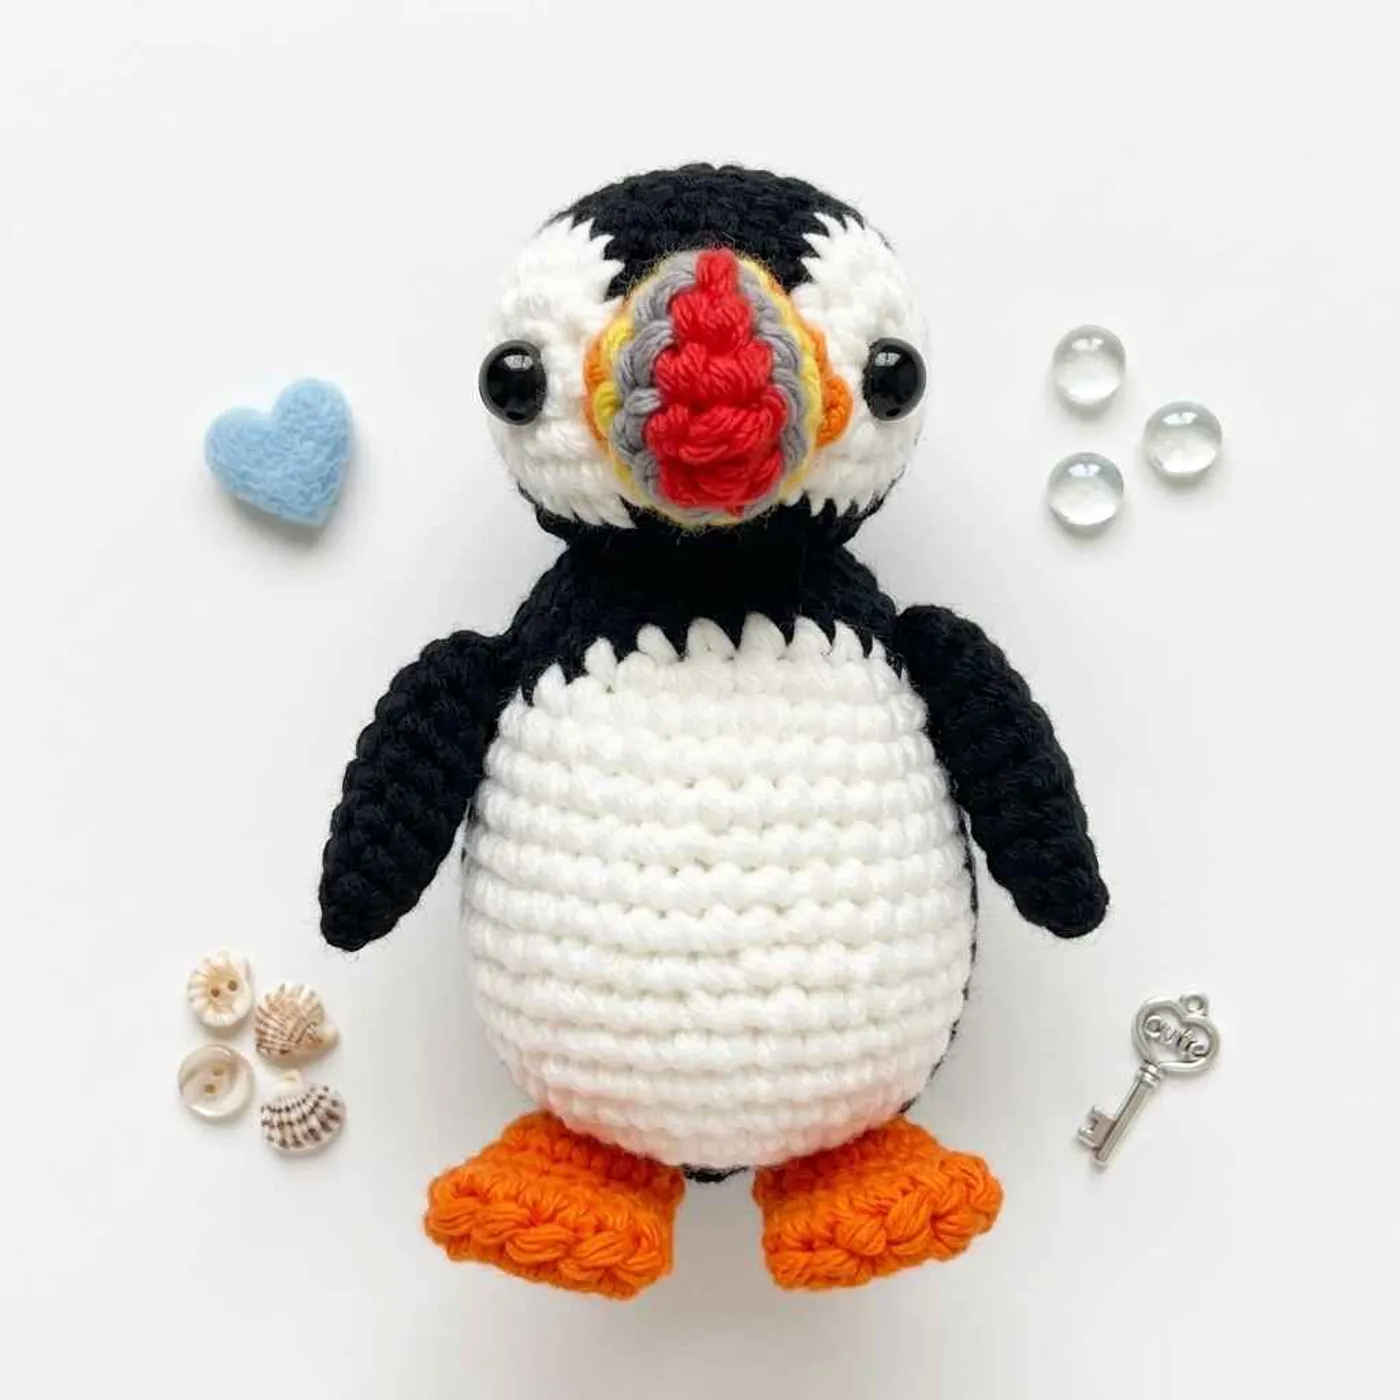
This baby puffin crochet pattern makes a chunky, standing seabird about 13 in (33 cm) tall. It has a black back and head, a white face and belly, a striped red, yellow and green beak, bright orange feet, two flat wings and a short tail.
It is worked in super bulky yarn with a 7 mm hook, so the stitches grow fast and the finished puffin feels soft and solid. The head and body are one piece, worked from the top of the head down in joined rounds with an invisible join.
What makes this puffin different from a basic amigurumi is the colorwork. The white face patches and the white belly are worked right into the rounds by switching between black and white, so there is no white patch to sew on later. The beak is also striped in the round.
It is a good project for a crocheter who can already work rounds, increases and decreases and wants to practice clean color changes on a bigger, quick-to-grow toy.
Tip: Carry the color you are not using along the inside of the piece. Keep the carried strand loose so the black and white sections do not pucker.
Finished size
About 13 in (33 cm) tall when worked at the stated gauge: 10 sc and 10 rounds = about 4 in (10 cm) with a 7 mm hook.
Check your gauge before you start. A looser gauge makes a bigger puffin and lets the stuffing show through.
Yarn substitution
The pattern lists five colors: #153 Black (A), #099 Fisherman (B), #138 Cranberry (C), #189 Butterscotch (D) and #116 Succulent (E). These shade names and numbers match Lion Brand Wool-Ease Thick & Quick, a super bulky (#6) yarn. You need 1 ball of each.
Any super bulky acrylic or wool blend that meets the gauge will work. Use a soft white or cream for B so the face and belly stand out against the black.
- Smaller puffin: Use worsted weight yarn with a 3.5–4 mm hook and 6–8 mm eyes. The puffin will come out roughly half the size.
- Beak colors: Any red, golden yellow and gray-green work. The beak is small, so leftovers from your stash are enough.
Common mistakes
- Counting the ch 1 as a stitch. Every round starts with ch 1, but it does not count. Work the first sc into the same stitch you joined into.
- Losing track of the color sections. Rounds 6 to 29 switch between A and B. Place a stitch marker at the start of each white section, and count each section as you go.
- Pulling the carried yarn too tight. A tight float makes the face and belly pucker. Spread out the stitches on your hook before each color change.
- Forgetting the eyes. Insert the 10 mm safety eyes after Rnd 13, before the opening gets too small to reach inside.
- Working Rnd 30 in both loops. Rnd 30 is worked in back loops only. This makes the flat base so the puffin can stand.
- Stuffing the feet. The feet are not stuffed. They are flattened and closed with a row of hdc and slip stitches.
FAQ
Can I give this puffin to a baby?
The PDF says it is not a toy, and safety eyes can be a choking risk for children under 3. For a child, embroider the eyes with black yarn and sew all parts on very securely.
How do I change colors in the middle of a round?
Work the last stitch of the old color up to the last yarn over. Yarn over with the new color and pull through to finish the stitch. Leave the old color hanging inside, and pick it up again at the next color section.
What is an invisible join?
After the last stitch of a round, drop the loop from your hook. Insert the hook from the wrong side to the right side in the first stitch of the round, put the loop back on the hook and pull it through. Then start the next round.
Does the puffin stand up on its own?
The back loop round (Rnd 30) gives the body a flat base, and the feet are sewn underneath. Stuff the bottom firmly and evenly so it sits flat.
Do I stuff the beak and tail?
Yes, stuff both lightly before sewing them on. Only the feet stay flat.
Pattern notes
- The puffin is made in 7 pieces: Head-Body, 2 Wings, Tail, Beak and 2 Feet.
- Head-Body, Tail, Beak and Feet are worked in joined rounds with an invisible join. Each round starts with ch 1, which does not count as a stitch.
- Each Wing is worked in one row.
- When the pattern says "with A" or "with B", switch to that color. Do not cut the old color until the pattern tells you to.
Head-Body
Head
With A (black), beginning at the top of the head, make a magic ring.
- Rnd 1 (RS): 8
scin ring; invisible join. [8] - Rnd 2: ch 1, 2
scin each st around; invisible join. [16] - Rnd 3: ch 1, (
scin next st, 2scin next st) around; invisible join. [24] - Rnd 4: ch 1, (
scin next 2 sts, 2scin next st) around; invisible join. [32] - Rnd 5: ch 1,
scin each st around; invisible join. [32]
Face
The two white face patches start here. Keep both colors attached and carry the unused one inside.
- Rnd 6: with A, ch 1,
scin next 8 sts; (with B,scin next 4 sts; with A,scin next 8 sts) twice; invisible join. [32] - Rnd 7: with A, ch 1,
scin next 3 sts, 2scin next st,scin next 3 sts; with B, 2scin next st,scin next 3 sts, 2scin next st,scin next st; with A,scin next 2 sts, 2scin each of next 2 sts,scin next 2 sts; with B,scin next st, 2scin next st,scin next 3 sts, 2scin next st; with A,scin next 3 sts, 2scin next st,scin next 3 sts; invisible join. [40] - Rnds 8 and 9: with A, ch 1,
scin next 7 sts; with B,scin next 11 sts; with A,scin next 4 sts; with B,scin next 11 sts; with A,scin next 7 sts; invisible join. [40] - Rnd 10: with A, ch 1,
scin next 9 sts; with B,scin next 9 sts; with A,scin next 4 sts; with B,scin next 9 sts; with A,scin next 9 sts; invisible join. [40] - Rnd 11: with A, ch 1, (
scin next 3 sts,sc2tog) twice; with B,scin next 3 sts,sc2tog,scin next 3 sts; with A,sc2togtwice; with B,scin next 3 sts,sc2tog,scin next 3 sts; with A, (sc2tog,scin next 3 sts) twice; invisible join. [32] - Rnd 12: with A, ch 1,
scin next 9 sts; with B,scin next 6 sts; with A,scin next 2 sts; with B,scin next 6 sts; with A,scin next 9 sts; invisible join. [32] - Rnd 13: with A, ch 1, (
scin next 2 sts,sc2tog) around; invisible join. [24]
Following the package instructions, insert the 10 mm safety eyes on the sides of the head, between Rnds 8 and 9, about 10 sts apart. Start stuffing now and keep stuffing as you go until the piece is finished.
Body
The white belly starts at the front of the body and grows wider, then narrows again near the base.
- Rnd 14: with A, ch 1,
scin next 11 sts; with B, 2scin each of next 4 sts; with A,scin next 9 sts; invisible join. [28] - Rnd 15: with A, ch 1, (
scin next 4 sts, 2scin next st) twice; with B,scin next 10 sts; with A, 2scin next st,scin next 4 sts, 2scin next st,scin next 2 sts; invisible join. [32] - Rnd 16: with A, ch 1, (2
scin next st,scin next 2 sts) 4 times; with B, 2scin next st,scin next 8 sts, 2scin next st; with A, (scin next 2 sts, 2scin next st) 3 times, 2scin next st; invisible join. [42] - Rnd 17: with A, ch 1,
scin next 16 sts; with B,scin next 12 sts; with A,scin next 14 sts; invisible join. [42] - Rnd 18: with A, ch 1,
scin next 16 sts; with B, (2scin next st,scin next 2 sts) twice, (scin next 2 sts, 2scin next st) twice; with A,scin next 14 sts; invisible join. [46] - Rnds 19–21: with A, ch 1,
scin next 16 sts; with B,scin next 16 sts; with A,scin next 14 sts; invisible join. [46] - Rnd 22: with A, ch 1,
scin next 7 sts,sc2tog,scin next 7 sts; with B,sc2tog,scin next 12 sts,sc2tog; with A,scin next 6 sts,sc2tog,scin next 6 sts; invisible join. [42] - Rnds 23 and 24: with A, ch 1,
scin next 15 sts; with B,scin next 14 sts; with A,scin next 13 sts; invisible join. [42] - Rnd 25: with A, ch 1, (
scin next 5 sts,sc2tog) twice,scin next st; with B,scin next 4 sts,sc2tog,scin next 5 sts,sc2tog,scin next st; with A,scin next 4 sts,sc2tog,scin next 5 sts,sc2tog; invisible join. [36] - Rnds 26 and 27: with A, ch 1,
scin next 13 sts; with B,scin next 12 sts; with A,scin next 11 sts; invisible join. [36] - Rnd 28: with A, ch 1,
scin next 13 sts; with B,sc2tog,scin next 9 sts, 2scin next st; with A,scin next 11 sts; invisible join. [36] - Rnd 29: with A, ch 1,
scin next 13 sts; with B, (sc2tog,scin next st) 4 times; with A,scin next 11 sts; invisible join. [32]
Cut B. Work the rest of the piece with A only.
- Rnd 30: ch 1, working in back loops only, (
scin next 2 sts,sc2tog) around; invisible join. [24] - Rnd 31: ch 1, (
scin next st,sc2tog) around; invisible join. [16]
Finish stuffing the piece. Stuff the base firmly so the puffin stands.
- Rnd 32: ch 1,
sc2togaround; invisible join. [8]
Fasten off, leaving a long yarn tail. Thread the tail through the tops of the stitches of the last round, pull it to close the opening and knot it securely.
Wings (make 2)
With A (black), ch 19.
- Row 1:
scin 2nd ch from hook and in next 13 ch, (sc,hdc) in next ch, (dc,tr) in next ch, ch 1, (tr,dc) in next ch, (hdc,sc) in next ch. [22 sts and 1 ch-1 space]
Fasten off, leaving a long tail for sewing. The taller stitches at the end make the pointed, triangular wing tip.
Tail
With A (black), make a magic ring.
- Rnd 1: 8
scin ring; invisible join. [8] - Rnd 2: ch 1, (
scin next 2 sts, 2scin each of next 2 sts) twice; invisible join. [12] - Rnd 3: ch 1,
scin first 3 sts, 2scin each of next 2 sts,scin next 4 sts, 2scin each of next 2 sts,scin last st; invisible join. [16] - Rnd 4: ch 1,
scin first 4 sts, 2scin each of next 2 sts,scin next 6 sts, 2scin each of next 2 sts,scin last 2 sts; invisible join. [20] - Rnd 5: ch 1,
scin first 5 sts, 2scin each of next 2 sts,scin next 8 sts, 2scin each of next 2 sts,scin last 3 sts; invisible join. [24]
Fasten off, leaving a long tail for sewing. Stuff the tail.
Feet (make 2)
With D (yellow-orange), make a magic ring.
- Rnd 1: 6
scin ring; invisible join. [6] - Rnd 2: ch 1,
scin each st around; invisible join. [6] - Rnd 3: ch 1, (
scin next 2 sts, 2scin next st) twice; invisible join. [8] - Rnd 4: ch 1, (
scin next 3 sts, 2scin next st) twice; invisible join. [10] - Rnd 5: ch 1, (
scin next 4 sts, 2scin next st) twice; invisible join. [12] - Rnd 6: ch 1, (
scin next st, 2scin next st) around; invisible join. [18]
Do not stuff the foot.
- Row 7: flatten the last round and crochet through both layers, (
hdcin next 2 sts,sl stin next st) 3 times. [9]
Fasten off, leaving a long tail. The hdc and slip stitch row makes the three webbed toes.
Beak
With C (red), make a magic ring.
- Rnd 1: 6
scin ring; invisible join. [6] - Rnd 2: with C, ch 1, (with C, 3
scin next st; with D,scin next 2 sts) twice; invisible join. [10] - Rnd 3: with D, ch 1, 2
scin first st; with C, 2scin next st; with D, 2scin next st,scin next 2 sts, 2scin next st; with C, 2scin next st; with D, 2scin next st,scin last 2 sts; invisible join. [16]
Cut C.
- Rnd 4: with D, ch 1,
scin each st around; invisible join. [16] - Rnd 5: with E, ch 1,
scin next 2 sts; with D, 2scin each of next 2 sts; with E,scin next 6 sts; with D, 2scin each of next 2 sts; with E,scin last 4 sts; invisible join. [20]
Cut D.
- Rnd 6: with E, ch 1, (
scin next 3 sts,sc2tog) 4 times; invisible join. [16]
Fasten off, leaving a long tail. Stuff the beak.
Finishing
Use the photos as a guide. Where you can, sew with the yarn tails still attached to each piece.
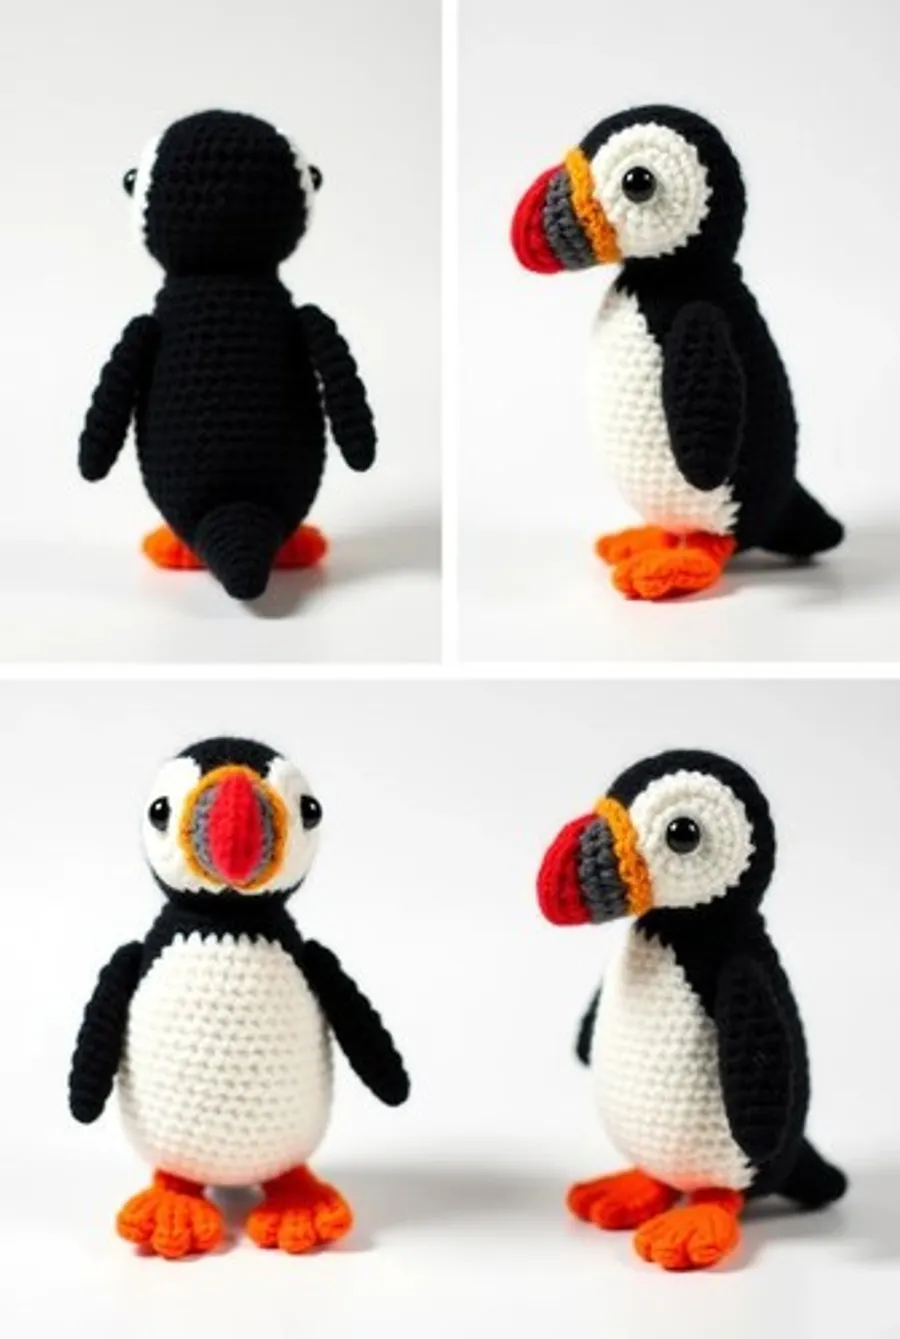
- With black embroidery floss, embroider straight lines around the eyes.
- With A, sew the wings vertically onto the sides of the body, between the black and white sections, with the triangular tips at the lower end. Sew the straight edge of each triangular tip horizontally onto the black section.
- With A, sew the tail to the back of the body.
- With D, sew the feet to the bottom of the body.
- With E, sew the beak to the head, centered between the eyes on the white face.
- Weave in all ends.
Tip: Pin every piece in place first and check the puffin from the front, the side and the back before you sew. The wings and feet change how it stands.
Your baby puffin is ready to stand on a shelf or join a seabird collection.
Optional & Creative Ideas
- Make a smaller puffin: Use worsted weight yarn and a 3.5–4 mm hook for a shelf-sized bird about half as tall.
- Change the eye marking: Stitch a small triangle of gray or black floss above and behind each eye for the classic puffin look.
- Child-friendly version: Embroider the eyes with black yarn instead of using safety eyes.
- Make a colony: Work a few puffins at different sizes for a seabird display or a nautical nursery.
Final Thoughts
This puffin grows fast in super bulky yarn, and the white face and belly are built into the rounds, so most of the work is careful counting. Take your time with the color sections and you will have a big, cheerful seabird in an afternoon or two.
Patterns and instructions on OpenCrochet are for personal use. Please do not redistribute copies of this content; share the page link instead.


