

Floppy Eared Bunny Plush Crochet Pattern with Striped Ears
Crochet a soft lilac bunny plush, 16 in standing, with striped floppy ears, big eyes and a blue belly patch. Bernat Baby Blanket yarn, 4.5 mm hook.
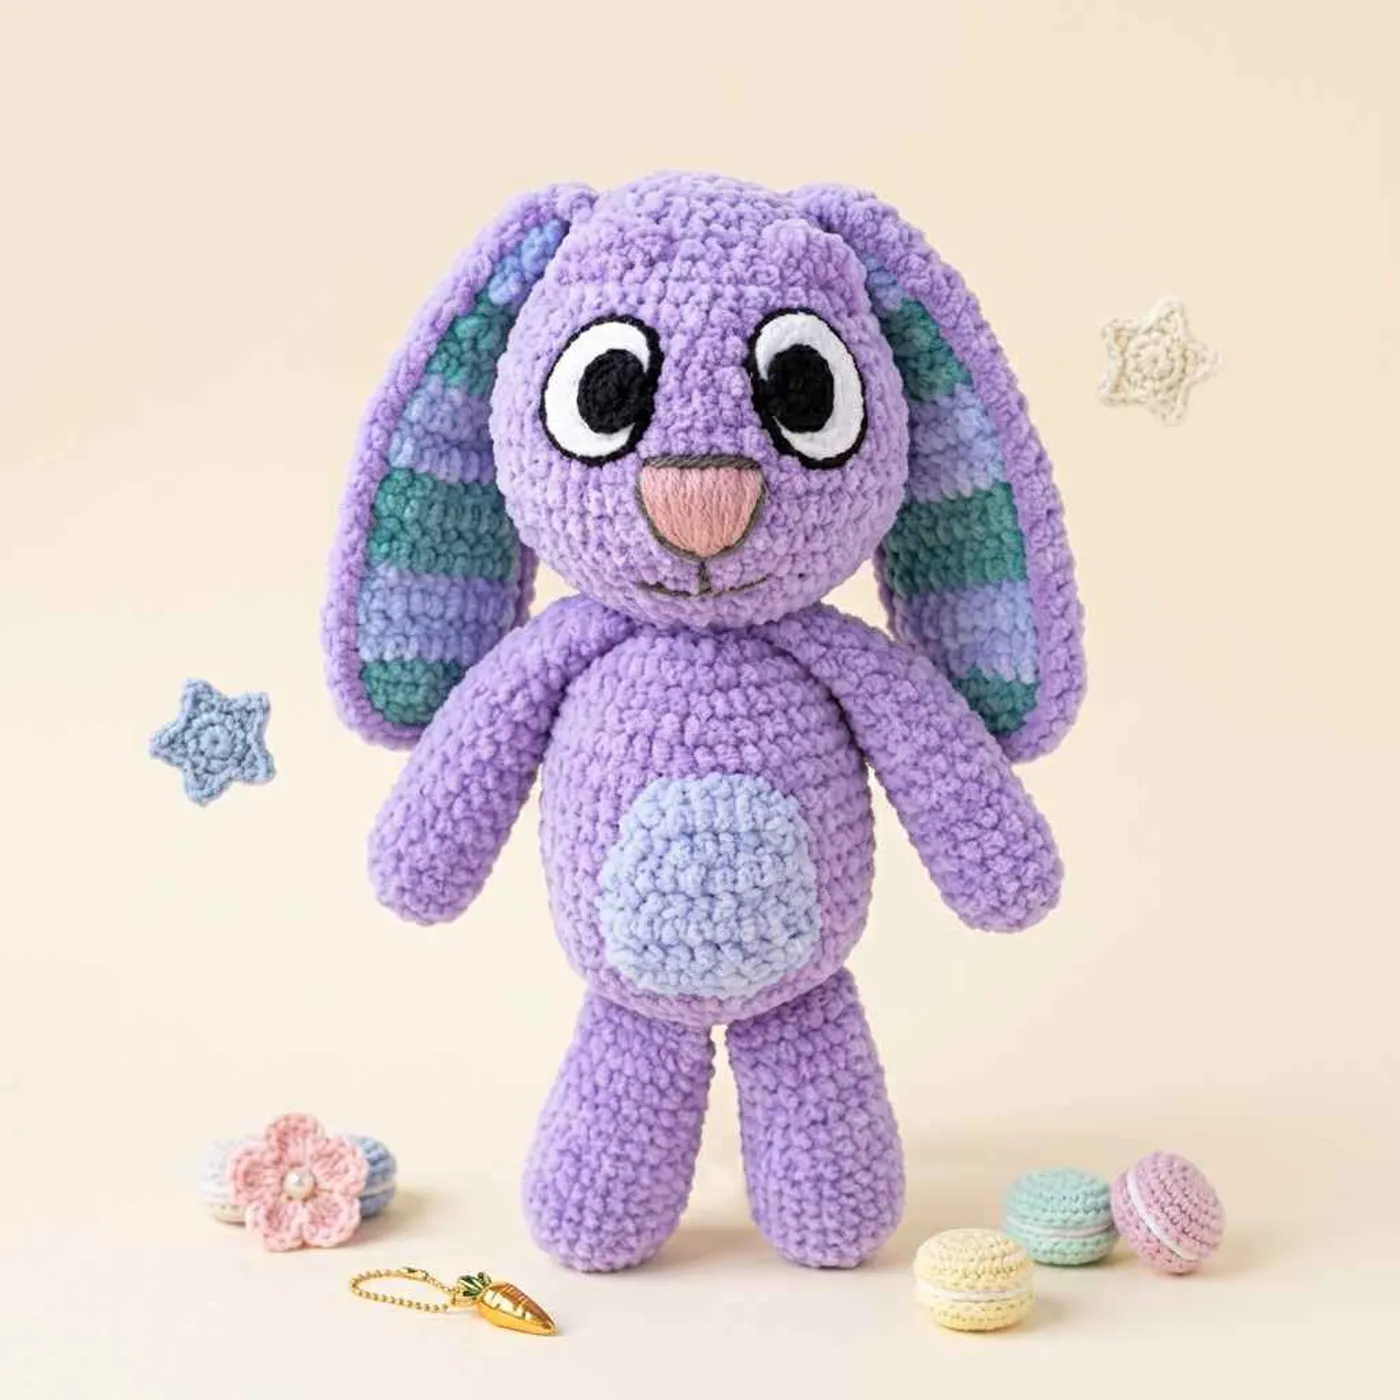
About this floppy eared bunny plush
This is a large, soft bunny plush in lilac, with long floppy ears that are striped blue and green on the inside, a light blue belly patch, long arms and legs, and big expressive eyes. It is made with Bernat Baby Blanket yarn, so it has a plush, cuddly feel.
The finished bunny is 11 in (about 28 cm) tall when sitting and 16 in (about 41 cm) when standing. That makes it a real plush toy rather than a small amigurumi.
The body and head are worked in one piece, with a narrow neck between them. The arms, legs and ears are made separately and sewn on. The arms and legs are stuffed only at the bottom, so the tops can be folded flat and sewn to the body.
The face does not use safety eyes. The eyes are small crocheted ovals with a black outline, and the pupils are sewn on top, so you can angle them to give the bunny its curious look.
The ears are double-layered: a plain lilac outer ear and a striped inner ear, joined with a round of single crochet. The stripes show when the ears flop forward.
You use two hooks: 4.5 mm for the plush and 2.5 mm for the eyes.
Finished size
The finished plush is 11 in (about 28 cm) sitting and 16 in (about 41 cm) standing, using the yarn and hooks listed in the materials.
The designer notes that a different yarn or color may change the finished size and the look. If you substitute, check your fabric and measure the body before you sew the pieces together.
Yarn substitution
The pattern uses Bernat Baby Blanket yarn: about 240 yards in Baby Lilac, about 25 yards in Baby Blue and about 18 yards in Misty Jungle Green. The eyes, nose and mouth use small amounts of worsted weight cotton.
You can use other brands or colors. Choose a soft yarn that gives a dense fabric with a 4.5 mm hook, so the stuffing does not show.
Keep the contrast between the lilac body, the blue belly patch and the striped inner ears. For the eyes, use a cotton yarn with a clear black and white contrast.
Common mistakes
- Over-stuffing the tops of the limbs. Stuff the arms and legs firmly at the bottom, lighter towards the top, and leave the last third of the arm and the last quarter of the leg unstuffed, so you can fold them flat.
- Losing the stripes on the inner ears. Change color exactly where the pattern says. The stripes alternate between green and blue.
- Placing the eyes straight. Angle the eyes inwards towards the top, with 3 stitches between them at the top and 6 stitches at the bottom.
- Forgetting to stuff the body before the neck. Add stuffing to the body at round 20, and to the head at round 40.
- Counting errors in soft yarn. The stitches are harder to see in a plush yarn. Use a stitch marker and check the total at the end of each round.
FAQ
Does the bunny have safety eyes?
No. The eyes are crocheted pieces, with a black outline and a separate pupil, which you sew onto the face. That makes the finished plush free of hard parts.
How are the arms and legs joined to the body?
The last round of each limb is folded in half and worked across, so the top is closed flat. Sew the arms on either side of the neck at row 21, and the legs underneath the body, just over halfway and slightly towards the front.
How do the ears work?
Each ear has an outer piece in lilac and an inner piece in stripes. Place the inner piece on top of the outer one and crochet around the edge. Then sew the ears to the head at row 39, angled inwards towards the back.
Where does the belly patch go?
Sew the blue belly patch to the center of the body, between rows 6 and 15.
Can I change the colors?
Yes. The designer says the yarn and colors can be substituted at your discretion, though this may change the size and appearance.
Pattern
Arms (make 2)
Use the 4.5 mm hook and lilac yarn. Work in rounds.
- R1:
8 scin mr (8) - R2:
8 inc(16) - R3-12:
16 sc(16). Add stuffing to the arm. - R13:
(2 sc, dec) x 4(12) - R14-17:
12 sc(12) - R18: fold in half and
6 scacross to join the top together (6)
Stuff the arms heavily at the bottom, becoming lighter, with no stuffing at all in the last third of the arm. Fasten off and leave a long end for sewing.
Legs (make 2)
Use the 4.5 mm hook and lilac yarn.
- R1:
8 scin mr (8) - R2:
8 inc(16) - R3:
(sc, inc) x 8(24) - R4-9:
24 sc(24). Add stuffing to the leg. - R10:
(4 sc, dec) x 4(20) - R11-12:
20 sc(20) - R13:
(3 sc, dec) x 4(16) - R14-15:
16 sc(16) - R16:
(6 sc, dec) x 2(14) - R17: fold in half and
7 scacross to join the top together (7)
Stuff the legs heavily at the bottom, becoming lighter, with no stuffing at all in the last quarter of the leg. Fasten off and leave a long end for sewing.
Belly patch
Use the 4.5 mm hook and blue yarn. Ch 1 and turn between rows. The first ch does not count as a stitch.
Work in rows. Ch 8 and start in the 2nd chain from the hook.
- R1:
inc, 5 sc, inc(9) - R2-5:
9 sc(9) - R6:
dec, 5 sc, dec(7) - R7:
dec, 3 sc, dec(5)
Fasten off and leave a long end for sewing.
Eyes (make 2)
Use the 2.5 mm hook and white cotton yarn. Work in rounds. Ch 5 and start in the 2nd chain from the hook.
- R1:
3 sc, sc3inc, then work on the underside of the chain:2 sc, inc, sl st into the 1st stitch - R2:
(2 sc, 3 inc) x 2(16) - R3:
(2 sc, (sc, inc) x 3) x 2(22) - R4:
(2 sc, (2 sc, inc) x 3) x 2(28). Sl st into the next stitch and fasten off. - R5: in black cotton yarn, sl st evenly around the edge of the eye.
Fasten off and leave a long end for sewing.
Pupils (make 2)
Use the 2.5 mm hook and black cotton yarn. Work in rounds. Ch 4 and start in the 2nd chain from the hook.
- R1:
2 sc, sc3inc, then work on the underside of the chain:2 sc, inc, sl st into the 1st stitch - R2:
(sc, 3 inc) x 2(14)
Fasten off and leave a long end for sewing.
Inner ears (make 2)
Use the 4.5 mm hook and green yarn. Ch 1 and turn between rows. The first ch does not count as a stitch.
Work in rows. Ch 4 and start in the 2nd chain from the hook.
- R1:
inc, sc, inc(5) - R2:
inc, 3 sc, inc(7) - R3:
inc, 5 sc, inc(9) - R4:
9 sc(9). Switch to blue. - R5-8:
9 sc(9). Switch to green. - R9-12:
9 sc(9). Switch to blue. - R13:
9 sc(9) - R14:
3 sc, dec, 4 sc(8) - R15-16:
8 sc(8). Switch to green. - R17:
3 sc, dec, 3 sc(7) - R18-19:
7 sc(7) - R20:
3 sc, dec, 2 sc(6). Switch to blue. - R21-22:
6 sc(6) - R23:
2 sc, dec, 2 sc(5) - R24:
5 sc(5)
Fasten off.
Eyebrows (make 2)
Use the 4.5 mm hook and lilac yarn. Work in rows. Ch 5 and start in the 2nd chain from the hook.
- R1:
4 sc, sl st into the bottom of the first chain.
Fasten off and leave a long end for sewing.
Outer ears (make 2)
Use the 4.5 mm hook and lilac yarn. Ch 1 and turn between rows. The first ch does not count as a stitch.
Work in rows. Ch 4 and start in the 2nd chain from the hook.
- R1:
inc, sc, inc(5) - R2:
inc, 3 sc, inc(7) - R3:
inc, 5 sc, inc(9) - R4-13:
9 sc(9) - R14:
3 sc, dec, 4 sc(8) - R15-16:
8 sc(8) - R17:
3 sc, dec, 3 sc(7) - R18-19:
7 sc(7) - R20:
3 sc, dec, 2 sc(6) - R21-22:
6 sc(6) - R23:
2 sc, dec, 2 sc(5) - R24:
5 sc(5)
Ch 1. Place the inner and outer ear together, with the inner ear piece on top, and crochet evenly around: 24 sc along one edge, 3 sc across the bottom and 24 sc back up the other edge. Then inc, 3 sc, inc at the top of the ear and join with a sl st.
Fasten off and leave a long end for sewing.
Body and head
Use the 4.5 mm hook and lilac yarn. Work in rounds.
- R1:
8 scin mr (8) - R2:
8 inc(16) - R3:
(sc, inc) x 8(24) - R4:
(2 sc, inc) x 8(32) - R5:
(3 sc, inc) x 8(40) - R6:
(4 sc, inc) x 8(48) - R7-14:
48 sc(48) - R15:
(10 sc, dec) x 4(44) - R16:
44 sc(44) - R17:
(9 sc, dec) x 4(40) - R18:
40 sc(40) - R19:
(8 sc, dec) x 4(36) - R20:
(sc, dec) x 12(24). Add stuffing to the body. - R21:
12 dec(12) - R22:
12 inc(24) - R23:
(sc, inc) x 12(36) - R24:
(5 sc, inc) x 6(42) - R25:
(6 sc, inc) x 6(48) - R26:
(7 sc, inc) x 6(54) - R27:
(8 sc, inc) x 6(60) - R28-32:
60 sc(60) - R33:
(8 sc, dec) x 6(54) - R34:
(7 sc, dec) x 6(48) - R35:
(6 sc, dec) x 6(42) - R36:
42 sc(42) - R37:
(5 sc, dec) x 6(36) - R38:
(4 sc, dec) x 6(30) - R39:
(3 sc, dec) x 6(24) - R40:
24 sc(24). Add stuffing to the head. - R41:
(sc, dec) x 8(16) - R42:
8 dec(8)
Fasten off and sew the small hole together at the top of the head.
Assembly
- Sew the arms to the top of the body, on either side of the neck, at row 21.
- Sew the legs underneath the body, just over halfway, slightly towards the front of the plush.
- Sew the belly patch to the center of the body, between rows 6 and 15.
- Sew the ears at row 39, angled inwards towards the back.
- Sew each pupil to the white of the eye, so that it meets the black outline.
- Sew the eyes to the face between rows 30 and 35. Angle them inwards towards the top, so that there are 3 stitches between the eyes at the top and 6 stitches at the bottom.
- Embroider a nose with pink cotton yarn between rows 26 and 30. Outline it with dark grey cotton yarn and embroider a smile underneath.
- Sew the eyebrows at rows 37 to 39, angled upwards in the middle.
Optional & Creative Ideas
- Customize colors: Make the bunny in other soft colors, and use a contrasting pair of colors for the stripes inside the ears.
- Change the size: A thinner yarn with a smaller hook makes a smaller bunny, and a thicker yarn makes a bigger one.
- Add an accessory: Crochet a small bow or a scarf in the same blue as the belly patch.
- Gift idea: Make the plush in the colors of a nursery for a baby shower gift.
Final Thoughts
This bunny takes time because of its size and its many small pieces, but the soft yarn and the big eyes make it worth it. Take your time with the face, because the angle of the eyes and eyebrows gives the bunny its charm.
Patterns and instructions on OpenCrochet are for personal use. Please do not redistribute copies of this content; share the page link instead.


