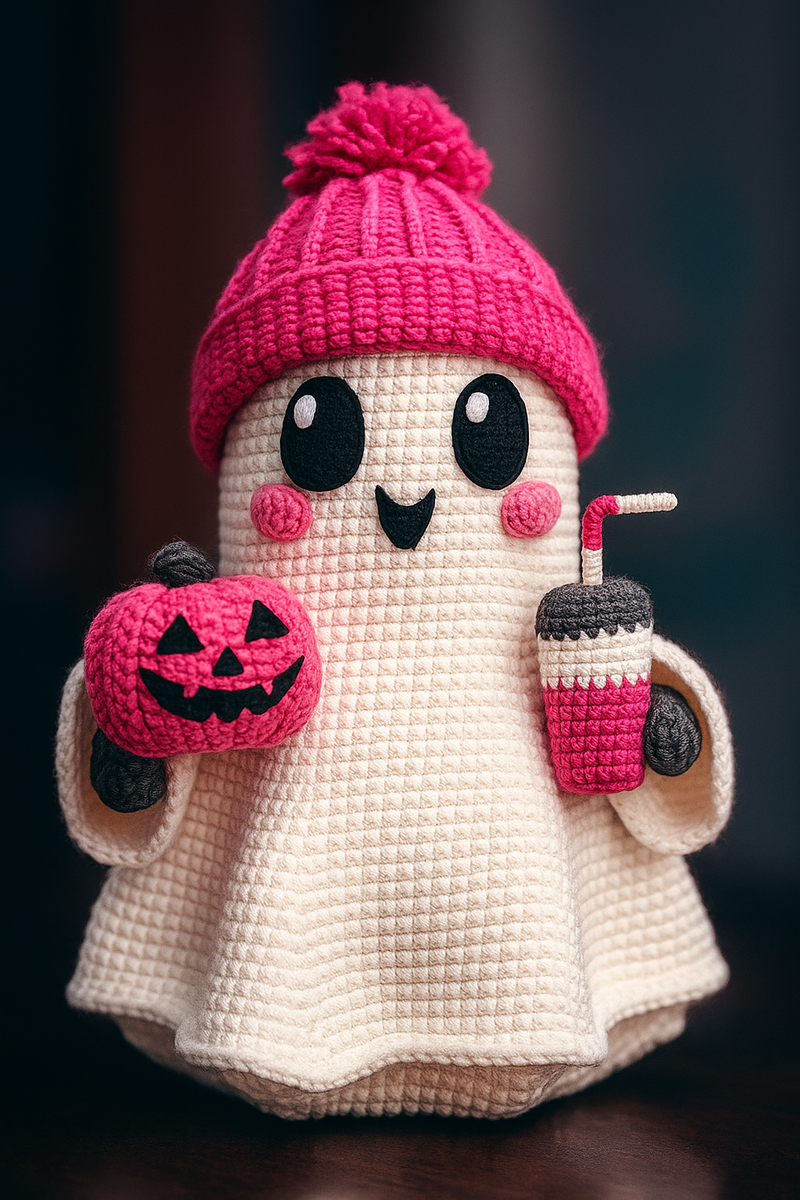
Cute Ghost Plush Doll Crochet Pattern with Accessories
Adorable ghost plush crochet pattern with detailed instructions and chart. Includes sleeves, hat, pumpkin, bat wings, and milk tea cup!
A step-by-step guide to making your own adorable crochet 💖
🧸 Part 1: Head and Body of the Doll
Start by forming a magic ring and working in continuous rounds. You’ll begin small and increase the number of stitches in each round to build a rounded shape for the head and body.
Continue increasing and working in single crochet until your plush reaches a rounded, stuffed body shape. After several rounds of straight stitches (no increases), you’ll stuff it with filling before attaching the base.
🦶 Part 2: Making the Base
The base is created separately and attached to the bottom of the doll’s body. It starts with a magic ring and uses double crochet stitches, gradually increasing the stitch count each round to create a flat circle.
Once finished, stuff the doll firmly and sew the base onto the body, one round inward from the edge to ensure stability.
🧤 Part 3: Making the Sleeves
Dark Grey Inner Sleeve:
Start with a magic ring and use single crochet to build a small cylindrical shape. You'll slightly decrease and increase in the middle rounds to give the sleeve a natural taper.
White Outer Sleeve:
Begin with a chain of 12 and join it into a circle. You’ll then work upward with rounds of single crochet and gradual increases to create a bell-shaped outer sleeve. This part adds a layered, puffy look to the arms.
After finishing both pieces, insert the grey sleeve inside the white one, align the bottoms, and sew them together. Attach the completed sleeves to the sides of the body between rounds 21 and 26.
🎀 Part 4: Crocheting the Hat
Using pink yarn, crochet a rectangle by chaining 25 stitches. Work back and forth in rows of half double crochet until the piece measures 28 rows long.
Fold the rectangle in half (lengthwise), stitch the short sides together to form a tube, and then gather the top edge tightly to close it.
To Make the Pompom:
Wrap yarn around two fingers about 20 times. Slide the looped yarn off and tie a strand tightly in the center. Cut the loops on both ends, fluff with a fork or comb, and trim it into a round shape. Sew the pompom to the top of the hat.
🎃 Part 5: Making the Pumpkin Accessory
Pumpkin Body:
Create a rectangle by chaining 15 and crocheting single crochet rows back and forth. About halfway through, switch to half double crochet for a few rows to give the pumpkin a soft middle bulge, then switch back to single crochet.
Fold the piece in half lengthwise, stitch the sides, and gather one end tightly. Fill with stuffing and then gather the other end. This will give you a rounded pumpkin shape.
Pumpkin Stem:
With dark grey yarn, make a small piece by chaining 12 and working some slip stitches, single crochets, and half double crochets. This piece is then sewn to the top of the pumpkin.
You can cut out felt pieces to create a face for the pumpkin (eyes, nose, mouth), and either glue or sew them on.
🥤 Part 6: Crocheting the Milk Tea Cup
Cup Body:
Start with a magic ring and work in single crochet to make the base of the cup. Use the “back loop only” technique in round three to give it a clean edge.
You’ll then add subtle increases to shape the cup. Switch yarn colors to add a white “foam” layer and then grey for the cup’s outer color. When you're near the top, leave a small hole to insert a straw.
Straw:
Cut a 7cm piece of steel wire. Wrap it tightly with pink or white yarn to mimic a straw. Insert it into the top of the cup.
🦇 Part 7: Bat Wings (Optional Halloween Look)
Use black yarn and start with a magic ring. Build the wing shapes using a combination of chains, slip stitches, double crochets, and half double crochets.
The wings are shaped by working in different directions, skipping stitches, and folding sections. Stitch the wings to the back of the plush or the arms for a fun bat-like appearance.
👁️ Part 8: Facial Features
Eyes:
- Cut two black ovals from felt (each about 2 × 2.5 cm).
- Cut two smaller white ovals (0.5 × 1 cm) and glue or sew them onto the black pieces to create pupils.
- Attach the eyes to the head around round 15, leaving 4 stitches between them for proper spacing.
Blush Cheeks:
- Crochet a small strip starting with 7 chains.
- In the next row, work one single crochet, two half double crochets, one double crochet, and two more half double crochets.
- Make two identical pieces and sew one just below each eye.
✅ Final Touches
Once all components are completed and attached, make sure everything is sewn securely. Trim excess threads and adjust any loose fibers. You can add extra details like bows, buttons, or embroidery for personality.
Materials
- Yarn (3mm Cotton Preferred): White - Dark pink and light pink - Dark grey and light grey - Black
- 3mm or 3.5mm crochet hook
- Large and small wool needles
- Steel wire (for shaping accessories like the straw)
- Polyester fiberfill for stuffing
- Black and white felt sheets
- Scissors
- Glue (optional for attaching felt)
- Comb or fork (for the pompom)
Abbreviations
Time to Complete
Difficulty Level
beginnerPerfect for those new to crochet


